Step-by-Step Guide: How to Wire a 240V Air Compressor Diagram

Wiring a 240V air compressor can seem like a daunting task, but with the right knowledge and tools, it can be a straightforward process. This step-by-step guide will walk you through the process of wiring a 240V air compressor, ensuring that your compressor operates safely and efficiently.
Before you begin the wiring process, it’s important to gather all the necessary materials and tools. You will need:
– A 240V air compressor
– A circuit breaker with the appropriate amperage rating
– Electrical wire with the correct gauge for the amperage of your compressor
– Wire connectors or terminal blocks
– Electrical tape or heat shrink tubing
– Wire strippers and cutters
– Screwdrivers
Once you have all the materials and tools ready, you can start the wiring process. The first step is to turn off the power to the circuit you’ll be working on. This can usually be done by switching off the circuit breaker in your electrical panel.
Next, you’ll want to identify the hot wires in the circuit breaker panel. These are the wires that carry the electricity to your compressor. They are usually colored black and red.
Now, it’s time to connect the wires to the circuit breaker. Start by removing the cover panel from the electrical panel to access the breaker. Use a screwdriver to unscrew the wire connectors holding the hot wires in place. Carefully disconnect the hot wires from the breaker, taking note of their positions.

With the hot wires disconnected, you can connect them to the new circuit breaker. Insert the black and red wires into the terminals of the circuit breaker and tighten the screws to secure them in place. Make sure the wires are fully inserted and securely fastened.
Section 1: Safety Precautions
Electrical Safety

1. Disconnect power: Before beginning any electrical work, ensure that the power supply to the air compressor is turned off and the circuit breaker is tripped.
2. Use proper tools: Make sure to use insulated tools when working with electrical connections to prevent accidents or electric shocks.
3. Wear protective gear: Always wear safety glasses, gloves, and appropriate clothing to protect yourself from electrical hazards.

General Safety
1. Read the manual: Familiarize yourself with the manufacturer’s instructions and safety guidelines before attempting to wire the air compressor.
2. Work in a well-ventilated area: Ensure that there is enough fresh air circulation in the workspace to prevent the buildup of fumes or gases.
3. Keep the area clean and organized: Remove any clutter or obstacles that may interfere with your work or cause accidents.
4. Check for potential hazards: Look for any exposed wiring, damaged components, or loose connections that may pose a safety risk.
Helpful Tips
- Label all wires and connections for easy identification and troubleshooting.
- Double-check your work before turning on the power to avoid any wiring mistakes.
- If you are unsure about any step or aspect of the wiring process, consult a qualified electrician.
By following these safety precautions, you can ensure a safe and successful wiring process for your 240V air compressor.

Section 2: Gather the Necessary Tools and Materials
1. Tools
Before you start wiring your 240V air compressor, it’s important to gather all the necessary tools to ensure a smooth and efficient installation process. Here are the tools you will need:
- Wire cutters
- Wire strippers
- Needle-nose pliers
- Screwdriver set
- Socket set
- Voltage tester
- Measuring tape
- Marker or pen
- Electrical tape
2. Materials
In addition to the tools, you will also need to gather the necessary materials for wiring your 240V air compressor. Here is a list of the materials you will need:
- 240V air compressor
- Electrical wire (typically 10-gauge for a 240V circuit)
- Circuit breaker (double-pole, 30-amp)
- Wire connectors
- Grounding wire (typically bare copper)
- Electrical junction box
- Conduit or cable clamps
- Mounting hardware (if necessary)
Once you have gathered all the necessary tools and materials, you will be ready to move on to the next step of the wiring process. It is important to have everything prepared and on hand to ensure a safe and effective installation.

Section 3: Shut Off Power and Locate the Proper Circuit
Step 1: Safety First!
Before starting any electrical work, it is crucial to ensure your own safety. Make sure to turn off the power supply at the main breaker box. This will prevent any potential accidents or electrical shocks.
Step 2: Locate the Circuit
Once the power is shut off, you need to locate the circuit that will be used for the 240V air compressor. Check the user manual or the specifications of the air compressor to find out the specific amp rating required.
TIP: If you are unsure which circuit to use or need help, consult a licensed electrician.
Step 3: Identify the Circuit Breaker

After locating the circuit, go to your circuit breaker box and identify the breaker that controls that particular circuit. Usually, circuit breakers are labeled, but if not, you can use a circuit tester to identify the correct one.
TIP: It is recommended to label the breaker for future reference.
Step 4: Turn Off the Circuit Breaker
Once you have identified the correct breaker, turn it off by flipping the switch to the “OFF” position. This will ensure that no power is flowing to the circuit while you are working on it.
Step 5: Verify Power Shutdown
Finally, use a voltage tester to verify that there is no power running through the circuit. This will provide an additional layer of safety and ensure that no live wires are present.

TIP: Do not proceed with any electrical work if the circuit is still energized. Contact a professional if needed.
Section 4: Prepare the Junction Box
1. Gather the necessary tools and materials
Before you begin preparing the junction box, make sure you have all the necessary tools and materials at hand. You will need a screwdriver, wire cutters, wire strippers, electrical tape, wire nuts, and a junction box cover.
2. Turn off the power
Before working with any electrical components, it is important to turn off the power to the circuit. Locate the breaker switch or fuse that controls the circuit for the air compressor and switch it off.
3. Remove the junction box cover
Using a screwdriver, remove the screws that secure the junction box cover. Carefully remove the cover to access the wiring inside.

4. Examine the existing wiring
Once the junction box cover is removed, take a close look at the existing wiring. Check for any signs of damage or wear and ensure that the wires are properly connected.
5. Disconnect the existing wiring
If necessary, disconnect the existing wiring from the terminals or connectors inside the junction box. Use a screwdriver or wire cutters to loosen the screws and remove the wires.
6. Install the new wiring
If you are replacing the existing wiring or adding new wiring, follow the manufacturer’s instructions to install the wires. Strip the ends of the wires to expose the bare copper and connect them to the appropriate terminals or connectors.
7. Secure the wires
Once the wiring is in place, use wire nuts to secure the connections. Twist the wires together and screw the wire nut onto the ends until it is tight and secure. Wrap electrical tape around the base of the wire nut for added protection.
8. Replace the junction box cover
After all the wiring is properly connected and secured, carefully replace the junction box cover. Screw it back into place using the screws that were removed earlier.
Congratulations! You have successfully prepared the junction box for your 240V air compressor. Now you can move on to the next step of the wiring process.
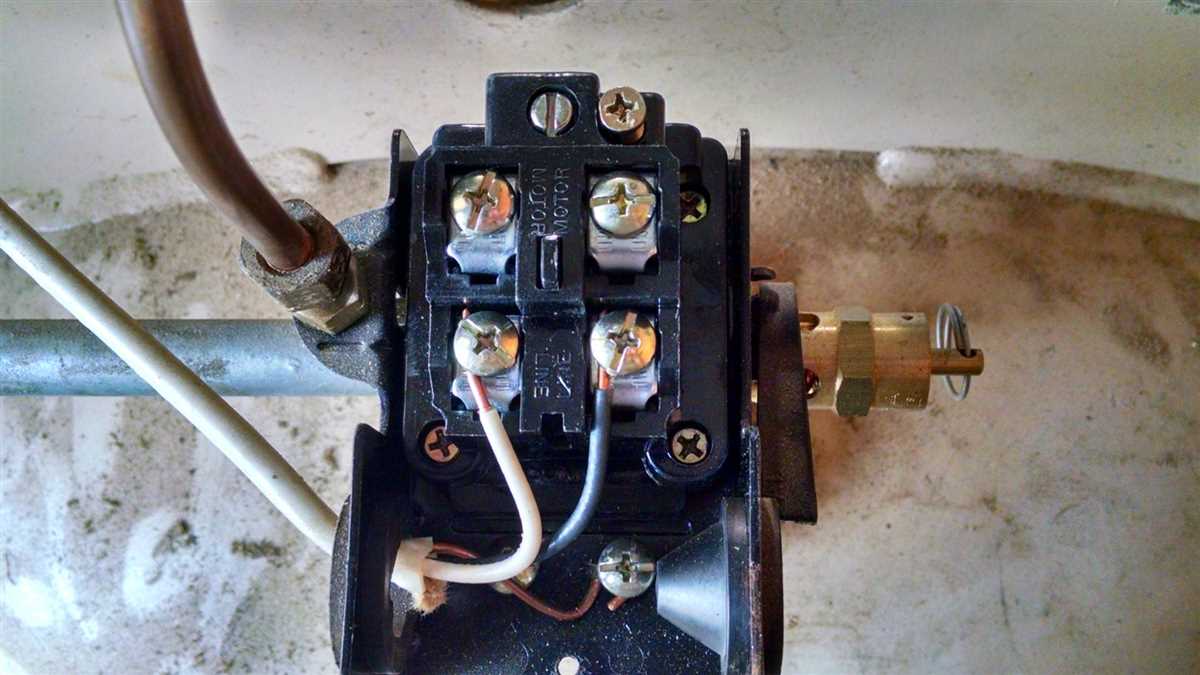
Section 5: Connect the Wires
Step 1: Prepare the wires
Before connecting the wires, make sure the power to the air compressor is turned off. Begin by stripping the ends of the wires to expose the bare copper.
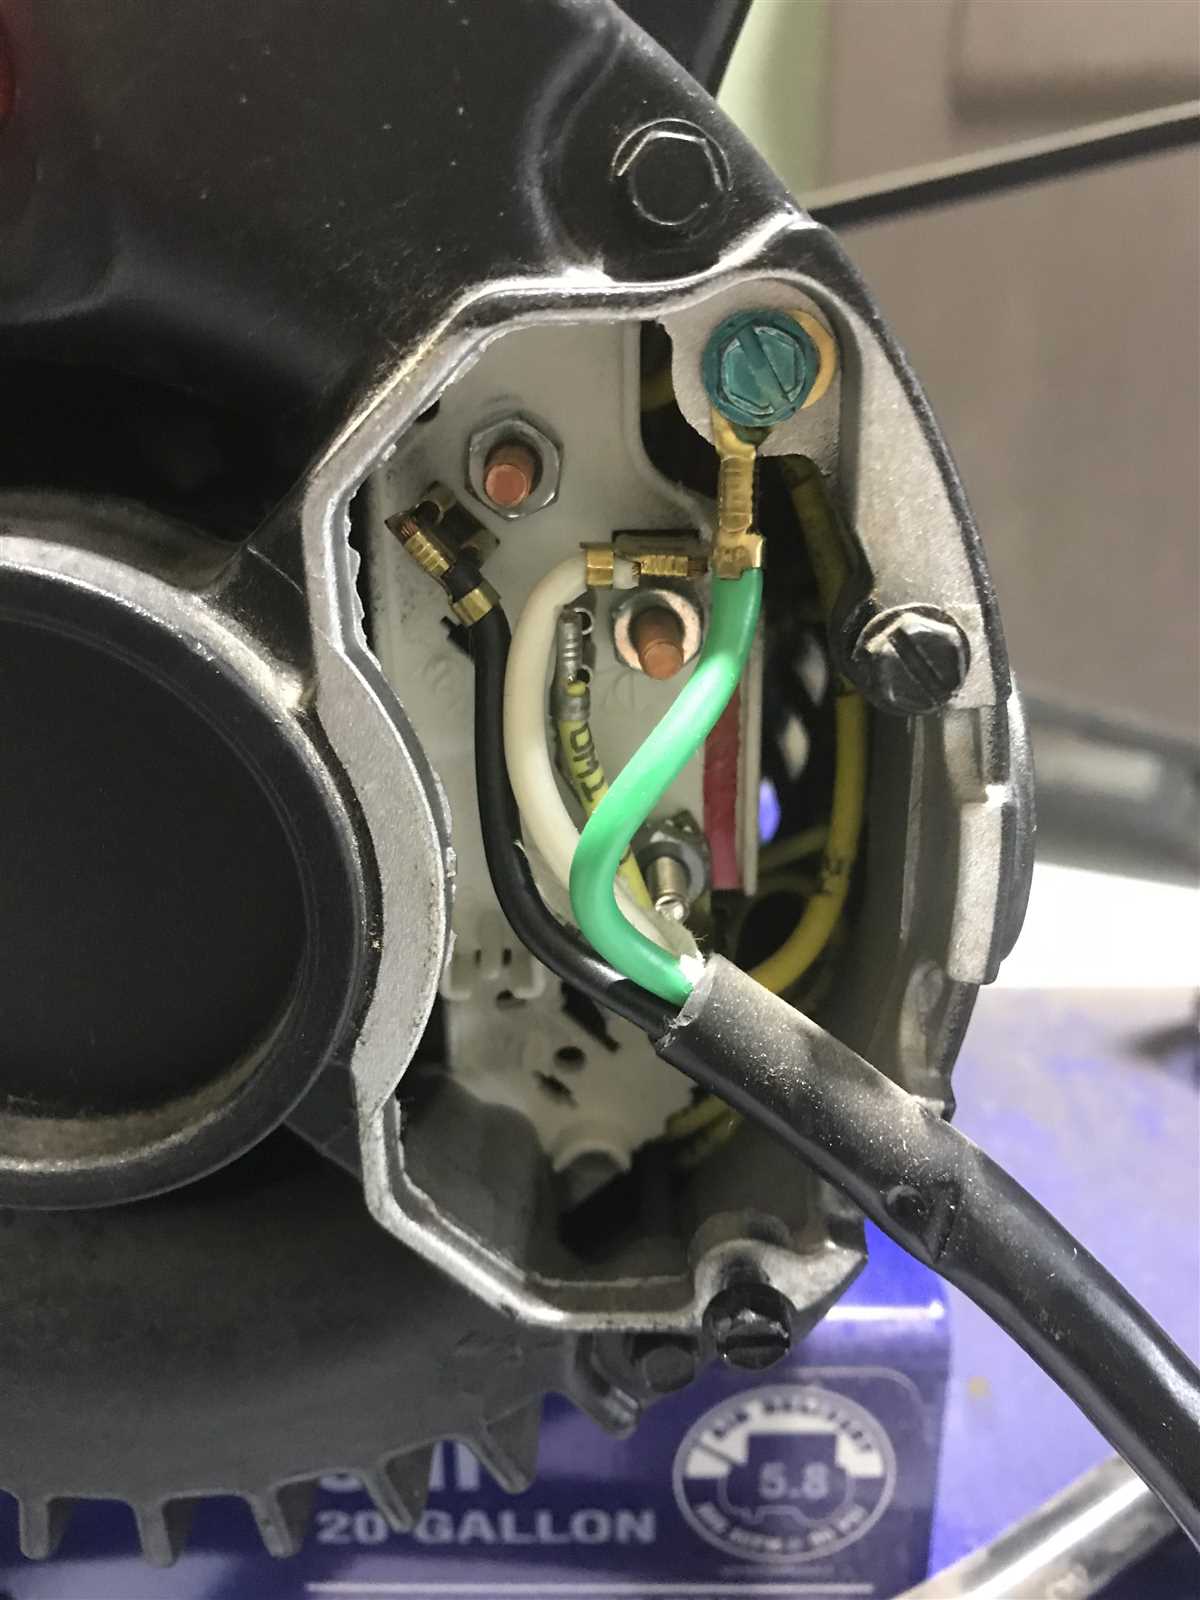
Take the white wire and strip approximately 1/2 inch of insulation from the end. Do the same for the black and green wires.
Note: The white wire is the neutral wire, the black wire is the hot wire, and the green wire is the ground wire.
Step 2: Connect the wires to the motor
Locate the motor terminals on the air compressor. The terminals should be labeled with “L1” and “L2” for the hot wires, and “N” or “Neutral” for the neutral wire.
Connect the stripped end of the white wire to the neutral terminal and tighten the screw to secure it in place. Connect the stripped end of the black wire to one of the hot terminals and tighten the screw. Connect the stripped end of the green wire to the ground terminal and tighten the screw.
Step 3: Secure the wire connections
After connecting the wires, double-check that they are securely fastened to the motor terminals. If necessary, tighten the screws to ensure a tight connection.
Once the connections are secure, use electrical tape or wire nuts to cover the exposed wire ends. This will provide additional protection and help prevent any accidental contact with live wires.
Note: It is important to thoroughly insulate the wire connections to prevent any electrical shocks or hazards.
Step 4: Test the wires
Before turning on the power, perform a final check of the wire connections to ensure they are properly connected and insulated.
Once you are confident that the connections are secure, turn on the power to the air compressor and test the unit to verify that it is functioning correctly.
Note: If you experience any issues or observe any abnormalities, immediately turn off the power and consult a professional electrician.
Section 6: Grounding the Air Compressor
In order to ensure safe operation of your 240V air compressor, it is important to properly ground the equipment. Grounding helps to protect against electrical shocks and reduces the risk of fire or other hazards.
Step 1: Check the Local Electrical Codes
Before attempting to ground your air compressor, it is essential to familiarize yourself with the local electrical codes and regulations in your area. These codes may vary, so it is important to ensure that you are in compliance with the specific requirements for your location.
Step 2: Install a Grounding Rod
The first step in grounding your air compressor is to install a grounding rod. This is typically a copper or galvanized steel rod that is at least 8 feet long and 5/8 inch in diameter. The rod should be driven into the ground near the compressor. This provides a direct path for the electrical current to flow into the earth.
Before installing the grounding rod, make sure to locate the underground utilities and avoid any potential hazards. Once the rod is installed, ensure that it is securely grounded in the earth and free from any obstructions.
Step 3: Connect Grounding Wire
Next, connect a grounding wire from the air compressor to the grounding rod. This wire should be at least 10 AWG (American Wire Gauge) and made of copper or similarly conductive material. The wire should be securely attached to the compressor’s grounding terminal and to the grounding rod.
When connecting the wire, strip the insulation from the ends and use appropriate connectors such as grounding clamps or lugs. Make sure all connections are tight and secure to ensure a reliable ground.
Step 4: Test the Grounding
After the grounding wire is connected, it is important to test the grounding to ensure that it is functioning properly. Use a multimeter or other electrical testing equipment to verify that there is a continuous path to ground and that the resistance is within acceptable limits.
If any issues are detected during the testing process, double-check all connections and verify that the grounding wire is properly connected. It may be necessary to seek the assistance of a qualified electrician if further troubleshooting or repair is needed.
By following these steps to properly ground your 240V air compressor, you can ensure safe operation and minimize the risk of electrical hazards. Always prioritize safety and compliance with local electrical codes when working with electrical equipment.
Section 7: Test and Verify
Once you have completed the wiring process for your 240V air compressor, it is important to test and verify that everything is functioning correctly before fully putting it into operation. This will ensure the safety and efficiency of the equipment.
1. Check for proper connections
Inspect all the connections you have made during the wiring process. Make sure that all wires are securely fastened and that there are no loose or exposed connections. Double-check the wiring diagram to ensure that you have connected the wires correctly.
2. Test power supply
Using a voltmeter, test the power supply to ensure that it is providing the correct voltage. Check the voltage between the hot wires and between the hot wires and the ground, ensuring that it matches the specifications for your air compressor.
3. Test compressor motor
Start by turning on the air compressor and listening for any unusual noises or vibrations. Check that the motor is running smoothly and there are no signs of overheating. Verify that the pressure gauge is functioning properly and that the compressor is building up pressure.
Additionally, check that the motor is drawing the correct current by using a multimeter. Compare the reading to the specifications provided by the manufacturer and ensure that it is within the acceptable range.
4. Verify safety features
Ensure that all safety features, such as pressure relief valves and thermal overload protection, are working correctly. Verify that the pressure relief valve releases pressure when the set limit is reached and that the thermal overload protection shuts off the motor if it becomes too hot.
5. Final checks
Before fully putting the air compressor into operation, perform a final check of the entire system. Look for any signs of leaks or loose fittings. Verify that all controls and switches are functioning properly. Ensure that the pressure switch is set to the desired pressure range.
By testing and verifying the wiring and functionality of your 240V air compressor, you can ensure that it operates safely and reliably, providing you with the necessary compressed air for your applications.
FAQ:
Can I wire a 240V air compressor diagram using regular electrical wire?
No, you cannot wire a 240V air compressor diagram using regular electrical wire. A 240V air compressor requires a specialized wire that can handle the higher voltage and current. It is recommended to use a dedicated circuit with the appropriate wire size and breaker for your specific air compressor.
What size wire do I need for a 240V air compressor?
The size of the wire you need for a 240V air compressor depends on the ampacity rating of your air compressor and the distance from the electrical panel. Generally, a 10-gauge wire is suitable for most 240V air compressors, but it is always recommended to consult the manufacturer’s instructions or consult with a licensed electrician for the specific wire size requirements.
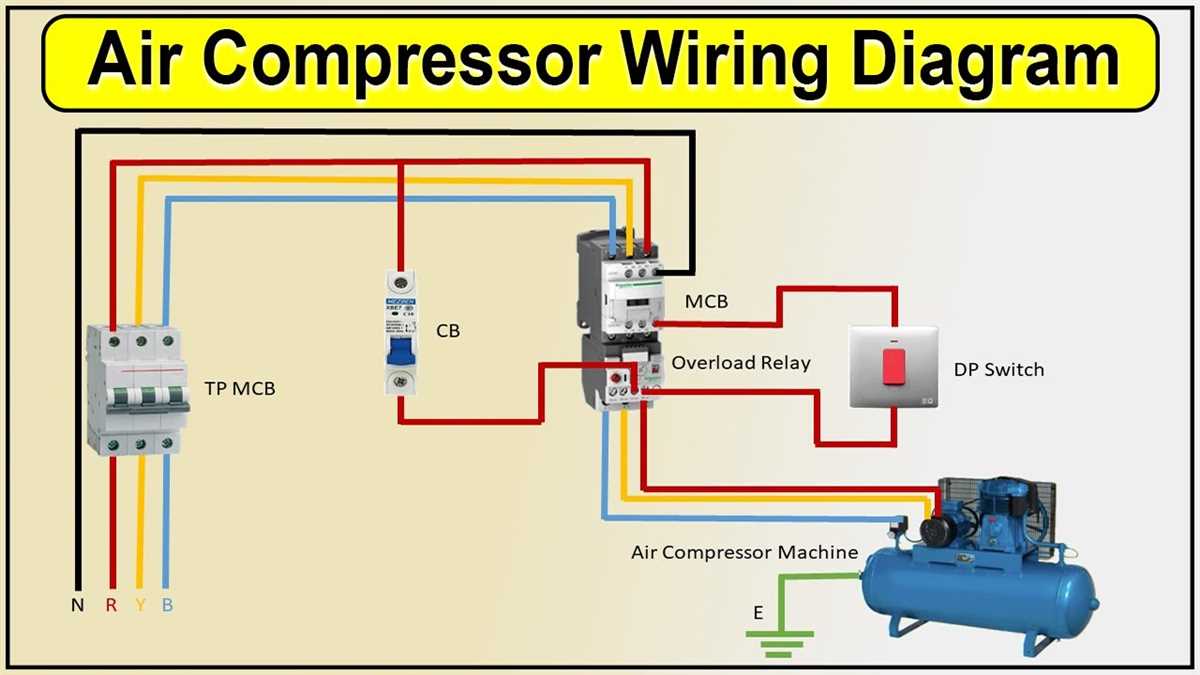
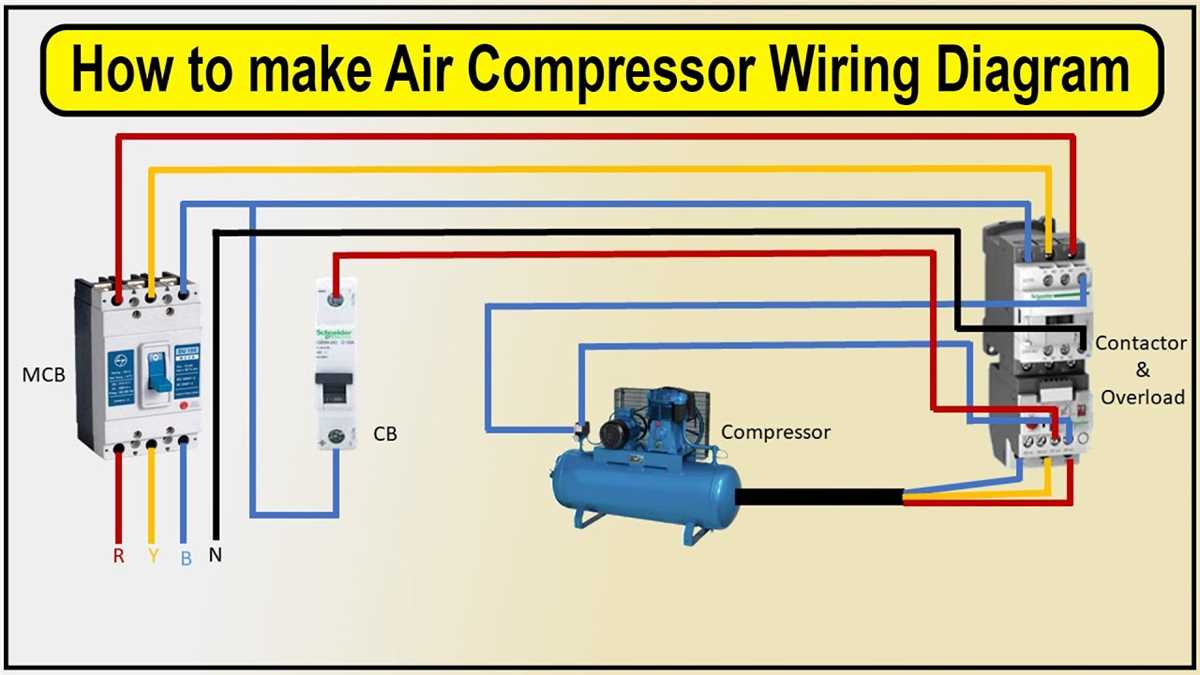
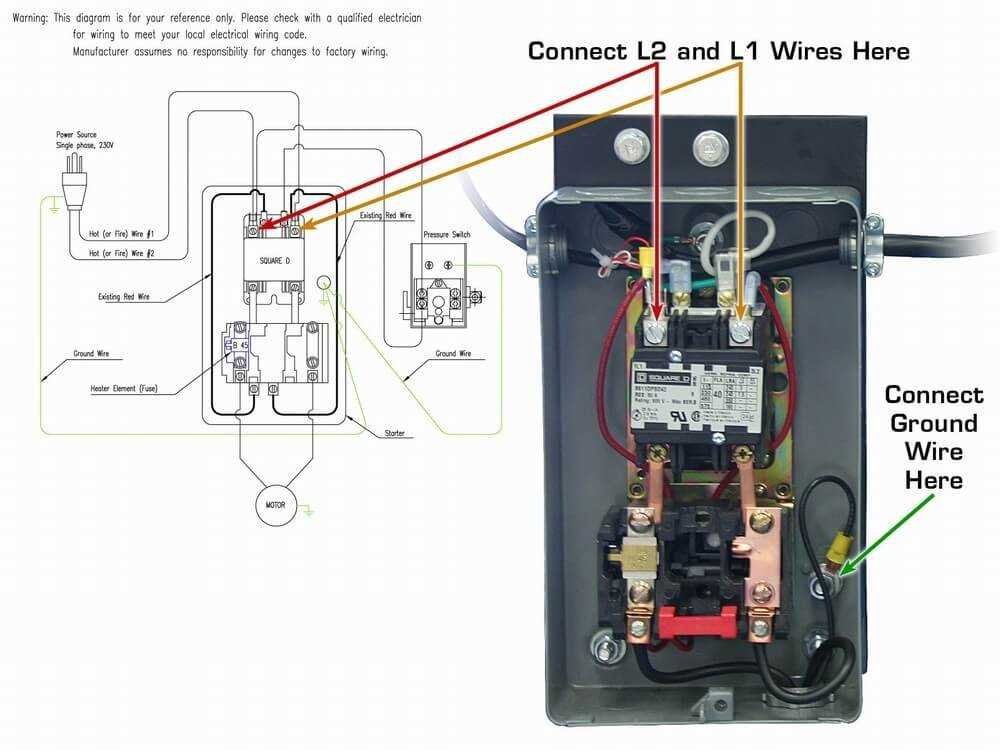
How do I wire a 240V air compressor diagram?
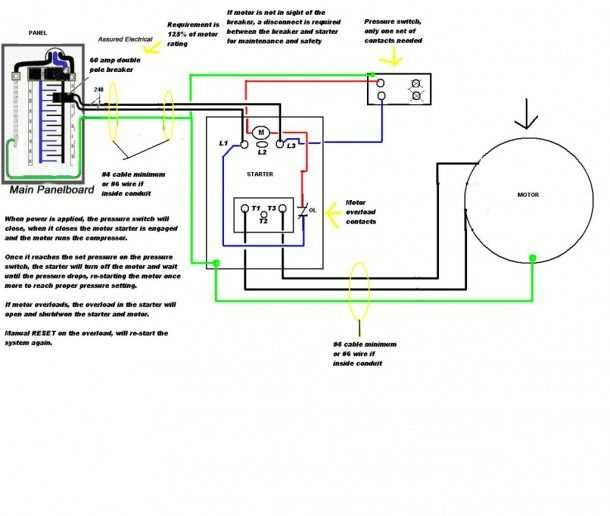
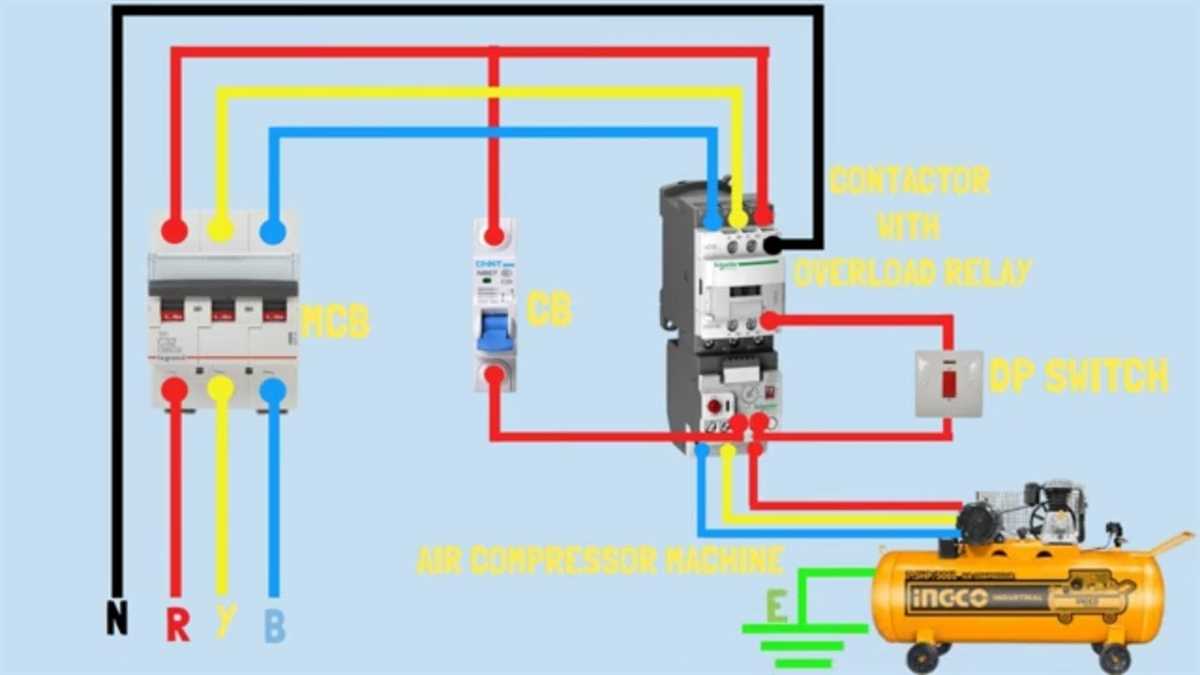
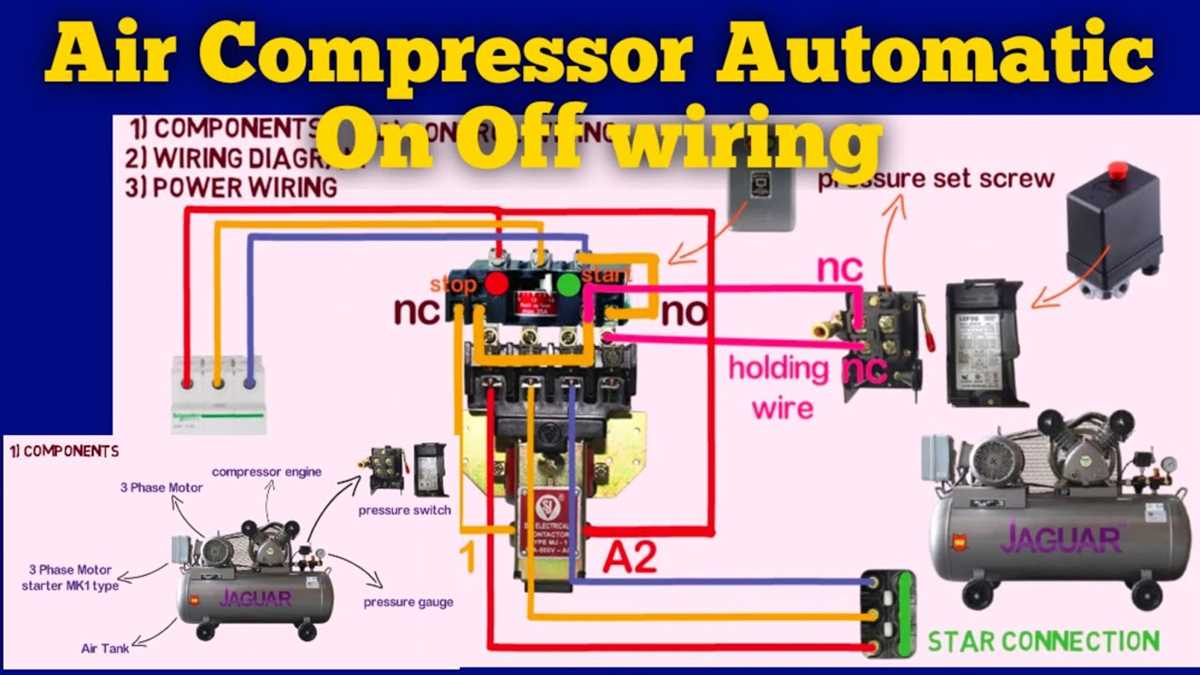
Wiring a 240V air compressor diagram requires connecting the incoming power supply to the air compressor’s motor starter. The motor starter typically consists of a contactor, overload relay, and start/stop buttons. The power supply is connected to the contactor, and the motor’s wires are connected to the overload relay. The start/stop buttons are then used to control the motor’s operation. It is important to follow the wiring diagram provided by the manufacturer or consult with a licensed electrician for the proper wiring procedures.
Can I use a lower voltage for my air compressor?
No, you cannot use a lower voltage for your air compressor if it requires a 240V power supply. Using a lower voltage can result in the motor not running at its intended speed or not running at all. It can also cause damage to the motor and other electrical components. It is important to provide the correct voltage as specified by the manufacturer to ensure the proper and safe operation of your air compressor.
Video:


Meet Harrison Clayton, a distinguished author and home remodeling enthusiast whose expertise in the realm of renovation is second to none. With a passion for transforming houses into inviting homes, Harrison's writing at https://thehuts-eastbourne.co.uk/ brings a breath of fresh inspiration to the world of home improvement. Whether you're looking to revamp a small corner of your abode or embark on a complete home transformation, Harrison's articles provide the essential expertise and creative flair to turn your visions into reality. So, dive into the captivating world of home remodeling with Harrison Clayton and unlock the full potential of your living space with every word he writes.


