Step-by-Step Guide: How to Plumb an Air Compressor

When it comes to using an air compressor, proper plumbing is essential. Without the necessary plumbing, the compressor may not operate efficiently, resulting in lower performance and potential damage to the equipment. In this step-by-step guide, we will walk you through the process of plumbing an air compressor to ensure optimal functionality and longevity.
Before starting the plumbing process, it is crucial to gather all the necessary tools and materials. This may include pipe cutters, tubing, connectors, fittings, and Teflon tape. Additionally, it is important to have a clear understanding of the layout of your workspace and the requirements of your air compressor system.
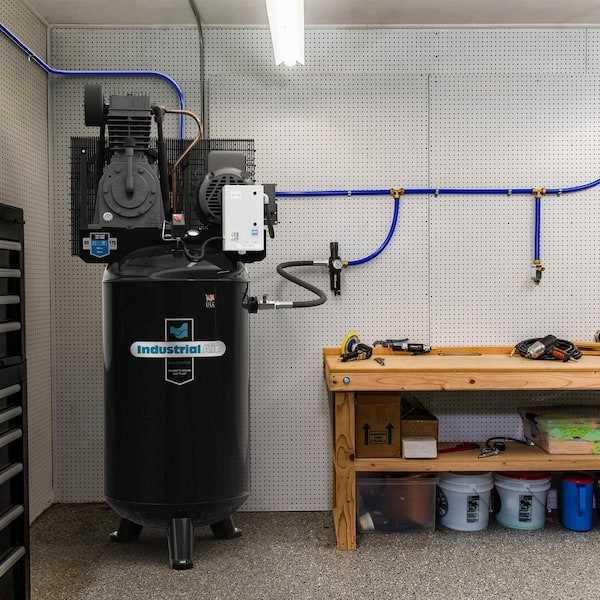
The first step in plumbing an air compressor is to determine the optimal location for the compressor itself. It should be placed in an area with good ventilation and adequate space for maintenance and repair. Once the location is determined, secure the compressor in place to prevent any movement during operation.
Next, begin the actual plumbing process by connecting the air intake filter to the compressor. This will help to ensure that the air being drawn in is clean and free of contaminants. Use a connector and Teflon tape to secure the filter in place and prevent any air leaks.
After connecting the intake filter, it is time to install the pressure regulator and pressure gauge. These components are critical for controlling the air pressure and monitoring the system’s performance. Follow the manufacturer’s instructions to properly install and calibrate these devices.

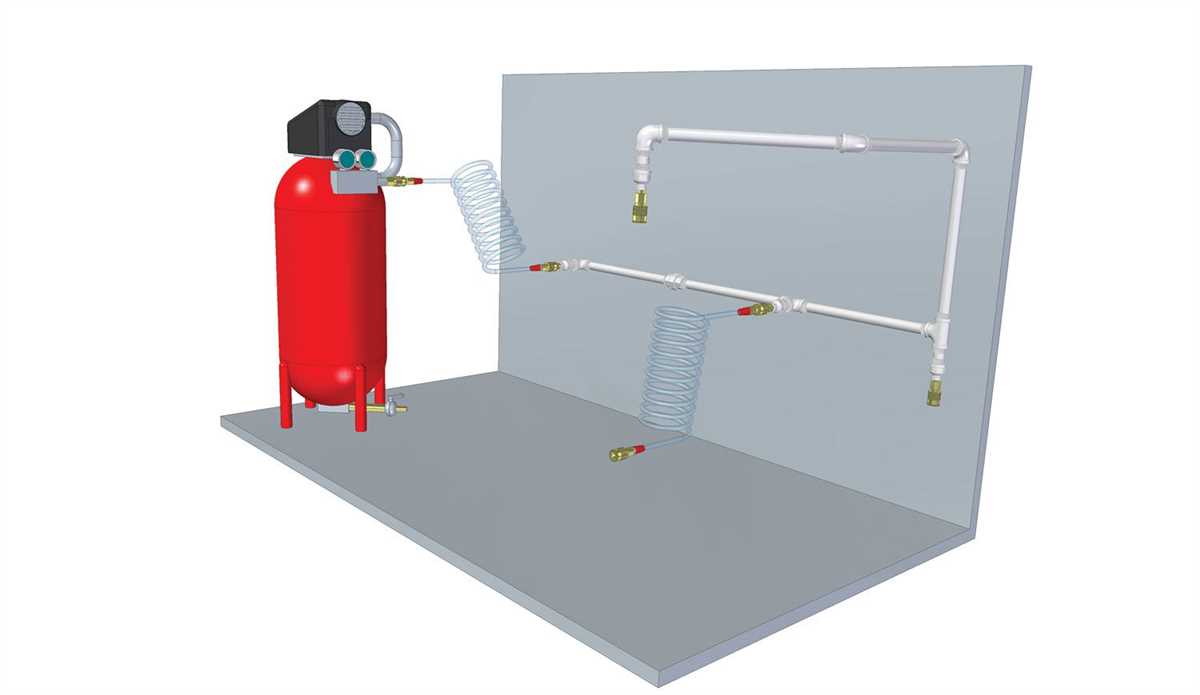
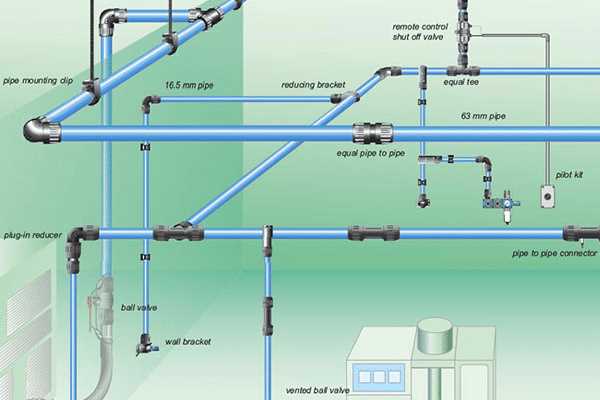
Once the pressure regulator and gauge are in place, it is time to connect the various air lines and conduits. This may involve cutting and measuring the tubing to the appropriate lengths, as well as using connectors and fittings to join different sections together. It is important to ensure a secure and airtight connection to prevent any leaks.
Finally, test the newly plumbed air compressor system for any leaks or abnormalities. Turn on the compressor and monitor the pressure levels and the performance of the connected tools or equipment. If any leaks or issues are detected, address them immediately to prevent further damage.
By following this step-by-step guide, you can effectively plumb an air compressor and ensure its optimal functionality for various applications. Remember to always prioritize safety and adhere to the manufacturer’s instructions when working with any air compressor system.
Choose the Right Location
When pluмbing an air compressor, it is crucial to choose the right location for optimal performance and safety. Here are some key considerations when selecting the location:
- Accessibility: Select a location that provides easy access for maintenance and repairs. This will ensure that you can quickly and efficiently troubleshoot any issues that may arise.
- Ventilation: Proper ventilation is essential to prevent overheating and to maintain air quality. Choose a location with adequate airflow to ensure the compressor operates at its best and to minimize the risk of inhaling harmful fumes.
- Noise: Consider the noise level generated by the compressor when deciding on a location. If noise is a concern, choose a location away from living or working areas to minimize disruption.
- Stability: The compressor should be placed on a stable surface to prevent vibrations and reduce the risk of tipping over. Ensure that the location can accommodate the weight of the compressor and any additional equipment or accessories.
- Moisture: Avoid placing the compressor in a damp or humid environment. Moisture can cause rust and damage to the compressor components. Choose a dry location to prolong the lifespan of the equipment.
By carefully considering these factors, you can select a suitable location for your air compressor that ensures optimal performance, longevity, and safety.

Gather the Necessary Tools
To successfully plumb an air compressor, you will need a few essential tools to ensure the job is done correctly. Make sure you have the following tools on hand before you start:
- Tape Measure: You will need a tape measure to accurately measure and mark the areas where the air lines will be installed.
- Pipe Cutter: A pipe cutter is necessary to cut the air lines to the correct length. Ensure you have a pipe cutter that is capable of cutting the type of pipe you will be using.
- Deburring Tool: After cutting the pipe, you will need a deburring tool to remove any burrs or sharp edges from the cut ends.
- Pipe Wrench: A pipe wrench is useful for tightening and loosening fittings and connections. Make sure you have the appropriate size pipe wrench for the fittings you will be working with.
- Teflon Tape: Teflon tape is used to create a leak-proof seal between threaded fittings. Ensure you have enough Teflon tape to wrap around all the fittings.
- Thread Sealant: If you are working with fittings that do not have tapered threads, you will need thread sealant to create a proper seal. Make sure you have the correct type of thread sealant for the fittings you will be using.
- Drill and Bits: Depending on the type of mounting brackets you will be using, you may need a drill and appropriate drill bits to secure the brackets to the wall.
- Level: A level will be necessary to ensure the air lines are installed straight and level.
- Pencil or Marker: You will need a pencil or marker to mark the locations where the air lines will be installed.
- Safety Glasses: It is always important to wear safety glasses when working with tools to protect your eyes from any potential hazards.
By gathering all of these tools before you begin, you can ensure that you have everything you need to successfully plumb your air compressor. This will help to minimize any delays or issues that may arise during the installation process.
Shut Off the Power
Before starting any work on your air compressor, it is important to shut off the power to ensure your safety. Locate the main power switch or circuit breaker that supplies electricity to the compressor and turn it off. This will prevent any accidental start-ups or electrical hazards while working.
Warning: Do not skip this step. Working on an air compressor without shutting off the power can result in serious injury or even death.
Once you have turned off the power, you can use a voltage tester to double-check that the electricity to the compressor is indeed disconnected. Simply place the voltage tester on the power outlet or wires connected to the compressor and check for any active electrical current. If the voltage tester indicates that there is still electricity flowing, do not proceed with the installation until the issue is resolved.

Remember, safety should always be your top priority when working with any electrical equipment, including air compressors. Taking the time to shut off the power and confirm that it is off can help prevent accidents and ensure a successful installation.
Install a Pressure Regulator
Step 1: Choose the right pressure regulator

Before installing a pressure regulator, it is important to choose the right one for your air compressor. Consider the maximum pressure rating of your compressor and make sure the regulator you choose can handle that pressure.
Step 2: Determine the regulator location

You will need to find a suitable location to install the pressure regulator. It should be easily accessible and close to the air compressor. Make sure there is enough space for the regulator and any additional fittings or piping that may be required.

Step 3: Prepare the air line
Before installing the pressure regulator, you will need to prepare the air line. Cut the air line to the desired length and use a pipe cutter or hacksaw to make a clean, square cut.
Step 4: Install the pressure regulator
Attach the pressure regulator to the air line using suitable fittings. Make sure all connections are tight and secure. Use thread sealant or Teflon tape on the threads to prevent leaks. Tighten the fittings with a wrench or pliers.
Step 5: Test the pressure regulator
Once the pressure regulator is installed, it is important to test it for proper operation. Connect the air compressor and turn it on. Adjust the pressure regulator to the desired pressure setting and check if the pressure is being regulated correctly.

By following these steps, you can successfully install a pressure regulator for your air compressor. A pressure regulator helps control the pressure of the compressed air, ensuring that it is at the appropriate level for your specific application.
Connect the Air Compressor
In order to properly use your air compressor, you will need to connect it to the appropriate power source and other necessary components. Follow these steps to connect your air compressor:
1. Power Source
Make sure that your air compressor is plugged into a properly grounded power outlet. Check the voltage requirements of your specific model and ensure that the outlet can provide the necessary power.

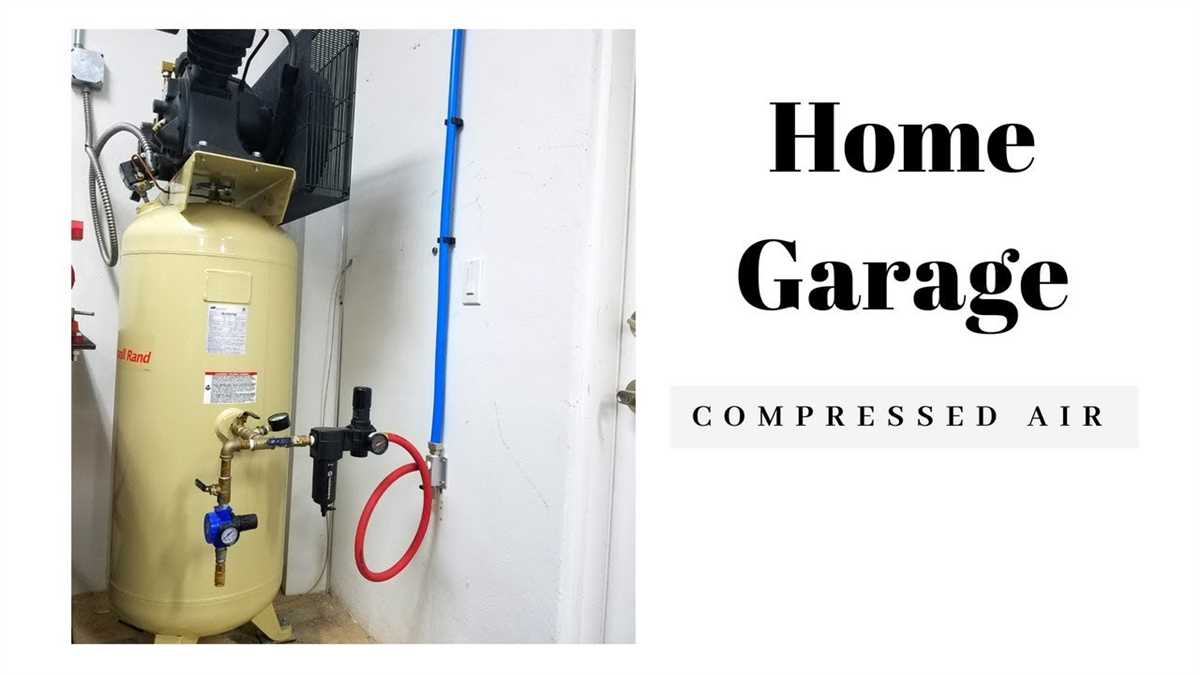
2. Pressure Regulator
Attach a pressure regulator to the outlet of the air compressor. This will allow you to control the amount of pressure that is being released from the compressor. Adjust the pressure regulator to the desired level for your specific application.
3. Air Filter
Connect an air filter to the outlet of the pressure regulator. The air filter will help remove any contaminants, such as dirt or oil, from the compressed air. This will help protect your tools and equipment from damage and ensure that the air being released is clean.
4. Air Hose
Attach an air hose to the outlet of the air filter. The air hose will allow you to direct the compressed air to your desired location. Make sure that the air hose is securely connected to both the air filter and your tools or equipment.
5. Safety Measures
Before using the air compressor, make sure to read and understand the user manual and any safety precautions provided by the manufacturer. Ensure that all connections are tight and secure, and that any valves or switches are in the correct position.

By following these steps, you will be able to properly connect your air compressor and ensure its safe and efficient operation.
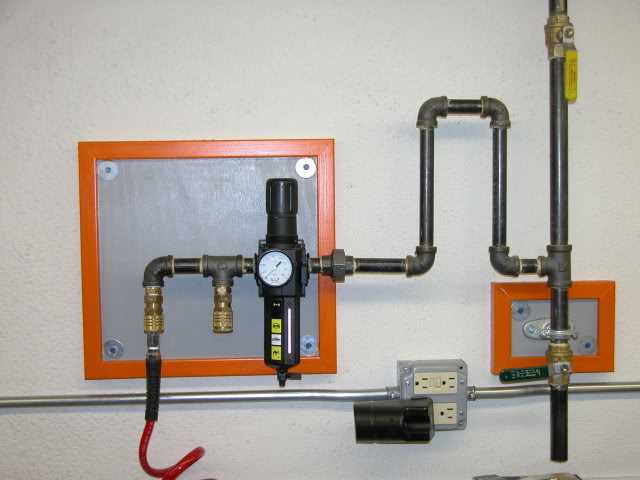
Install a Filter and Moisture Separator
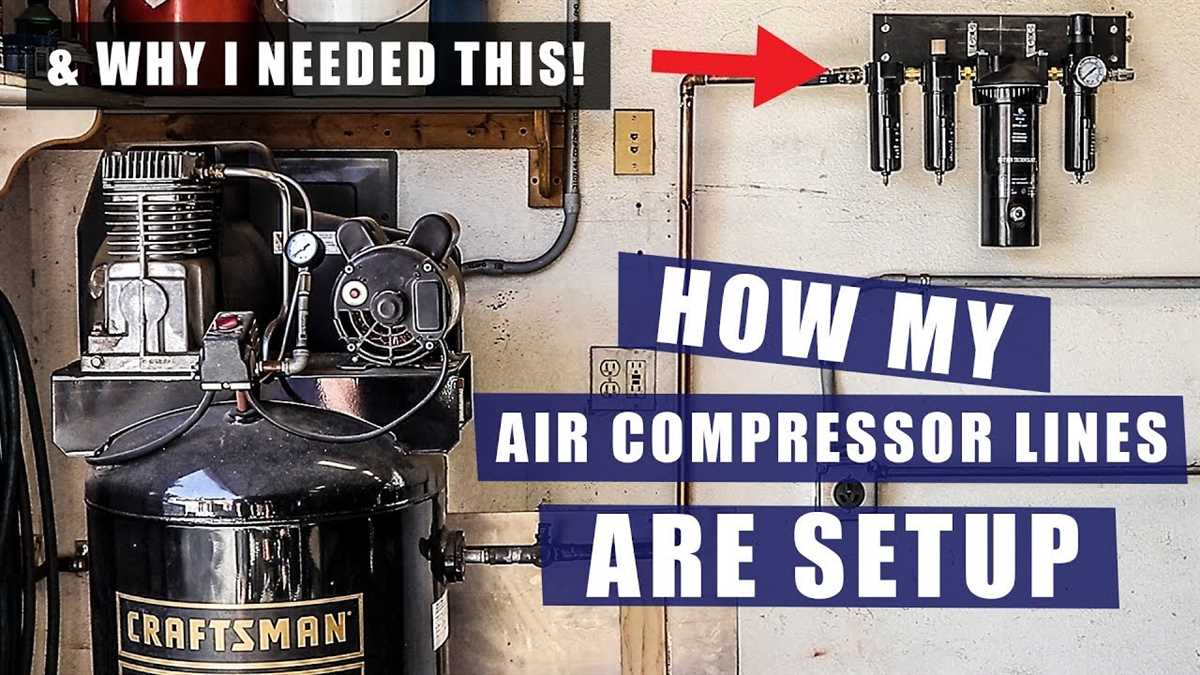
Installing a filter and moisture separator is an important step when plumbing an air compressor. These components help remove impurities and moisture from the compressed air, ensuring clean and dry air is delivered to your tools or equipment.
1. Choose the right filter and moisture separator: There are different types and sizes of filters and moisture separators available in the market. Consider the flow rate of your air compressor and the level of filtration required for your specific application. Look for filters that can remove particles, oil, and water from the compressed air.
2. Determine the installation location: Find a suitable location to install the filter and moisture separator. It should be easily accessible and close to the air compressor. Ensure there is enough space for proper airflow around the components.
3. Mount the filter and moisture separator: Use mounting brackets or secure the components to a sturdy surface using screws. Make sure they are securely fastened to prevent any vibrations or movement during operation.
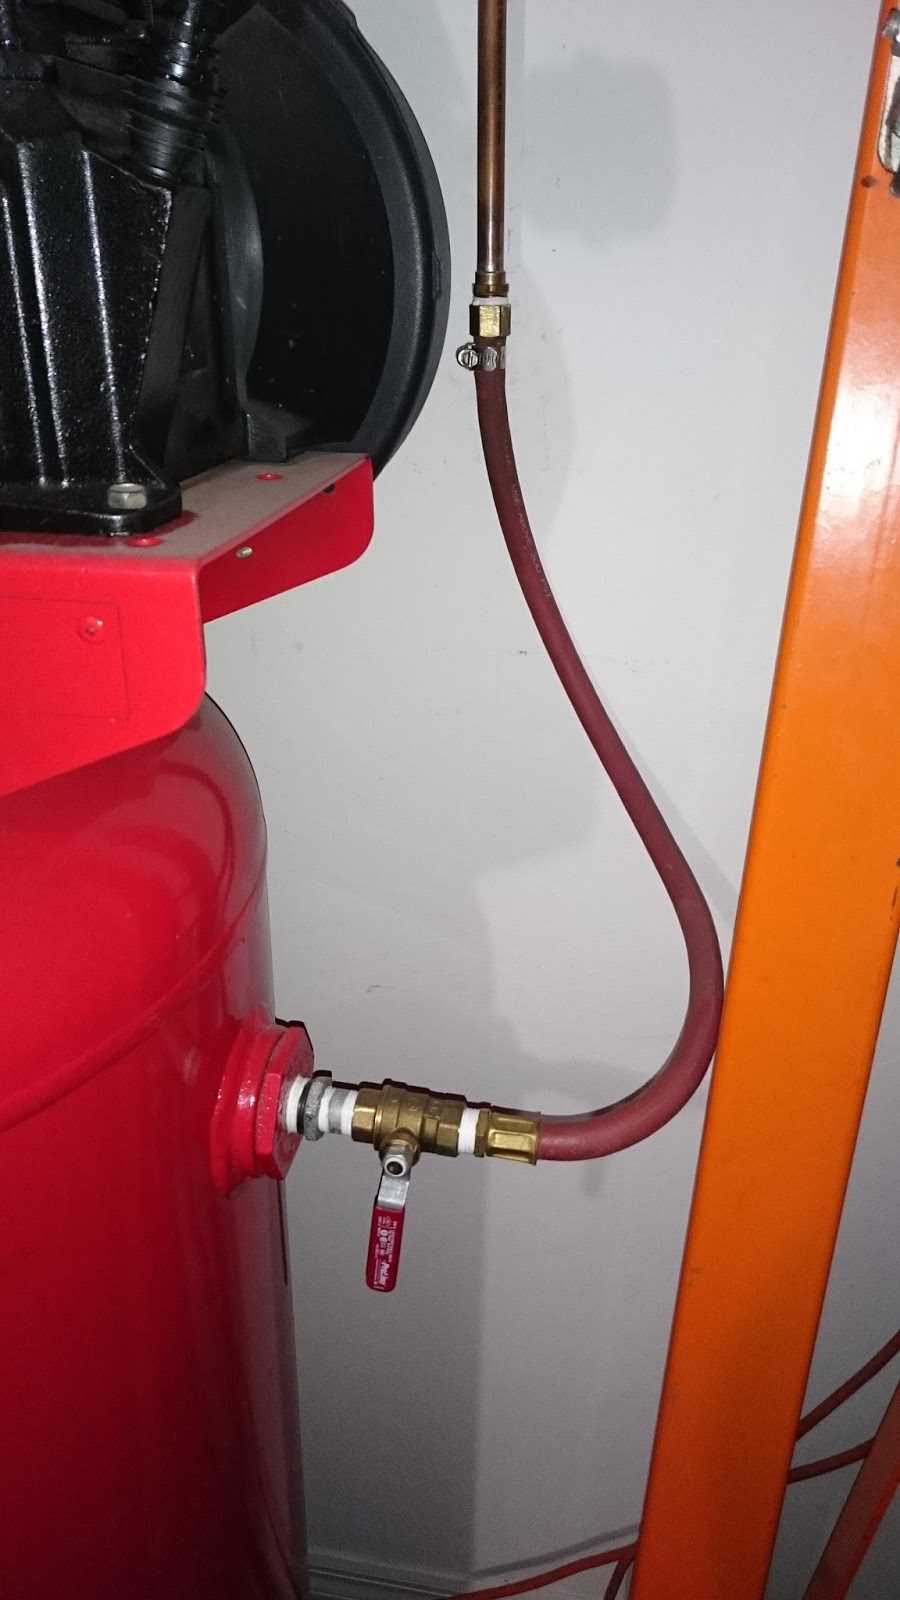
4. Connect the air lines: Use appropriate fittings and connectors to connect the filter and moisture separator to the air compressor and downstream air lines. Ensure the connections are tight and leak-free.
5. Install a drain valve: Many filters and moisture separators come with a drain valve to remove accumulated water. Install the drain valve at the bottom of the components for easy drainage. Make sure to periodically drain the water to prevent damage and maintain the performance of the system.
6. Test for proper operation: Once the filter and moisture separator are installed, test the system for proper operation. Check for any leaks, and verify that the compressed air is clean and dry.
Following these steps will help ensure that your air compressor system is equipped with an effective filter and moisture separator to provide clean, dry air for your tools and equipment.
Add a Drain Valve
Adding a drain valve to your air compressor system is an important step to ensure proper maintenance and prevent damage. The drain valve allows you to remove excess moisture and debris that can accumulate in the system over time. This helps to prolong the life of your compressor and improves its efficiency.
Choose the right drain valve
When selecting a drain valve for your air compressor, consider factors such as the size of your system, the airflow rate, and the location of the valve. There are several types of drain valves available, including manual and automatic options. Manual drain valves require you to manually open and close the valve to drain the accumulated moisture. Automatic drain valves, on the other hand, are designed to automatically drain the system at set intervals or when a certain level of moisture is reached.
Install the drain valve
To install the drain valve, locate a suitable spot on the compressor system where the moisture tends to collect. This is usually near the bottom of the tank or at a low point in the piping system. Once you have identified the location, drill a hole and install the drain valve using the appropriate fittings. Make sure to secure the valve tightly to prevent any leaks.
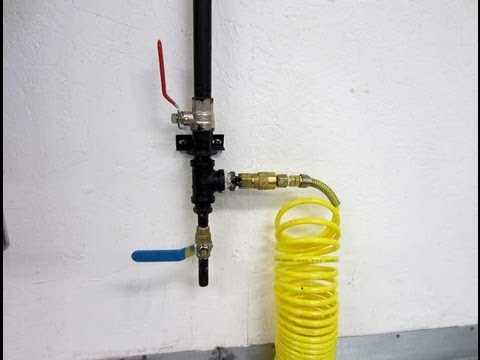
Tip: It’s a good idea to install a ball valve before the drain valve. This will allow you to shut off the airflow to the system before draining, preventing any potential accidents or leaks.
Test the drain valve
After installing the drain valve, it is important to test it to ensure it is functioning properly. Open the valve and verify that the accumulated moisture is being drained out effectively. If the valve does not drain properly, check for any clogs or obstructions and clean or replace the valve as necessary.
Regularly check and maintain the drain valve to ensure it continues to function effectively. This may involve cleaning the valve, replacing any damaged parts, or adjusting the drainage intervals for automatic valves.
In conclusion, adding a drain valve to your air compressor system is a crucial step in maintaining its performance and prolonging its lifespan. By properly draining excess moisture and debris, you can prevent damage and ensure your compressor operates efficiently for years to come.
Test the System
Once you have completed the installation of your air compressor system, it is important to test it to ensure that everything is functioning properly. Testing the system will help you identify any leaks or issues that may need to be addressed before putting the system into full operation.
Start by inspecting all the connections and fittings in your system. Look for any signs of leaks, such as air escaping or moisture buildup. Check that all connections are tight and secure. If you notice any leaks, use a solution of soapy water to identify the source. Bubbles will form where there is a leak, allowing you to identify and fix the issue.
Next, check the pressure in the system. Use a pressure gauge to measure the output pressure of the air compressor. Compare this to the recommended pressure range for your specific application. If the pressure is too low or too high, consult the user manual or contact the manufacturer for guidance on how to adjust the pressure settings.
Test the functionality of the system. Turn on the air compressor and observe how it operates. Check that the compressor starts and stops properly, without any unusual noises or vibrations. Listen for any air leaks while the system is running. Test the pressure switch to ensure it is functioning correctly.
If you have any additional components in your system, such as filters or regulators, test their functionality as well. Adjust the settings and test how they affect the performance and output of the air compressor. Make sure they are able to regulate the pressure and flow as intended.
Finally, monitor the system during a continuous operation. Run the air compressor for an extended period of time and observe its performance. Check for any fluctuations in pressure or any other issues that may arise. This will help you ensure that the system is capable of sustaining operation over longer periods of time.
By thoroughly testing the system, you can address any potential issues early on and ensure that your air compressor system is in optimal working condition. This will help prolong the lifespan of the system and provide you with reliable and efficient performance.
FAQ:
What tools do I need to plumb an air compressor?
To plumb an air compressor, you will need a variety of tools including a pipe cutter, pipe wrench, Teflon tape, a pipe reamer, and a drill with a hole saw attachment.
What type of pipe should I use to plumb my air compressor?
It is recommended to use either copper or galvanized steel pipe to plumb an air compressor. Both types of pipe are durable and can withstand the high pressure of compressed air.
Can I use PVC pipe to plumb my air compressor?
No, PVC pipe is not suitable for plumbing an air compressor. PVC pipe is not designed to handle the high pressure of compressed air and can burst, causing serious injury or damage.
Should I use solder or compression fittings to connect the pipes?
It depends on your skill level and personal preference. Solder fittings require skilled soldering techniques, while compression fittings are easier to install but may not be as secure. If you are unsure, it is recommended to consult a professional.
Do I need to install a pressure regulator and filter in the air line?
Yes, it is highly recommended to install a pressure regulator and filter in the air line. The pressure regulator will allow you to adjust the air pressure coming from the compressor, while the filter will remove any moisture and debris from the air before it is used.
Video:


Harrison Clayton
Meet Harrison Clayton, a distinguished author and home remodeling enthusiast whose expertise in the realm of renovation is second to none. With a passion for transforming houses into inviting homes, Harrison's writing at https://thehuts-eastbourne.co.uk/ brings a breath of fresh inspiration to the world of home improvement. Whether you're looking to revamp a small corner of your abode or embark on a complete home transformation, Harrison's articles provide the essential expertise and creative flair to turn your visions into reality. So, dive into the captivating world of home remodeling with Harrison Clayton and unlock the full potential of your living space with every word he writes.


