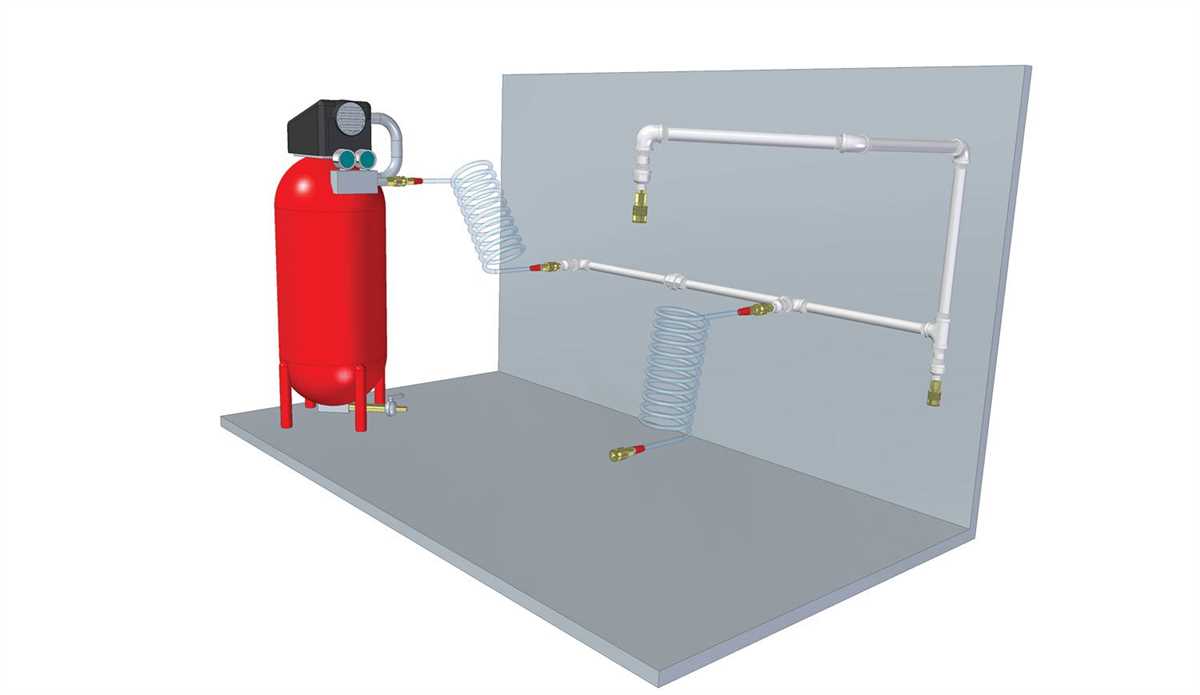
Step-by-Step Guide: Connecting an Air Compressor to PVC Pipe

When it comes to powering tools and equipment, an air compressor is a versatile and reliable option. One of the most common ways to connect an air compressor is by using PVC pipe. PVC pipe is durable, affordable, and easy to work with, making it the perfect choice for creating a compressed air system in your workshop or garage. In this step-by-step guide, we will walk you through the process of connecting an air compressor to PVC pipe, ensuring a safe and efficient setup.
Step 1: Gather the necessary materials
Before getting started, make sure you have all the materials you will need. This includes a compressor, PVC pipe and fittings, pipe cutter or saw, PVC cement, Teflon tape, adjustable wrench, and safety equipment like gloves and goggles. Having everything on hand will help streamline the process and ensure that you have what you need when you need it.
Step 2: Determine the layout and measurements
Next, plan the layout of your compressed air system and measure the distances and angles where the PVC pipe will run. Consider factors such as the location of the compressor, any obstacles that may be in the way, and the desired locations for the air outlets. Taking accurate measurements and planning the layout upfront will save you time and effort later on.

Step 3: Cut and prepare the PVC pipe
Using a pipe cutter or saw, cut the PVC pipe to the desired lengths based on your measurements. Smooth out any rough edges with sandpaper or a file to ensure a proper fit. Make sure to remove any debris or burrs from the inside of the pipe as well.
Step 4: Assemble the PVC pipe and fittings
Once the PVC pipe is cut and prepared, start assembling the system by connecting the pipe and fittings. Apply PVC cement to the inside of the fittings and the outside of the pipe, making sure to evenly coat both surfaces. Insert the pipe into the fitting and twist it slightly to ensure a secure connection. Repeat this process for each joint in the system.
Step 5: Secure the connections and add Teflon tape

After assembling the PVC pipe and fittings, use an adjustable wrench to tighten the connections. This will ensure a leak-free system. Additionally, wrap Teflon tape around the threaded fittings to provide an extra layer of sealing and avoid air leaks. Be sure not to overtighten, as this can damage the threads.
Step 6: Test the system and make any necessary adjustments
Finally, turn on the air compressor and test the system for any leaks or issues. If you detect any leaks, tighten the connections or apply additional Teflon tape as needed. Once the system is fully functional and there are no air leaks, you can begin using your compressed air system for various applications, such as powering pneumatic tools and inflating tires.
By following this step-by-step guide, you can easily and safely connect an air compressor to PVC pipe, creating an efficient and reliable compressed air system for your workshop or garage.
Safety Precautions when Working with Air Compressors and PVC Pipe
1. Wear Safety Gear

When working with air compressors and PVC pipe, it is important to prioritize safety by wearing the appropriate protective gear. This includes safety goggles to protect your eyes from flying debris, gloves to protect your hands from sharp edges and chemicals, and earplugs or earmuffs to protect your hearing from the loud noise produced by the air compressor.
2. Use Proper Ventilation
Working in a well-ventilated area is crucial when using an air compressor and working with PVC pipe. The compressor can produce exhaust fumes and the PVC cement used to connect the pipe can generate toxic gases. Make sure you are working in a space that is well-ventilated to avoid inhaling these harmful substances.
3. Familiarize Yourself with the Equipment
Before using an air compressor, take the time to read the user manual and familiarize yourself with the equipment. Understand how to operate the compressor safely and how to connect the PVC pipe correctly. This will help prevent accidents caused by improper use or lack of knowledge about the equipment.
4. Inspect the PVC Pipe and Fittings
Prior to connecting the PVC pipe to the air compressor, inspect all the components for any signs of damage or wear. Cracked or damaged pipe and fittings can lead to leaks or bursts under high pressure, posing a safety risk. Replace any damaged parts before proceeding with the installation.

5. Securely Fasten the PVC Pipe and Fittings
When connecting the PVC pipe and fittings, ensure they are securely fastened to prevent any disconnection or air leaks. Use appropriate adhesive and follow the manufacturer’s instructions for application. It is also important to use proper tools, such as pipe wrenches or pliers, to tighten the fittings adequately.
6. Monitor the Pressure
Keep a close eye on the pressure gauge of the air compressor while it is in operation. Avoid exceeding the recommended operating pressure, as this can lead to pipe bursts or other damage. Regularly check the gauge and make necessary adjustments to maintain a safe and appropriate pressure level for your specific application.
By following these safety precautions, you can ensure a safe working environment and prevent accidents or injuries when connecting an air compressor to PVC pipe.
Choosing the Right Size PVC Pipe for Your Air Compressor
When connecting an air compressor to PVC pipe, it is important to choose the right size pipe for optimal performance and efficiency. The size of the PVC pipe directly affects the airflow and pressure drop in the system.
1. Consider the CFM: The first step in choosing the right size PVC pipe is to consider the airflow requirements of your air compressor, which is measured in Cubic Feet per Minute (CFM). A higher CFM rating requires a larger pipe diameter to accommodate the increased airflow. Refer to the manufacturer’s specifications or consult an expert to determine the CFM requirements of your air compressor.

2. Calculate the required pipe diameter: Once you know the CFM requirements, you can use a pipe sizing chart or an online calculator to calculate the required pipe diameter. The diameter is usually measured in inches and ranges from 1/2 inch to several inches, depending on the CFM rating. Keep in mind that larger diameter pipes generally allow for better airflow and reduced pressure drop.
3. Consider pressure drop: Pressure drop is the decrease in pressure that occurs as air flows through the pipe. It is important to minimize pressure drop to prevent loss of power and efficiency in your air compressor. Choosing a larger diameter pipe can help reduce pressure drop, but it is also important to consider the pipe length and any potential restrictions, such as elbows or fittings, which can increase pressure drop.
4. Consult local building codes: Before finalizing your choice of PVC pipe size, it is important to consult local building codes and regulations. Some jurisdictions may have specific requirements for the size and type of pipe that can be used for compressed air systems.
In conclusion, choosing the right size PVC pipe for your air compressor involves considering the CFM requirements, calculating the required pipe diameter, minimizing pressure drop, and ensuring compliance with local building codes. Taking these factors into account will help ensure optimal performance and efficiency for your air compressor system.
Gathering the Necessary Tools and Materials
Before connecting an air compressor to PVC pipe, you will need to gather the necessary tools and materials. Here is a list of items you will need:

- Air compressor
- PVC pipe
- PVC fittings (elbows, tees, couplings, etc.)
- PVC primer and cement
- Pipe cutter or hacksaw
- Measuring tape
- Pencil or marker
- Deburring tool or sandpaper
- Pipe wrench
- Teflon tape
Make sure to gather all of these tools and materials before starting the process of connecting your air compressor to PVC pipe. It is important to have everything on hand to ensure a smooth and efficient installation.
Keep in mind that the specific tools and materials needed may vary depending on the size and complexity of your air compressor setup. It is always a good idea to check the manufacturer’s instructions or consult a professional if you are unsure about any aspect of the installation process.
Cutting and Preparing the PVC Pipe for Connection
Before connecting the air compressor to PVC pipe, it is important to properly cut and prepare the PVC pipe for connection. This ensures a secure and leak-free connection.
1. Measure and Mark
To begin, measure the length of PVC pipe needed for your specific application. Use a tape measure or ruler to accurately determine the desired length. Once measured, mark the pipe with a pencil or marker to indicate where it should be cut.

2. Secure the Pipe
Next, secure the PVC pipe in a vice or clamp to prevent it from moving during the cutting process. This will help ensure a straight and clean cut.
3. Cut the Pipe
Using a hacksaw or PVC pipe cutter, carefully cut the PVC pipe along the marked line. Apply firm and steady pressure to ensure a smooth and accurate cut. Take caution to avoid any jagged or uneven edges.
4. Remove Burrs
After cutting the pipe, use a file or sandpaper to remove any burrs or rough edges from the cut end. This will help prevent damage to the air compressor fittings and ensure a proper seal.
5. Clean the Pipe
Before connecting the PVC pipe to the air compressor, it is important to clean the cut end of the pipe. Use a clean cloth or rag to remove any debris or dirt that may interfere with the connection.
Following these steps will help you properly cut and prepare the PVC pipe for connection, ensuring a secure and leak-free connection to your air compressor.
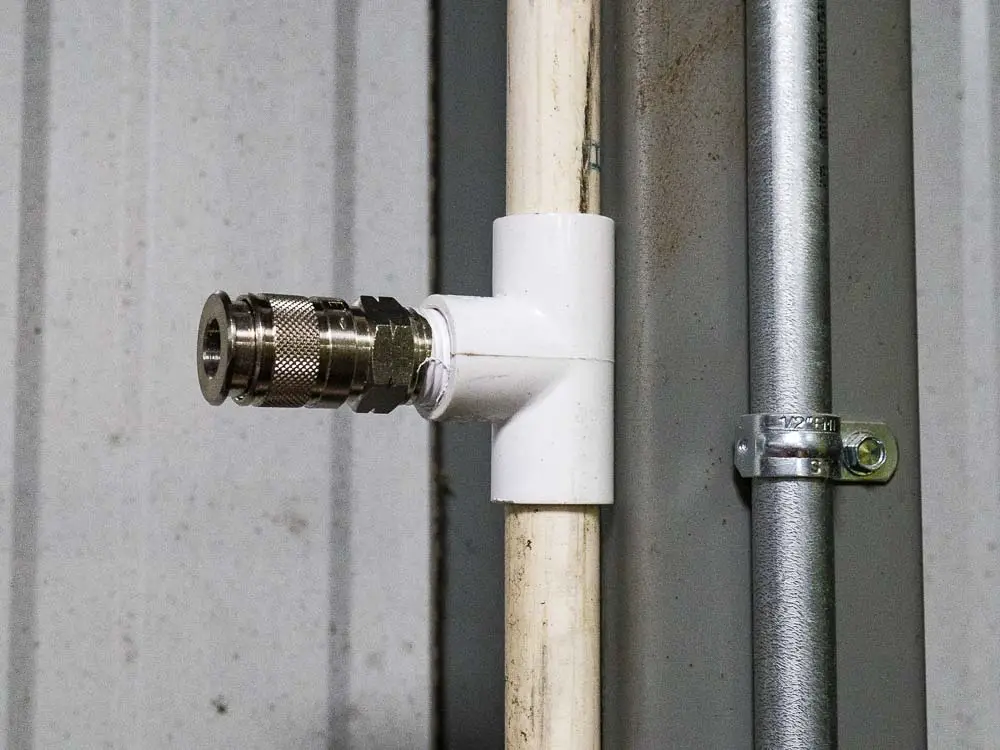
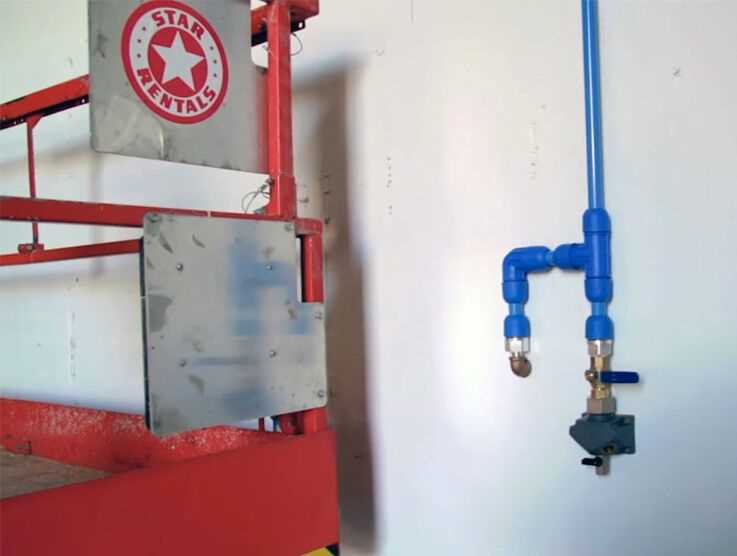
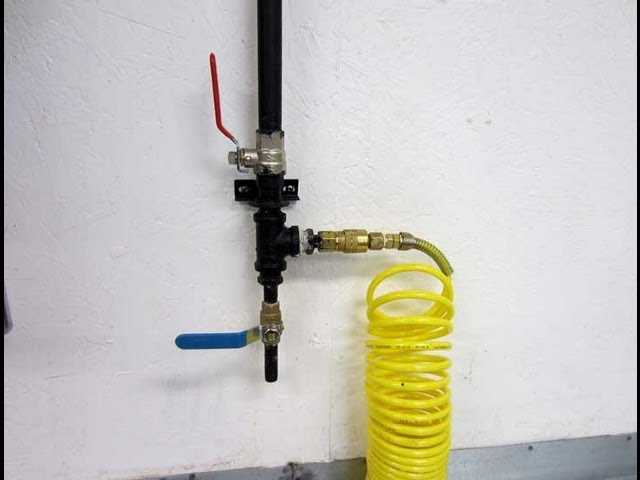
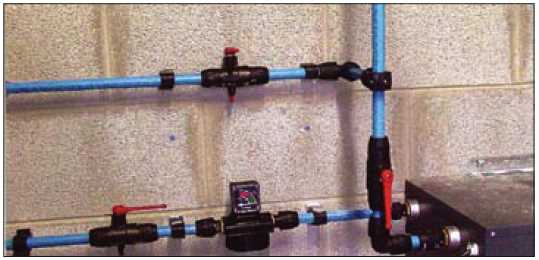
Connecting the PVC Pipe to the Air Compressor
Step 1: Prepare the PVC Pipe
Before connecting the PVC pipe to the air compressor, it is important to prepare the pipe properly. Start by measuring and cutting the PVC pipe to the desired length using a PVC cutter or a saw. Make sure to clean the cut edge of the pipe to remove any burrs or debris that may affect the connection.
Step 2: Apply PVC Primer and Cement
To ensure a secure and leak-free connection, it is necessary to use PVC primer and cement. Begin by applying the primer to the outside end of the PVC pipe and the inside of the air compressor fitting. Allow the primer to dry for a few seconds, and then apply a layer of PVC cement to both the pipe and the fitting.
Step 3: Connect the Pipe to the Compressor
With the primer and cement applied, it is time to connect the PVC pipe to the air compressor. Insert the pipe into the fitting and apply pressure to ensure a tight fit. Hold the pipe in place for a few seconds to allow the cement to bond and create a strong connection.
Step 4: Test the Connection
After connecting the PVC pipe to the air compressor, it is important to test the connection for any leaks or issues. Turn on the air compressor and run it for a few minutes to pressurize the system. Check the connection points for any signs of air leakage. If there are no leaks, the connection is successful.
Note: It is important to follow the manufacturer’s instructions when using PVC primer and cement. These products can be hazardous, so make sure to use them in a well-ventilated area and avoid direct contact with your skin.
Securing the Connection with PVC Cement
To ensure a secure and tight connection between the air compressor and the PVC pipe, it is crucial to use PVC cement. PVC cement, also known as PVC glue or PVC solvent, is a type of adhesive specifically designed for bonding PVC materials together.
Before applying the PVC cement, make sure the surfaces of the PVC pipe and the air compressor fitting are clean and free from dirt, debris, or moisture. Any contaminants can interfere with the adhesive’s ability to create a strong bond.
Once the surfaces are clean, apply a thin layer of PVC cement to the outside of the PVC pipe and the inside of the air compressor fitting. Be careful not to apply too much, as excess cement may result in a messy and less effective connection.
After applying the PVC cement, quickly and firmly push the PVC pipe into the air compressor fitting. The cement will start to bond the two surfaces together, creating a strong and reliable connection.
It is important to keep the connection still and undisturbed for a few minutes to allow the PVC cement to fully dry and cure. The drying time can vary depending on the specific PVC cement product, so it is best to refer to the manufacturer’s instructions for the recommended drying time.
Once the PVC cement is fully dried and cured, the connection should be secure and able to withstand the air pressure from the compressor. It is always a good idea to perform a pressure test or check for any leaks before putting the system into regular use.
Testing the Air Compressor and PVC Pipe Connection
After connecting the air compressor to the PVC pipe, it is important to test the connection before pressing forward with any further steps. Testing the connection ensures that there are no leaks or issues that could compromise the effectiveness and efficiency of the air compressor.
Step 1: Visual Inspection
Start by visually inspecting the entire connection. Check the fittings, joints, and pipes for any signs of damage, cracks, or loose connections. Ensure that all components are tightly secured and properly aligned.
Step 2: Applying Pressure
Before turning on the air compressor, it is recommended to close any valves or regulators in the system to prevent excessive pressure buildup. Once the valves are closed, turn on the air compressor and allow it to build up pressure in the system.
Step 3: Listening for Leaks
Next, use your ears to listen for any hissing or escaping air. This could indicate a leak in the connection. Pay close attention to the fittings and joints, as these are common areas for leaks to occur.
Step 4: Soapy Water Test
If you suspect a leak but cannot hear it, you can perform a soapy water test. Mix a solution of water and dish soap and apply it to the connection. Look for any bubbles forming, as they indicate air escaping from the connection.
Step 5: Troubleshooting Leaks
If you find any leaks during the testing process, you will need to troubleshoot and fix them. This may involve tightening fittings, applying additional sealant, or replacing damaged components. It is essential to address any leaks before proceeding with the use of the air compressor.
By thoroughly testing the air compressor and PVC pipe connection, you can ensure its reliability and safety. Identifying and addressing any issues beforehand will help prevent future problems and ensure the optimal performance of your air compressor system.
Troubleshooting Common Connection Issues
Leakage
One of the most common issues when connecting an air compressor to PVC pipe is leakage. If you notice air leaking from the connections, there are several possible causes. First, ensure that all connections are tight and properly sealed. Use Teflon tape or a thread sealant to create a tight seal. If the leak persists, check for hairline cracks or damage in the PVC pipe or fittings. Replace any damaged components to prevent further leaks.
Low Air Pressure
If you are experiencing low air pressure when using your air compressor connected to PVC pipe, there are a few troubleshooting steps you can take. First, check your air compressor’s pressure settings and make sure they are properly adjusted. Additionally, inspect the PVC pipe for any blockages or restrictions. Use a pipe cleaner or compressed air to clear any obstructions. If the issue persists, it may be due to a faulty regulator or compressor, and professional assistance may be required.
Inadequate Air Flow
If you notice a decrease in air flow when connecting an air compressor to PVC pipe, there are a few potential causes. First, check for any kinks or bends in the PVC pipe that may be obstructing the flow of air. Straighten out any kinks and remove any objects that may be blocking the pipe. Additionally, check the air filter on your compressor and clean or replace it if necessary. A dirty or clogged filter can restrict air flow. If the issue persists, it may be due to a malfunctioning compressor or a problem with the PVC pipe itself.
Condensation Buildup
Condensation buildup is a common issue when using an air compressor connected to PVC pipe. If you notice excessive condensation in the pipe, there are a few steps you can take to address the issue. First, make sure the PVC pipe is properly insulated to prevent temperature fluctuations. Additionally, consider installing a moisture trap or drain valve to remove excess moisture from the air before it enters the pipe. Regularly draining the air compressor’s tank can also help prevent condensation buildup. If the problem persists, consult a professional for further assistance.
Pressure Drops

If you are experiencing sudden drops in pressure when using an air compressor connected to PVC pipe, there are a few possible causes. First, check the pressure relief valve on your compressor to ensure it is set correctly. If the valve is functioning properly, the issue may be due to a leak or blockage in the PVC pipe. Check all connections for leaks and inspect the pipe for any obstructions. Additionally, make sure the compressor’s tank is properly pressurized. If the problem continues, it may be necessary to consult a professional for further troubleshooting.
FAQ:
Why would I need to connect an air compressor to PVC pipe?
Connecting an air compressor to PVC pipe allows for the efficient and effective distribution of compressed air to various tools and equipment. PVC pipe is a durable and cost-effective option for creating a network of air lines in a workshop or garage.
What materials do I need to connect an air compressor to PVC pipe?
To connect an air compressor to PVC pipe, you will need a variety of materials including PVC pipe, PVC fittings, Teflon tape, a pipe cutter or saw, PVC primer and cement, a compressor hose, and hose clamps.
Can I connect an air compressor to regular plumbing PVC pipe?
No, regular plumbing PVC pipe is not suitable for use with compressed air. Compressed air exerts significantly more pressure than water, and regular PVC pipe is not rated for the higher pressure. It is important to use specially rated PVC pipe and fittings, specifically designed for use with compressed air systems.
Is it difficult to connect an air compressor to PVC pipe?
Connecting an air compressor to PVC pipe can be a relatively straightforward process. However, it does require careful measurement, cutting, and gluing of the PVC components. Additionally, it is important to properly secure the connections with clamps and ensure the system is leak-free before using the compressor.
Video:


Meet Harrison Clayton, a distinguished author and home remodeling enthusiast whose expertise in the realm of renovation is second to none. With a passion for transforming houses into inviting homes, Harrison's writing at https://thehuts-eastbourne.co.uk/ brings a breath of fresh inspiration to the world of home improvement. Whether you're looking to revamp a small corner of your abode or embark on a complete home transformation, Harrison's articles provide the essential expertise and creative flair to turn your visions into reality. So, dive into the captivating world of home remodeling with Harrison Clayton and unlock the full potential of your living space with every word he writes.


