How to Set PSI on an Air Compressor

An air compressor is a versatile tool that is used in a variety of applications, from basic household tasks to professional industrial processes. One important aspect of using an air compressor effectively is setting the proper PSI, or pounds per square inch, for the task at hand. PSI is a unit of pressure measurement that determines the force of the air being released from the compressor. Understanding how to set the PSI on an air compressor is essential for achieving optimal performance and safety.
To set the PSI on an air compressor, it is important to first identify the specific requirements of the task. Different tools and applications require different PSI levels to operate efficiently and produce the desired results. Consulting the manufacturer’s instructions or doing a quick online search can provide the recommended PSI range for a particular tool or task.
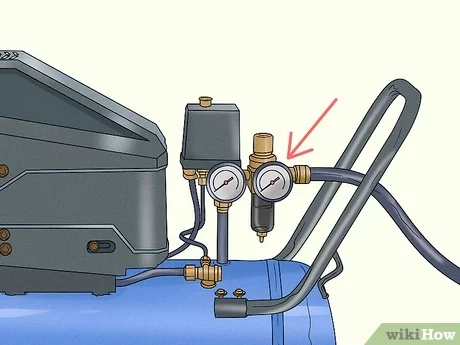
Once the recommended PSI range has been determined, it is time to adjust the pressure on the air compressor. Most air compressors are equipped with a pressure regulator, which allows you to set and control the PSI output. The pressure regulator is usually located near the outlet valve or on the control panel of the compressor. It typically has a dial or knob that can be turned to adjust the pressure.
To set the PSI on the compressor, start by turning off the compressor and relieving any built-up pressure in the tank. Then, locate the pressure regulator and turn the knob or dial to the desired PSI level. It is important to make incremental adjustments and check the pressure gauge to ensure that the desired PSI is being reached. Once the desired PSI is set, turn on the compressor and allow it to build up the pressure in the tank.
In conclusion, setting the PSI on an air compressor is a crucial step in using the tool effectively and safely. By identifying the recommended PSI range for the task, adjusting the pressure regulator accordingly, and ensuring that the desired PSI is being attained, you can optimize the performance of your air compressor and achieve the best results in your applications.

Determine the Optimal PSI
Before setting the PSI on your air compressor, it is important to determine the optimal PSI level for the specific task you will be performing. The optimal PSI will vary depending on the type of tool or equipment you are using.
1. Refer to the manufacturer’s guidelines: The first step in determining the optimal PSI is to consult the manufacturer’s guidelines or documentation for the tool or equipment you are using. The manufacturer will typically provide a recommended PSI range that is suitable for optimal performance.
2. Consider the application: Consider the specific application or task you will be using the air compressor for. For example, if you are using the air compressor for painting, the optimal PSI level will be different compared to using it for powering pneumatic tools. Take into account factors such as the size and type of materials being used.
3. Test and adjust: Once you have an idea of the optimal PSI range, it is important to test and adjust the PSI accordingly. Start with the lowest recommended PSI and gradually increase it until you find a level that provides the desired performance and results. Take note of the PSI level that worked best for future reference.

4. Seek professional advice: If you are unsure about the optimal PSI for a specific task or if you are using a new tool or equipment, it is advisable to seek professional advice. Consult a specialist or technician who can help you determine the optimal PSI and provide guidance on how to set it correctly on your air compressor.
5. Regularly monitor and adjust: Once you have determined the optimal PSI, it is important to regularly monitor and adjust the PSI as needed. Changes in temperature, altitude, or the type of task being performed may require adjustments to the PSI level. Regular maintenance and calibration of the air compressor will also help ensure that the PSI remains at the optimal level for efficient and safe operation.
Choosing the Right Pressure
When setting the PSI on an air compressor, it is important to choose the right pressure for your specific needs. The pressure you need will depend on the type of equipment or tool you will be using.
First, you should check the manufacturer’s guidelines or the user manual for the equipment you will be using. These guidelines will often specify the recommended operating pressure. It is important to follow these recommendations to ensure proper performance and safety.
If you do not have access to the manufacturer’s guidelines, you can use a general rule of thumb. For most handheld tools, such as nail guns or spray guns, a pressure between 70 and 90 PSI should be sufficient. However, for larger tools or equipment, such as air sanders or impact wrenches, you may need a higher pressure, typically between 90 and 120 PSI.
![Diyife Bike Pump with Pressure Gauge, [120 PSI][Perfect Full Set] Mini Bicycle Pump, Ball Pump with Needle, Glueless Patch Kit, Cycle Valve Caps and Frame Mount Fits Presta &Schrader Valve(Blue)](https://m.media-amazon.com/images/I/41DYNSS-jBL._SL160_.jpg)
Keep in mind that using too high of a pressure can be dangerous and can cause damage to your equipment. On the other hand, using too low of a pressure may result in poor performance or the inability to complete the task at hand. It is important to find the right balance.
Once you have determined the appropriate pressure for your equipment, you can set the PSI on your air compressor. To do this, locate the pressure regulator knob or dial on your compressor. Turn the knob or dial to the desired pressure, making sure to align the marker with the corresponding PSI value.
It is also a good idea to periodically check the pressure using a pressure gauge. This will ensure that the compressor is maintaining the correct pressure and will allow you to make any necessary adjustments if needed.
Overall, choosing the right pressure for your air compressor is essential for optimal performance and safety. By following the manufacturer’s guidelines or using general recommendations, you can ensure that your equipment operates effectively and efficiently.
Gather the Necessary Tools
Before you begin setting the PSI on an air compressor, it is important to gather all the necessary tools to ensure a smooth and efficient process. Here are some tools that you will need:

- Pressure gauge: This tool is used to measure the pressure of the air in the compressor tank. Make sure to choose a pressure gauge that is compatible with the PSI range that you want to set.
- Adjustment tool: Depending on the type of air compressor you have, you might need a specific tool to adjust the PSI. This can be a wrench, a screwdriver, or another tool specified in the compressor’s manual.
- Safety goggles: When working with an air compressor, it is important to protect your eyes from any potential hazards. Safety goggles will shield your eyes from any flying debris or accidental releases of air pressure.
- User manual: Always consult the user manual that came with your air compressor. The manual will provide detailed instructions on how to set the PSI and any specific tools that might be required.
Once you have gathered all the necessary tools, you can proceed with setting the PSI on your air compressor. Remember to follow the instructions carefully and take any necessary safety precautions to ensure a successful and safe operation.
Required Equipment
Before you can set the PSI on your air compressor, you will need to gather a few essential tools and equipment. Having the necessary equipment on hand will ensure that you can properly adjust the PSI to meet your specific needs. Here are the items you will need:
Air Compressor
The first item you will need is an air compressor. This is the machine that will generate the compressed air that you will use for various tasks. Make sure you have a functioning and properly sized air compressor for your intended applications.
Pressure Gauge
In order to accurately adjust the PSI on your air compressor, you will need a pressure gauge. This device measures the pressure of the air inside the compressor tank and displays it in units of PSI. Ensure that your pressure gauge is in good working condition and provides accurate readings.

Adjustment Knobs
Most air compressors have built-in adjustment knobs that allow you to set the desired PSI. These knobs are often labeled and can be easily turned to increase or decrease the pressure. Familiarize yourself with the locations and functions of these knobs on your specific air compressor.
Protective Gear
Working with an air compressor can be potentially hazardous, so it is important to have the necessary protective gear. This can include safety glasses to protect your eyes from debris, hearing protection to prevent damage from loud noises, and gloves to protect your hands while handling equipment.
Additional Accessories
Depending on your specific needs, you may also require additional accessories such as air hoses, connectors, and fittings. These accessories will enable you to connect the air compressor to various tools or devices, allowing you to utilize the compressed air for different applications.
By ensuring that you have all the required equipment before setting the PSI on your air compressor, you can ensure safe and effective operation of the machine. Having the right tools will help you achieve the desired pressure level and make the necessary adjustments for your specific tasks.
Turn on the Air Compressor
To start using your air compressor, follow these steps:
- Check the power source: Ensure that the air compressor is plugged into a suitable power outlet. Make sure the power source can handle the voltage requirements of the compressor.
- Prepare the compressor: Before turning on the air compressor, ensure that it is placed on a stable surface. Make sure the compressor is in a well-ventilated area and there is sufficient space around it for proper airflow.
- Connect accessories: Connect any air hoses or tools that you will be using with the air compressor. Make sure the connections are secure and there are no leaks.
- Turn on the compressor: Locate the power switch or button on the air compressor and turn it on. You may need to adjust the pressure settings at this point if required.
- Allow the compressor to build pressure: Once the compressor is turned on, it will start building up pressure in the tank. You can monitor the pressure gauge to see when the desired PSI (pounds per square inch) is reached.
Note: It is important to read the manufacturer’s instructions and safety guidelines before operating the air compressor. Following proper safety procedures is essential to avoid accidents and injuries.
Starting the Machine
1. Checking the Power Source
Before starting the air compressor, it is important to ensure that it is properly connected to a power source. Check the power cord for any signs of damage or wear. Make sure the power outlet is working and can provide the appropriate voltage for the machine to operate.
2. Inspecting the Safety Features
Prior to starting the machine, it is crucial to inspect the safety features to prevent any accidents or injuries. Check if the emergency shut-off switch is easily accessible and functioning properly. Verify if the pressure relief valve is in place and not leaking.
3. Turning On the Machine
To start the air compressor, locate the power switch or button and turn it on. Wait for the machine to reach its initial operating pressure before proceeding with any adjustments. This ensures that the compressor is ready and functioning optimally.
4. Checking the Oil Level
Some air compressors require lubrication in the form of oil. Check the oil level before using the machine. If the oil level is low, top it up with the appropriate type and amount of oil as specified in the manufacturer’s instructions. This helps to maintain proper functioning and extend the lifespan of the compressor.
5. Monitoring Initial Operations
Once the air compressor is turned on, keep an eye on its initial operations. Observe for any unusual noises or vibrations that may indicate a problem. Watch the pressure gauge to ensure that the machine is building up pressure correctly. If any issues arise, it is important to address them immediately.
- Ensure proper power connection
- Inspect safety features
- Turn on the machine
- Check oil level
- Monitor initial operations
Adjust the Pressure Regulator
The pressure regulator on an air compressor allows you to control the amount of pressure that is being delivered to your tools or equipment. It is an important component that ensures the proper functioning of your air compressor.
To adjust the pressure regulator, follow these steps:
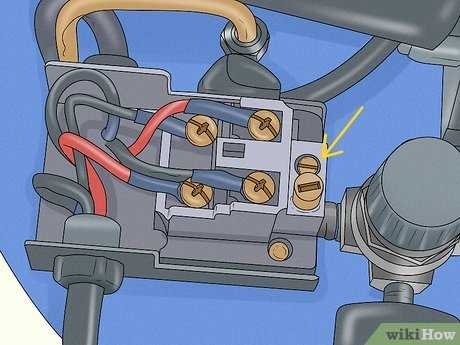
- Locate the pressure regulator on your air compressor. It is usually located near the air outlet.
- Check the manual or the label on the pressure regulator to determine the maximum pressure rating.
- Turn on the air compressor and let it build up pressure.
- Once the desired pressure is reached, use a pressure gauge to measure the current pressure. This will help you determine how much you need to adjust the pressure regulator.
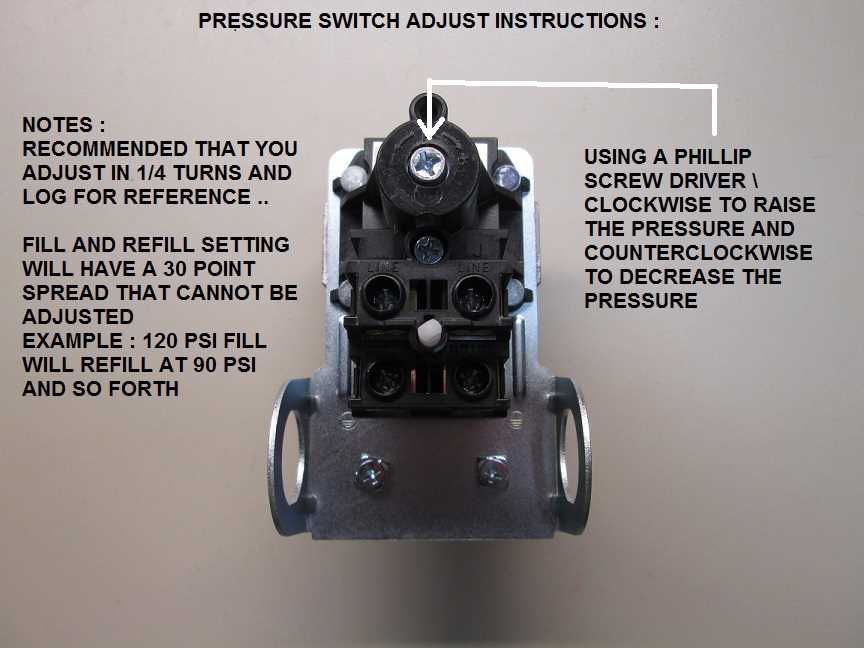
- Using the adjustment knob or screw on the pressure regulator, make small adjustments to increase or decrease the pressure. Turn the knob or screw clockwise to increase the pressure, and counterclockwise to decrease it.
- After making an adjustment, wait for the air compressor to build up pressure again and use the pressure gauge to measure the new pressure.
- Repeat the process of making small adjustments and measuring the pressure until you reach the desired level. Be sure to stay within the maximum pressure rating of the pressure regulator.
Note: It is important to periodically check and adjust the pressure regulator to ensure that your air compressor is delivering the correct amount of pressure for your specific needs. Remember to always wear appropriate safety gear and follow the manufacturer’s instructions when working with an air compressor.
Controlling the PSI
Controlling the PSI (pounds per square inch) on an air compressor is essential for achieving optimal performance and safety. The PSI determines the amount of pressure the compressor will deliver, and it can be adjusted to suit different tasks and requirements.
1. Pressure Regulator
A pressure regulator is a key component in controlling the PSI of an air compressor. It is usually located near the outlet of the compressor and allows you to adjust the pressure according to your needs. Turning the regulator knob clockwise increases the pressure, while turning it counterclockwise decreases the pressure.
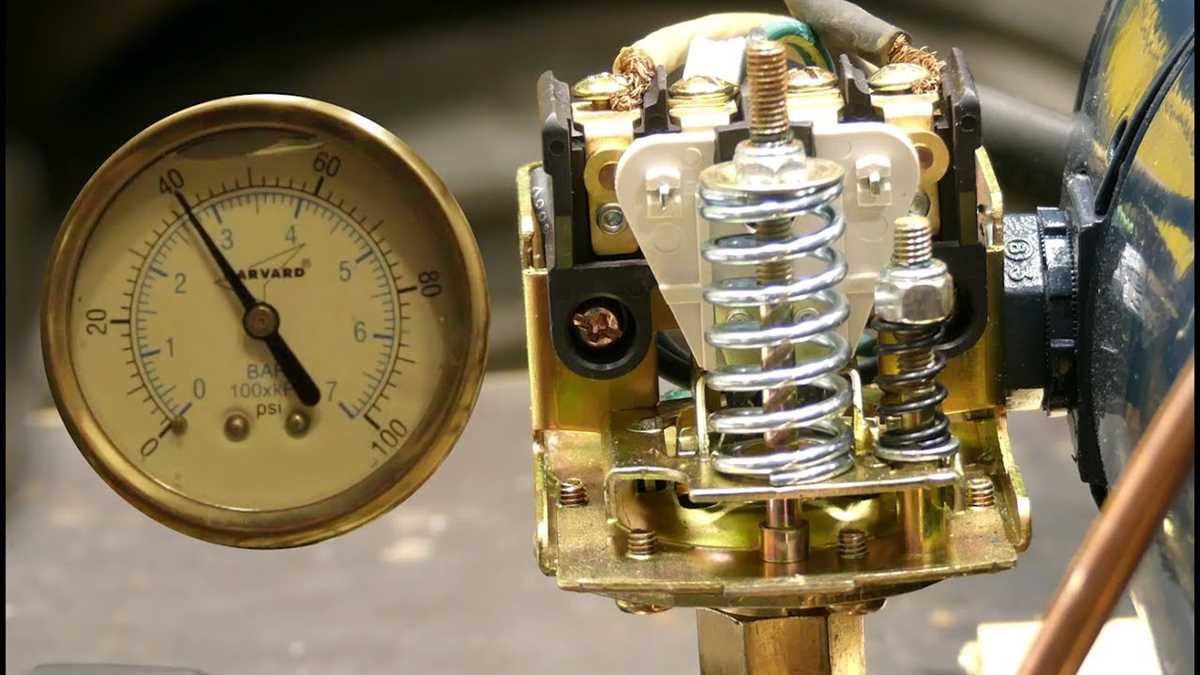
2. PSI Gauge
To accurately set the PSI on an air compressor, you need to monitor it using a PSI gauge. The gauge displays the current pressure level, allowing you to make adjustments as needed. It is important to refer to the manufacturer’s guidelines or specific task requirements to determine the appropriate PSI setting.
3. Safety Precautions
When controlling the PSI on an air compressor, it is crucial to prioritize safety. Excessive pressure can lead to equipment damage, leaks, or even explosions. Always start with a lower PSI setting and gradually increase it until the desired pressure is achieved. Regularly inspect the compressor for any signs of wear or damage and ensure that all connections are secure.
Note: It is important to wear appropriate safety gear, such as safety goggles and gloves, when working with an air compressor. Always follow the manufacturer’s instructions and guidelines for the specific model you are using.
In conclusion, controlling the PSI on an air compressor is a crucial step in achieving optimal performance and safety. By properly adjusting the pressure regulator and monitoring the PSI gauge, you can ensure that the compressor delivers the necessary pressure for the task at hand. Remember to prioritize safety and follow the manufacturer’s guidelines to prevent any potential accidents or damages.
Monitor the Pressure Gauge
One of the most important aspects of setting the PSI on an air compressor is to monitor the pressure gauge. The pressure gauge is the device on the compressor that displays the current psi (pounds per square inch) reading. It is crucial to keep an eye on this gauge to ensure the compressor is running at the desired pressure.
When monitoring the pressure gauge, check for any fluctuations or inconsistencies in the psi reading. If the gauge shows a lower or higher psi than the desired setting, it may indicate that adjustments need to be made to the compressor.
It is also important to monitor the pressure gauge while operating the air compressor. The gauge should not fluctuate drastically while the compressor is running. If there are significant changes in the psi reading, it may indicate a problem with the compressor or the air tool being used.
Another aspect to consider when monitoring the pressure gauge is to ensure it is accurate. Over time, the gauge may become less reliable and give inaccurate readings. It is recommended to periodically calibrate the gauge or replace it if necessary to ensure accurate psi readings.
By regularly monitoring the pressure gauge, you can effectively set and maintain the desired psi on your air compressor. This will help ensure optimal performance and efficiency when using air tools or inflating tires.
Checking the PSI Reading
Before using an air compressor, it is important to check the PSI (pounds per square inch) reading to ensure it is set correctly for your specific needs.
To check the PSI reading on an air compressor, locate the pressure gauge on the front or top of the compressor. The pressure gauge will have markings that indicate the current PSI level.
Once you have located the pressure gauge, double-check that the air compressor is turned off. This will prevent the gauge from giving a false reading.
Next, carefully remove the dust cap from the pressure gauge. Use your grip firmly, but gently, to avoid damaging the gauge.
After removing the dust cap, take a moment to visually inspect the pressure gauge. Look for any signs of damage or wear that could affect the accuracy of the reading. If you notice any issues, it is recommended to have the gauge replaced or repaired before using the air compressor.
With the pressure gauge in hand, turn on the air compressor. As the compressor builds up pressure, you will see the needle on the pressure gauge start to move. Keep a close eye on the needle until it reaches the desired PSI level.
If the needle overshoots the desired PSI level, use the pressure relief valve to release excess pressure. This will help prevent any potential damage or safety hazards.
Once the needle reaches the desired PSI level, turn off the air compressor and carefully replace the dust cap on the pressure gauge. This will help protect the gauge from dust and debris when not in use.
By regularly checking the PSI reading on your air compressor, you can ensure that it is set correctly for each specific job, allowing for efficient and safe use of the compressor.
FAQ:
What is PSI?
PSI stands for pounds per square inch and is a unit of measurement used to quantify the pressure of a gas or liquid. In the context of an air compressor, PSI refers to the amount of pressure the compressor can generate.
Why is it important to set the PSI on an air compressor?
Setting the PSI on an air compressor is important because it determines the amount of pressure the compressor will deliver. Different tools and equipment require different levels of pressure to operate effectively, so setting the PSI correctly is essential for the proper functioning of the tools.
How do I determine the correct PSI for my air compressor?
Determining the correct PSI for your air compressor depends on the specific tools or equipment you will be using. Consult the manufacturer’s recommendations or user manual for each tool to find the recommended PSI range. Additionally, you can consider factors such as the type of work you will be doing and the material you will be working with to determine the appropriate PSI.
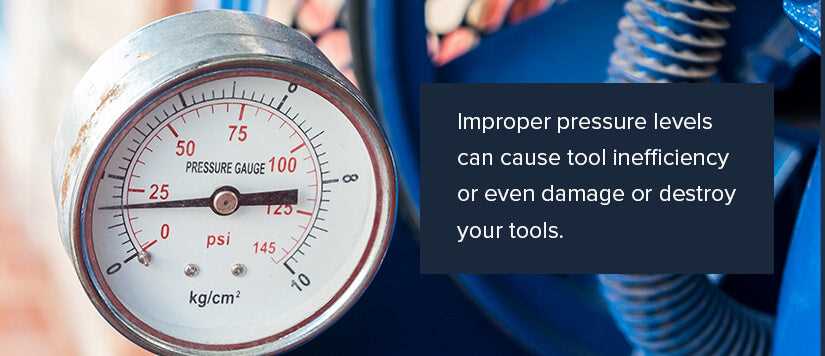
What happens if I set the PSI too high on my air compressor?
Setting the PSI too high on your air compressor can lead to several issues. It can cause damage to the tools or equipment you are using, as they may not be designed to handle that level of pressure. It can also increase the risk of accidents or injuries if the high pressure causes components to fail or burst. Additionally, setting the PSI too high can result in increased energy consumption and a shorter lifespan for the air compressor.
Can I set the PSI on my air compressor to any value?
No, you cannot set the PSI on your air compressor to any value. Each air compressor has a maximum PSI rating specified by the manufacturer, and you should not exceed this limit to avoid damaging the compressor. Within the maximum limit, you can adjust the PSI based on the requirements of the tools or equipment you are using.
How do I adjust the PSI on my air compressor?
The method for adjusting the PSI on an air compressor depends on the specific model and design of the compressor. In general, you will have a pressure regulator knob or dial that allows you to increase or decrease the pressure. Consult the user manual for your specific air compressor for detailed instructions on how to adjust the PSI.
Can I use the same PSI setting for all my tools and equipment?
No, you should not use the same PSI setting for all your tools and equipment. Different tools and equipment have different pressure requirements for optimal performance. It is important to adjust the PSI based on the specific requirements of each tool or equipment you are using. Using the wrong PSI setting can result in inefficient operation and potential damage to the tools.
Video:


Harrison Clayton
Meet Harrison Clayton, a distinguished author and home remodeling enthusiast whose expertise in the realm of renovation is second to none. With a passion for transforming houses into inviting homes, Harrison's writing at https://thehuts-eastbourne.co.uk/ brings a breath of fresh inspiration to the world of home improvement. Whether you're looking to revamp a small corner of your abode or embark on a complete home transformation, Harrison's articles provide the essential expertise and creative flair to turn your visions into reality. So, dive into the captivating world of home remodeling with Harrison Clayton and unlock the full potential of your living space with every word he writes.


