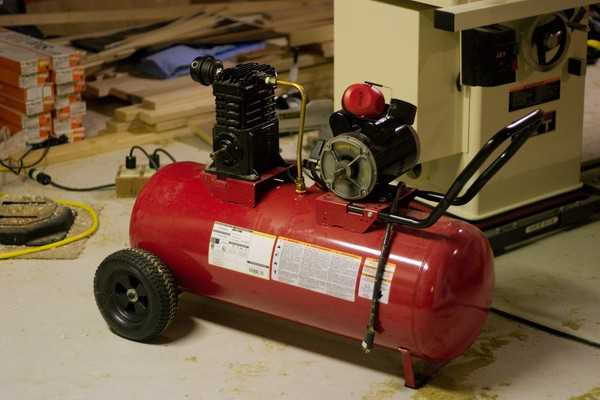
Fixing an Air Compressor Tank Leak: A Step-by-Step Guide

If you own an air compressor, you may encounter issues with the tank leaking. A leaking tank can be not only frustrating but also dangerous. It can decrease the efficiency of the compressor and lead to potential accidents. However, fixing a tank leak is not as difficult as it may seem. With the right tools and a step-by-step guide, you can repair the leak and extend the lifespan of your air compressor.
Step 1: Safety First. Before you begin any repair work, it is essential to prioritize safety. Turn off the air compressor and unplug it from the power source. Release any pressure in the tank by opening the drain valve. Wear protective gear, such as gloves and safety glasses, to prevent injuries during the repair process.
Step 2: Identify the Source of the Leak. The next step is to locate the precise area where the tank is leaking. Inspect the tank thoroughly and look for any visible cracks, holes, or damaged fittings. You may need to use soapy water and a brush to identify smaller leaks that are not immediately noticeable. Mark the location of the leak with a marker or tape for easy reference during the repair.
Step 3: Prepare the Tank Surface. To ensure a proper and long-lasting repair, the tank surface needs to be clean and free from any debris or rust. Use a wire brush or sandpaper to remove any rust or paint around the area where the leak is located. Clean the surface with a mild detergent and water solution, and then dry it thoroughly.
Step 4: Apply the Patching Material. To fix the tank leak, you will need to use a suitable patching material. Epoxy, specialized tank sealants, or metal patches are commonly used for this purpose. Follow the manufacturer’s instructions carefully and apply the patching material evenly over the leak, ensuring complete coverage. Allow the patching material to dry and cure according to the recommended time.

Step 5: Test for Leaks. After the patching material has thoroughly dried, it is important to test for any remaining leaks. Reconnect the air compressor and pressurize the tank. Use soapy water and a brush to check for any bubbles or signs of escaping air around the repaired area. If there are no visible signs of leaks, you have successfully fixed the air compressor tank leak.
Step 6: Perform Regular Maintenance. To prevent future tank leaks, it is crucial to perform regular maintenance on your air compressor. Regularly inspect the tank, fittings, and hoses for any signs of wear or damage. Keep the tank clean and free from moisture or debris. Change the oil and replace any worn-out parts as necessary. By following a maintenance routine, you can prolong the life of your air compressor and avoid potential leaks in the future.
In conclusion, fixing an air compressor tank leak is a manageable task if you approach it step by step. Ensuring safety, identifying the leak, preparing the tank surface, applying the patching material, testing for leaks, and maintaining the air compressor are all essential steps in the repair process. By following this guide, you can save money on repairs and keep your air compressor functioning efficiently for years to come.
What is an Air Compressor Tank Leak?
An air compressor tank leak refers to the unintentional release of compressed air from the tank of an air compressor. This type of leak can occur for several reasons, including corrosion, wear and tear, manufacturing defects, or improper maintenance. When a tank leak occurs, it can lead to a significant reduction in air pressure and may also pose safety risks.

One common cause of air compressor tank leaks is corrosion. Over time, moisture can accumulate inside the tank, leading to the formation of rust. The rust can weaken the tank’s metal structure and cause small holes or cracks to develop. These openings allow compressed air to escape, resulting in a loss of pressure.
Another potential cause of tank leaks is wear and tear. As an air compressor is used regularly, the constant expansion and contraction of the tank due to temperature changes can gradually weaken the metal. This can lead to the development of fissures or other openings through which compressed air can leak.
In some cases, air compressor tank leaks may be the result of manufacturing defects. If a tank is not properly constructed or welded, it may have weak points that are more susceptible to developing leaks. These defects may not be immediately apparent and can become apparent over time as the tank is subjected to pressure and stress.
Proper maintenance is crucial to preventing tank leaks. Regularly inspecting the tank for signs of corrosion or damage and addressing any issues promptly can help prolong the lifespan of the tank and prevent leaks. Additionally, following manufacturer guidelines for draining moisture from the tank and using appropriate sealants or coatings can also help prevent corrosion and minimize the risk of leaks.
Why is Fixing an Air Compressor Tank Leak Important?

An air compressor tank leak can have serious consequences and it is important to fix it as soon as possible. Here are a few reasons why fixing an air compressor tank leak is important:
1. Safety:
Fixing an air compressor tank leak is important for safety reasons. A leak in the tank can result in a build-up of pressure, which can lead to an explosion or a sudden release of pressure, causing injuries to anyone nearby. By fixing the leak, you are ensuring the safety of yourself and those around you.
2. Efficiency:

A leak in the air compressor tank can impact its efficiency. The compressor will have to work harder and longer to maintain the desired pressure, resulting in increased energy consumption and higher utility bills. Fixing the leak will ensure that the compressor operates efficiently and saves energy.
3. Cost savings:
Fixing an air compressor tank leak can help save money in the long run. By addressing the issue promptly, you prevent further damage to the tank and components, which could lead to more costly repairs or even the need for a replacement. Additionally, by improving the efficiency of the compressor, you will be able to save on energy costs.
4. Extended lifespan:
Regular maintenance and fixing any leaks in the air compressor tank can help extend its lifespan. By taking care of leaks promptly, you prevent rust, corrosion, and other damage that can shorten the life of the tank. This ensures that your air compressor lasts longer and performs optimally.
5. Environmental impact:
Air compressor leaks contribute to unnecessary air loss, which has an impact on the environment. By fixing the leak, you reduce air wastage and minimize your carbon footprint. This demonstrates a commitment to sustainability and environmental responsibility.
In conclusion, fixing an air compressor tank leak is important for safety, efficiency, cost savings, longevity, and environmental impact. It is essential to address the issue promptly to avoid any potential accidents, minimize energy consumption, save money, and ensure the longevity of the air compressor.
Step 1: Safety Precautions
In order to safely fix an air compressor tank leak, it is important to follow a series of safety precautions to prevent any accidents or injuries.
1. Wear Protective Gear
Before starting any repairs, make sure to wear appropriate protective gear, such as safety glasses, gloves, and closed-toe shoes. This will help protect you from any debris, sharp edges, or chemicals that may be involved in the repair process.
2. Disconnect Power
Prior to working on the air compressor tank, ensure that it is completely disconnected from any power sources. This means unplugging it from the electrical outlet and ensuring that any switches are turned off. This will minimize the risk of electrical shock during the repair.
3. Depressurize the Tank
Next, it is crucial to release any built-up pressure in the air compressor tank. This can be done by unplugging the drain valve and allowing the air to escape until the tank is fully depressurized. Failure to do so can result in sudden release of pressurized air, which can be dangerous.
4. Use Proper Tools
When repairing the air compressor tank, always use the appropriate tools for the job. This may include wrenches, pliers, or a repair kit specifically designed for fixing leaks. Avoid using makeshift tools or excessive force, as this can lead to further damage or injury.

5. Work in a Well-Ventilated Area
Lastly, make sure to work in a well-ventilated area to avoid inhaling any fumes or gases that may be present during the repair process. If necessary, use a fan or open windows and doors to improve air circulation and maintain a safe working environment.
Gather the Necessary Safety Equipment
When fixing an air compressor tank leak, it is important to prioritize safety. Before starting any repairs, make sure you have the necessary safety equipment on hand to protect yourself and others. This equipment will help minimize potential risks and keep you safe throughout the process.
Safety goggles: Protect your eyes from debris, sparks, and other potential hazards during the repair process. Make sure they fit properly and are rated for the type of work you will be doing.
Gloves: Wear gloves to protect your hands from cuts, burns, and chemicals. Choose gloves made of a durable material that will provide both comfort and protection.

Ear protection: Working with air compressors can be loud, so it is important to protect your hearing. Wear earplugs or earmuffs to minimize the risk of hearing damage.
Dust mask or respirator: Depending on the type of repair you are doing, there may be dust, fumes, or other airborne particles present. Protect your lungs by wearing a dust mask or respirator.
Fire extinguisher: Keep a fire extinguisher nearby in case of accidental fires. Make sure it is fully charged and easily accessible.
First aid kit: Accidents can happen, so it is always good to have a well-stocked first aid kit nearby. Make sure it includes basic supplies like bandages, antiseptic wipes, and sterile gloves.
By gathering and using the necessary safety equipment, you can reduce the risk of injuries and ensure a safe repair process. Remember to always follow safety guidelines and use caution when working with air compressor tanks.
Turn Off and Disconnect the Air Compressor
Before starting any repair work on the air compressor tank leak, it is important to turn off and disconnect the air compressor from the power source. This will prevent any accidents and ensure your safety throughout the process.
The first step is to locate the power switch or knob on the air compressor and turn it off. This will shut down the compressor and stop the flow of air. Once the compressor is turned off, unplug it from the power source to completely disconnect it.
Next, relieve any residual pressure in the tank by opening the drain valve or pulling the pressure relief valve. This will release any built-up air pressure and make it safer to work on the tank.
After disconnecting the air compressor and releasing the pressure, it’s a good idea to inspect the power cord and make sure it is in good condition. Look for any signs of fraying or damage and replace the cord if necessary.
By turning off and disconnecting the air compressor, you are taking the necessary precautions to ensure your safety and prevent any accidents while working on the tank leak. Remember to always follow safety guidelines and wear appropriate protective gear throughout the repair process.
Step 2: Locating the Leak
Once you have determined that your air compressor tank is indeed leaking, the next step is to locate the specific site of the leak. This can be done by following these steps:
- Inspect the tank visually for any signs of water or oil buildup. This could indicate the general area of the leak.
- Using a soapy water solution, carefully apply it to the suspected area of the tank. The soap bubbles will reveal any escaping air.
- If the leak is not immediately obvious, you may need to pressurize the tank. Attach an air hose to the tank’s valve and inflate it to a safe pressure level.
- Listen for any hissing or air escaping sounds that could indicate the location of the leak.
- If the leak is still not apparent, try feeling around the tank surface for any areas that feel colder than the surrounding metal. This could indicate a refrigerant leak.
Note: Be cautious when pressurizing the tank and do not exceed the recommended pressure limit. Always wear protective gloves and eye goggles when working with air compressors.
Once you have successfully located the leak, proceed to the next step to fix the issue.
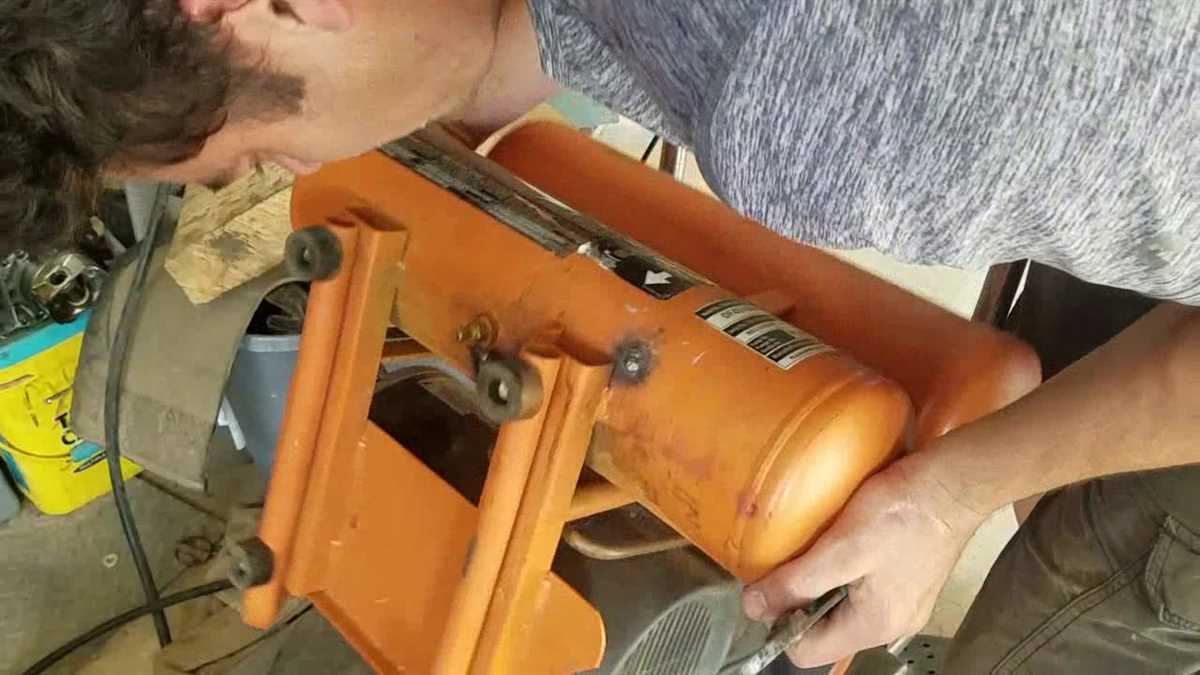
Inspect the Air Compressor Tank
Inspecting the air compressor tank is an important step in fixing any leaks. Begin by turning off and unplugging the air compressor to ensure safety during the inspection process.
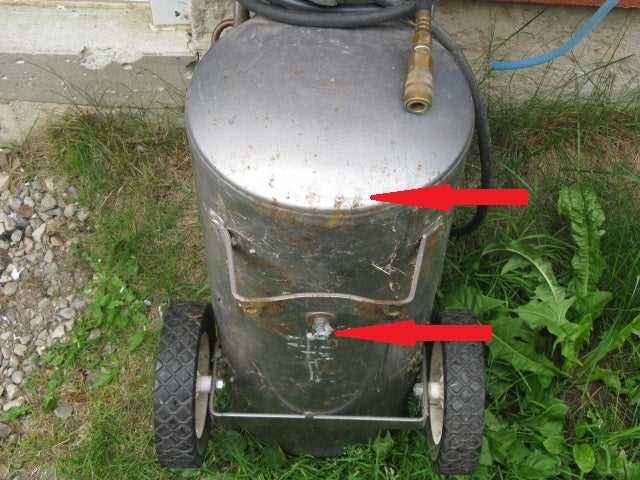
First, visually examine the entire surface of the tank for any visible signs of damage, such as dents, cracks, or rust. Pay close attention to the welds and seams, as these are common areas for leaks to occur.
Next, use your hand to feel for any abnormalities, such as rough spots or bulges, which may indicate weak points in the tank. If you come across any areas that feel weaker or softer than the surrounding metal, this could be a sign of a potential leak.
In addition to a visual and tactile inspection, it is also important to listen for any unusual sounds coming from the tank. If you hear hissing or rushing air when the compressor is powered on, this could indicate a leak in the tank.
Finally, inspect the fittings, valves, and gauges connected to the tank for any signs of damage or loose connections. Tighten any loose fittings and replace any damaged parts as needed.
Identify the Source of the Leak
When you notice a leak in your air compressor tank, the first step is to identify the source of the problem. By locating the source of the leak, you can determine the best course of action for fixing it.
The most common sources of air compressor tank leaks are the drain valve, pressure relief valve, and fittings. Start by visually inspecting these areas for any signs of leakage. Look for visible cracks, holes, or loose connections that could be causing the leak.
If you’re having trouble identifying the exact source of the leak, you can use a soapy water solution. Apply the solution around the suspected areas and look for any bubbles forming. Bubbles indicate that air is escaping from the tank, pinpointing the location of the leak.
Once you have identified the source of the leak, take note of the specific part or fitting that needs to be fixed or replaced. This will help you determine the materials and tools you’ll need for the repair.
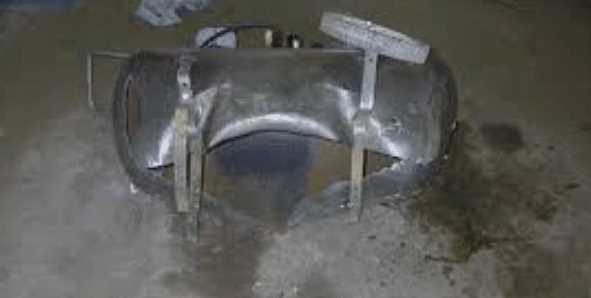
Step 3: Repairing the Leak
1. Identify the source of the leak
Before you can repair the air compressor tank leak, you need to locate where the leak is coming from. Inspect the tank thoroughly and look for any signs of moisture, rust, or damage. Pay close attention to the seams and welds, as these are common areas where leaks can occur.
2. Clean the area around the leak
Once you have identified the source of the leak, it is important to clean the area thoroughly before attempting any repairs. Use a cleaning solvent or a degreaser to remove any dirt, oil, or debris that may be present. This will ensure that the repair material adheres properly to the surface of the tank.
3. Choose the appropriate repair method
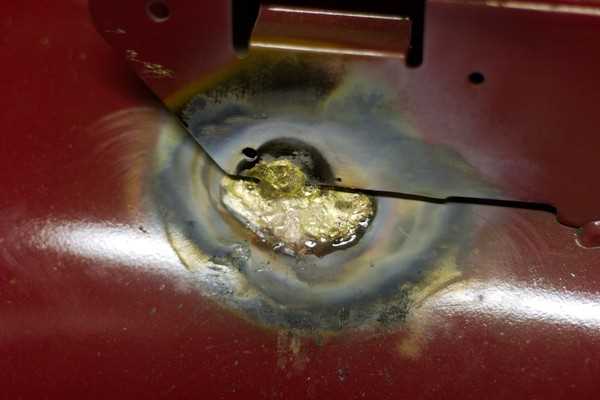
There are several methods that can be used to repair an air compressor tank leak, depending on the size and severity of the leak. Common repair methods include welding, epoxy resin, and rubber patch kits. Consider the pros and cons of each method and choose the one that is best suited for your specific situation.
4. Welding the leak (if applicable)
If the leak is large or located in a critical area of the tank, welding may be necessary. This should only be done by a qualified professional with experience in welding air compressor tanks. Make sure to follow all safety precautions and adhere to proper welding techniques to ensure a secure and lasting repair.
5. Applying epoxy resin or using a rubber patch kit
If the leak is small or located in a less critical area of the tank, epoxy resin or a rubber patch kit can be used to repair the leak. Follow the manufacturer’s instructions carefully and apply the repair material to the cleaned area. Allow sufficient time for the material to cure, and test the repair for any leaks before operating the air compressor again.
Remember, repairing an air compressor tank leak should be done with caution and attention to detail. If you are unsure about how to proceed or if the leak is extensive, it is best to consult a professional for assistance. Properly repairing the leak will help ensure the safe and efficient operation of your air compressor.
Clean and Prepare the Surface
Before beginning the repair process, it is essential to clean and prepare the surface of the air compressor tank. This ensures that the repair materials adhere properly and effectively seal the leak.
Start by removing any loose debris or contaminants from the area around the leak. Use a brush or rag to sweep away any dirt, dust, or grease. It is important to have a clean surface for the repair materials to bond correctly.
Next, use a mild detergent or cleaner to thoroughly clean the surface. This will remove any remaining dirt or grease that could hinder the adhesion process. Rinse the area with clean water and allow it to dry completely before moving on to the next step.
After the surface is clean and dry, it may be necessary to roughen it slightly for better adhesion. Use sandpaper or a wire brush to gently roughen the area around the leak. Be careful not to apply too much pressure or damage the metal surface.
Finally, wipe down the surface with a clean cloth to remove any remaining dust or debris. This will ensure that the repair materials adhere properly and provide a strong seal. Your air compressor tank is now ready for the repair process.
FAQ:
How can I fix a leak in my air compressor tank?
To fix a leak in your air compressor tank, you will need to drain the tank, locate the leak, and then clean and prepare the area around the leak. Next, you will need to apply epoxy or a sealing compound to the area and let it cure. Finally, you can test the tank for leaks and make any necessary adjustments.
What tools do I need to fix an air compressor tank leak?
To fix an air compressor tank leak, you will need a few tools including a wrench or socket set to remove any bolts or fittings, a wire brush or sandpaper to clean the area around the leak, and epoxy or a sealing compound to patch the leak. You may also need a compressor to test the tank for leaks.
How long does it take to fix an air compressor tank leak?
The time it takes to fix an air compressor tank leak can vary depending on the size and severity of the leak, as well as your level of experience. Generally, it can take anywhere from a few hours to a full day to fix a leak in an air compressor tank.
Can I use duct tape to fix an air compressor tank leak?
While duct tape may provide a temporary fix for a small air compressor tank leak, it is not a reliable long-term solution. It is best to use epoxy or a sealing compound specifically designed for repairing leaks in metal surfaces. These products will provide a more durable and lasting repair.
What should I do if the leak in my air compressor tank is large?
If the leak in your air compressor tank is large, it may be best to replace the tank altogether. Large leaks can be difficult to repair and may indicate more serious damage to the tank. It is recommended to consult a professional or contact the manufacturer for guidance on the best course of action.
Can I still use my air compressor if it has a small leak in the tank?
Using an air compressor with a small leak in the tank is not recommended. Even small leaks can affect the overall performance and efficiency of the compressor. Additionally, the leak may worsen over time and result in more significant damage to the tank. It is best to repair the leak before continuing to use the compressor.
Are there any safety precautions I should take when fixing an air compressor tank leak?
Yes, there are several safety precautions you should take when fixing an air compressor tank leak. Be sure to wear protective gloves and eyewear to prevent injury. Additionally, make sure the compressor is turned off and disconnected from power before beginning any repairs. Finally, be cautious when working with epoxy or sealing compounds, as they may emit fumes or be flammable.
Video:


Harrison Clayton
Meet Harrison Clayton, a distinguished author and home remodeling enthusiast whose expertise in the realm of renovation is second to none. With a passion for transforming houses into inviting homes, Harrison's writing at https://thehuts-eastbourne.co.uk/ brings a breath of fresh inspiration to the world of home improvement. Whether you're looking to revamp a small corner of your abode or embark on a complete home transformation, Harrison's articles provide the essential expertise and creative flair to turn your visions into reality. So, dive into the captivating world of home remodeling with Harrison Clayton and unlock the full potential of your living space with every word he writes.


