Easy Steps to Remove Pulley from Air Compressor Motor

Removing the pulley from an air compressor motor may seem like a daunting task, but with the right tools and a step-by-step approach, it can be done easily and safely. Whether you need to replace a worn-out pulley or make adjustments to the motor, this guide will provide you with the knowledge you need to get the job done.
Step 1: Before starting the removal process, always make sure to disconnect the power supply to the air compressor motor. Safety should be your top priority.
Step 2: Next, locate the set screw that holds the pulley in place. This screw is typically located on the side of the pulley hub and may require a hex key to loosen. Once the screw is loose, it is important to keep track of it to prevent loss.
Step 3: Once the set screw is removed, the pulley should slide off the motor shaft with some gentle tapping. If it does not budge, using a pulley removal tool can help apply the necessary force without damaging the motor.
Step 4: After the pulley is removed, inspect the motor shaft for any signs of wear or damage. Clean the shaft and apply a lubricant if necessary. Additionally, inspect the pulley for any signs of wear or damage that may need to be addressed before reinstalling or replacing it.

Step 5: Finally, when reassembling the parts, ensure the set screw is tightened securely to hold the pulley in place. Double-check that the power supply is still disconnected before testing the air compressor motor.
By following these easy steps, you can remove the pulley from an air compressor motor and make any necessary repairs or adjustments with confidence. Remember to prioritize safety and use the proper tools to avoid damaging the motor or other parts of the air compressor.
Safety Precautions for Removing Pulley
1. Disconnect the Power
Before attempting to remove the pulley from the air compressor motor, it is important to disconnect the power source. This can help prevent accidental starting of the motor while you are working on it, reducing the risk of injury.
2. Wear Protective Equipment

When removing the pulley, it is crucial to wear the appropriate protective equipment to ensure your safety. This may include safety goggles to protect your eyes from any debris that may fly off during the removal process, as well as gloves to protect your hands from any sharp edges.
3. Secure the Motor
Prior to removing the pulley, it is important to securely fasten and stabilize the air compressor motor. This can be done by using a clamp or a vise to secure the motor in place. This will help prevent any movement or shifting during the pulley removal process.
4. Use Proper Tools
Using the appropriate tools is essential when removing the pulley from the air compressor motor. This may include a pulley puller or an appropriate size wrench. Using the wrong tools can lead to damage to the motor or pulley, as well as increase the risk of injury.
5. Follow Manufacturer’s Instructions

Always refer to the manufacturer’s instructions or the user manual for your specific air compressor motor when removing the pulley. The manufacturer’s instructions will provide valuable guidance on the proper and safe removal process, helping to ensure your safety and the integrity of the motor.
Following these safety precautions can help minimize the risk of accidents or injuries when removing a pulley from an air compressor motor. It is important to always prioritize safety and take the necessary steps to protect yourself and the equipment you are working on.
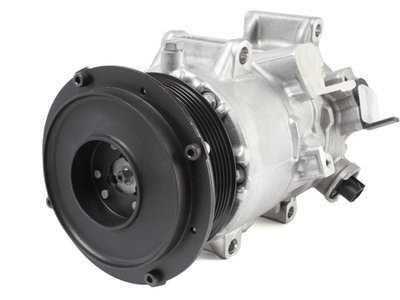
Tools Required for Pulley Removal
If you need to remove the pulley from your air compressor motor, there are a few tools that you will need to have on hand. These tools will help you safely and efficiently remove the pulley without causing any damage to the motor or other components. Here are the essential tools required for pulley removal:
- Socket set: A socket set with a variety of sizes will be necessary to fit the different bolts and fasteners that may be securing the pulley to the motor.
- Wrench: A wrench will come in handy for loosening and tightening any bolts or nuts that need to be removed.
- Pulley puller: This specialized tool is designed specifically for removing pulleys. It provides a safe and effective way to pull the pulley off the motor shaft without causing any damage.
- Hammer: A hammer can be used to tap lightly on the pulley or puller to help loosen the pulley if it is stuck.
- Protective gloves: It is always a good idea to wear protective gloves when working with tools to protect your hands from potential injuries.
- Safety glasses: Safety glasses are essential for protecting your eyes from any flying debris or particles that may be released during the pulley removal process.
Having these tools on hand will ensure that you have everything you need to safely and successfully remove the pulley from your air compressor motor. Remember to always follow proper safety precautions and consult the manufacturer’s instructions before attempting any repairs or maintenance on your equipment.
Disconnecting Power Supply before Removing Pulley
Step 1: Safety First
To ensure your safety, it is crucial to disconnect the power supply before attempting to remove the pulley from the air compressor motor. This will prevent any accidental start-up of the motor and reduce the risk of electrical shock. Take the necessary precautions by wearing protective gloves and goggles.

Step 2: Locate the Power Supply
Identify the power source that is supplying electricity to the air compressor motor. This is typically located either on the motor itself or on a nearby wall. Follow the power cord from the motor to the power source to ensure you have identified the correct supply.
Step 3: Switch off the Power
Once you have located the power supply, switch it off by either unplugging it from the wall or using the designated switch if available. Make sure the power is completely disconnected by testing the motor to ensure it does not start up before proceeding.
Step 4: Double Check the Power Supply
Before starting the pulley removal process, double-check that the power supply is disconnected. Look for any visual indicators such as lights or display screens on the air compressor motor to confirm it is powered off.
Step 5: Proceed with Pulley Removal
With the power supply successfully disconnected, you can now proceed with removing the pulley from the air compressor motor. Follow the remaining steps outlined in the guide to safely and effectively remove the pulley.

Remember, safety should always be the top priority when working with any machinery. Taking the time to disconnect the power supply before removing the pulley will help ensure a smooth and accident-free process.
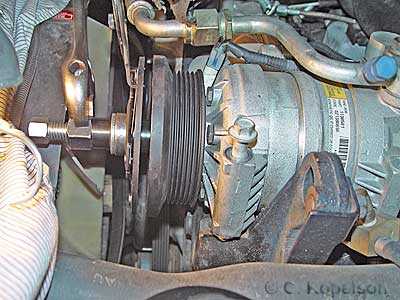
Loosening the Belt before Pulley Removal
Before removing the pulley from the air compressor motor, it is important to first loosen the belt. This will ensure that the belt is not under tension and will make it easier to remove the pulley.
To loosen the belt, start by locating the tensioner pulley. This is typically a smaller pulley that is connected to a spring-loaded arm. The tensioner pulley is used to adjust the tension of the belt.
Using a socket wrench or a spanner, rotate the tensioner pulley in the direction that loosens the belt. This may require some force, so be sure to use a tool with a comfortable grip. As you rotate the tensioner pulley, you will see the belt start to slacken. Continue rotating until there is enough slack in the belt to easily remove the pulley.
Once the belt is loosened, you can proceed with removing the pulley from the air compressor motor. Remember to take note of any washers or spacers that may be present on the pulley shaft, as these will need to be reinstalled correctly when reassembling the motor.
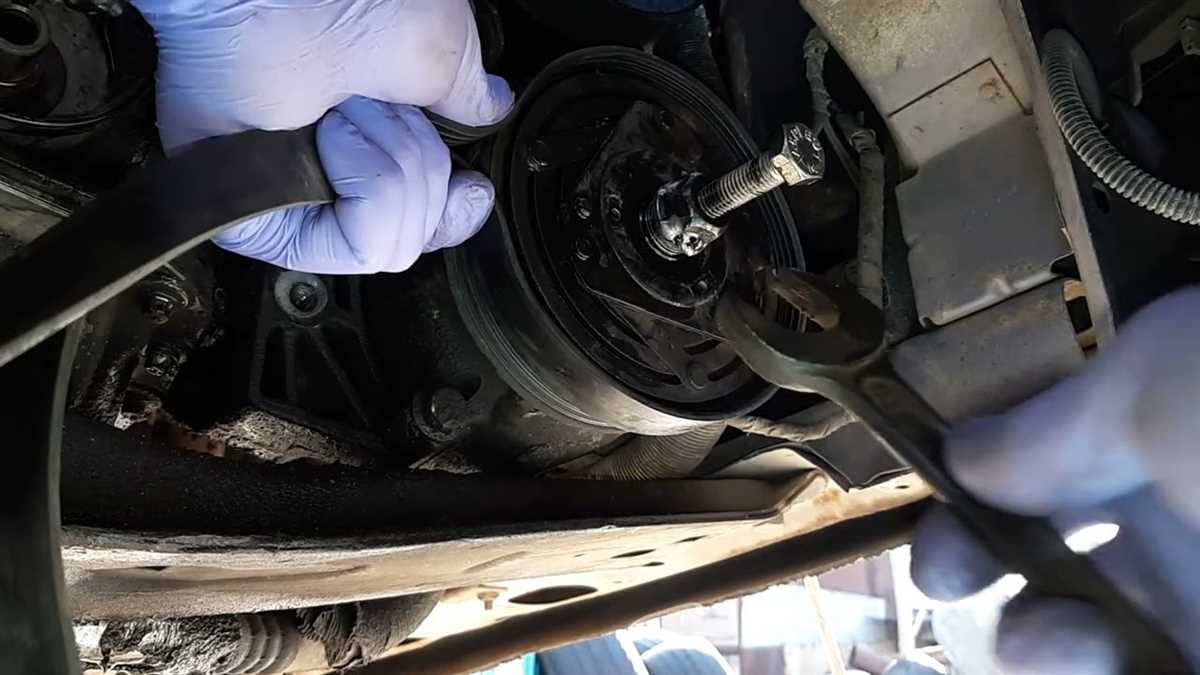
Removing Bolts Holding the Pulley
To remove the pulley from the air compressor motor, you will first need to locate the bolts that are holding it in place. These bolts are typically located around the circumference of the pulley and may require a socket wrench or a similar tool to remove.
Step 1: Begin by identifying the bolts that are securing the pulley to the motor shaft. Depending on the design of your air compressor, there may be two or more bolts that need to be removed.
Step 2: Once you have located the bolts, use a socket wrench or a similar tool to loosen them. Make sure to turn the wrench counterclockwise to loosen the bolts.
Step 3: If the bolts are stuck or difficult to loosen, you can try applying some penetrating oil to help loosen them. Allow the oil to soak in for a few minutes before attempting to loosen the bolts again.
Step 4: Once the bolts are loosened, you can remove them completely. Set them aside in a safe place where they won’t get lost.
Step 5: After removing all the bolts, the pulley should be free to be removed from the motor shaft. Carefully pull the pulley off the shaft, ensuring that you don’t damage any other components in the process.
By following these steps, you should be able to easily remove the pulley from the air compressor motor and proceed with any necessary repairs or replacements.
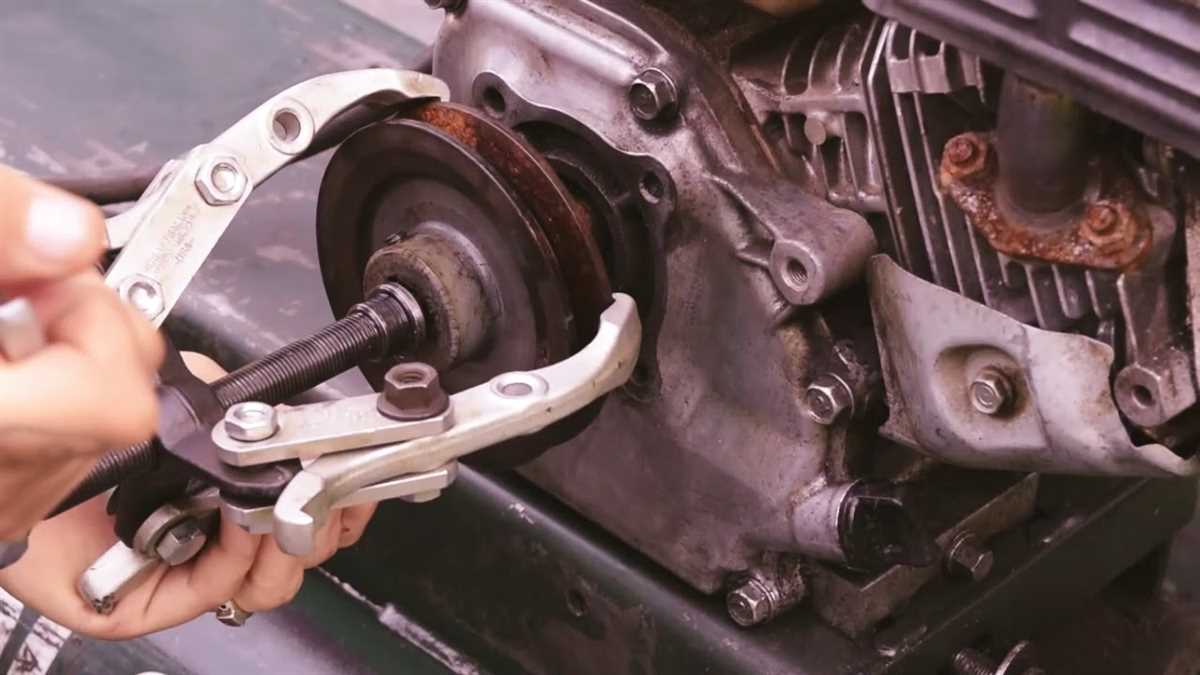
Using a Pulley Removal Tool
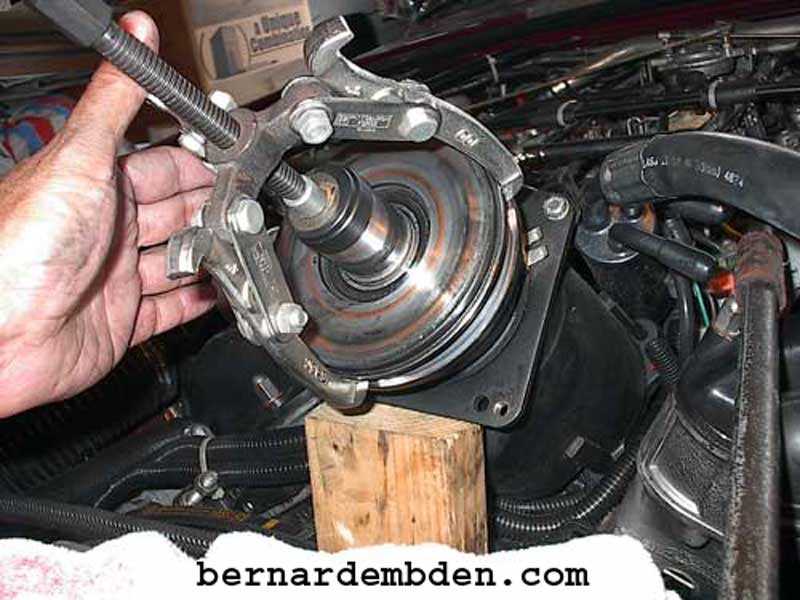
If you need to remove a pulley from an air compressor motor, using a pulley removal tool can make the process much easier and safer. A pulley removal tool is specifically designed to grip and remove pulleys from shafts without causing damage to the motor or the pulley itself.
Step 1: Prepare the pulley removal tool. Make sure the pulley removal tool is clean and in good condition. Check that all the components are properly assembled and functioning. Familiarize yourself with the different parts of the tool and how they work together.
Step 2: Disconnect power and release tension. Before working on the air compressor motor, disconnect the power source and release any tension on the pulley. This will help prevent any accidents or injuries during the removal process.
Step 3: Position the pulley removal tool. Place the pulley removal tool against the pulley, making sure that it is securely in position. The tool should be aligned with the shaft and the jaws should be centered on the pulley’s hub.
Step 4: Engage the pulley removal tool. Use the appropriate mechanism on the pulley removal tool to engage with the pulley. This could be a threaded rod, a cam lever, or another mechanism depending on the specific tool you are using. Follow the instructions that come with the tool to properly engage it with the pulley.
Step 5: Apply pressure and remove the pulley. Once the pulley removal tool is securely engaged with the pulley, begin applying pressure to remove the pulley from the motor shaft. This may require turning the rod on the tool, leveraging the lever, or using another method as instructed by the tool’s manufacturer.
Step 6: Repeat if necessary. If the pulley does not come off easily, repeat the process, applying more pressure if needed. Be careful not to exert excessive force that could damage the motor or the pulley.
Step 7: Inspect and clean. Once the pulley is successfully removed, carefully inspect both the pulley and the motor shaft for any signs of damage. Clean any debris or residue from the pulley removal tool and store it in a safe place for future use.
Step 8: Reassemble and test. If necessary, reassemble the air compressor motor with a new pulley or reinstall the original pulley. Secure it properly and test the motor to ensure it is functioning correctly.
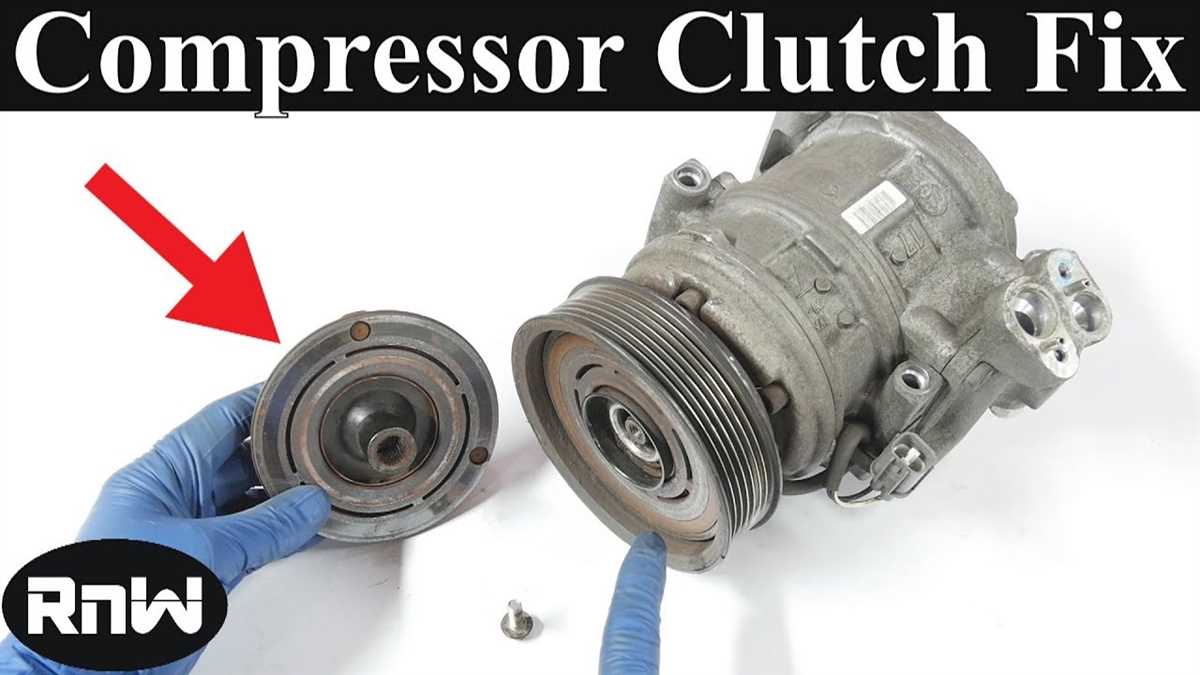
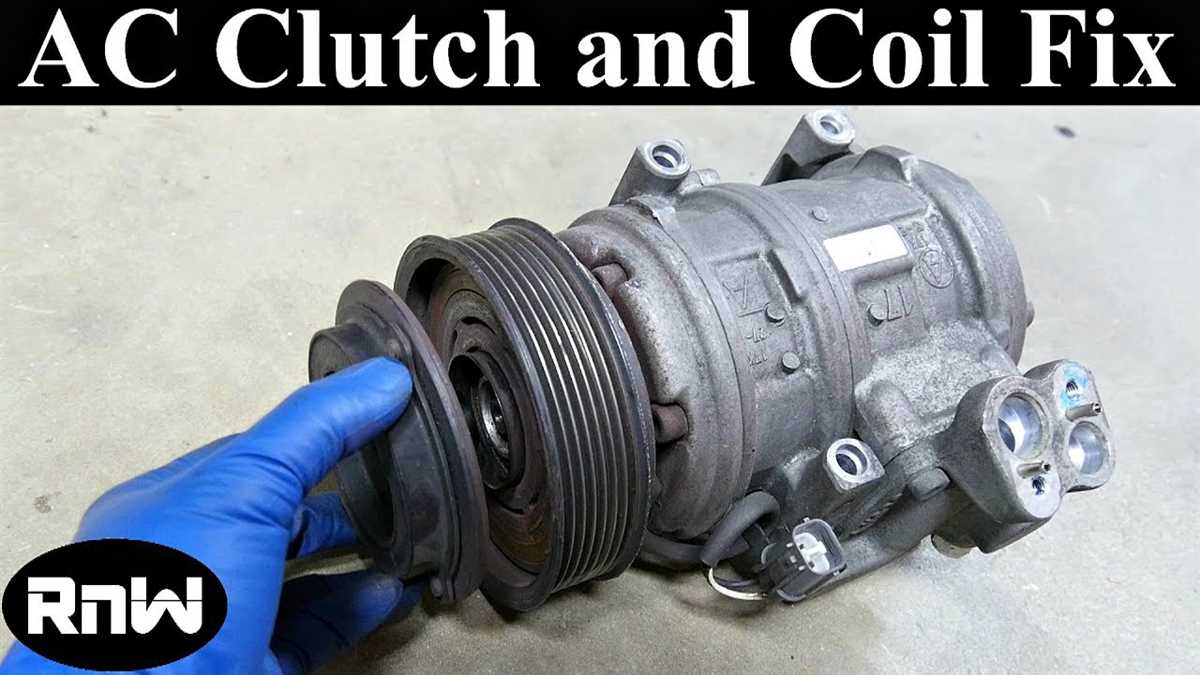
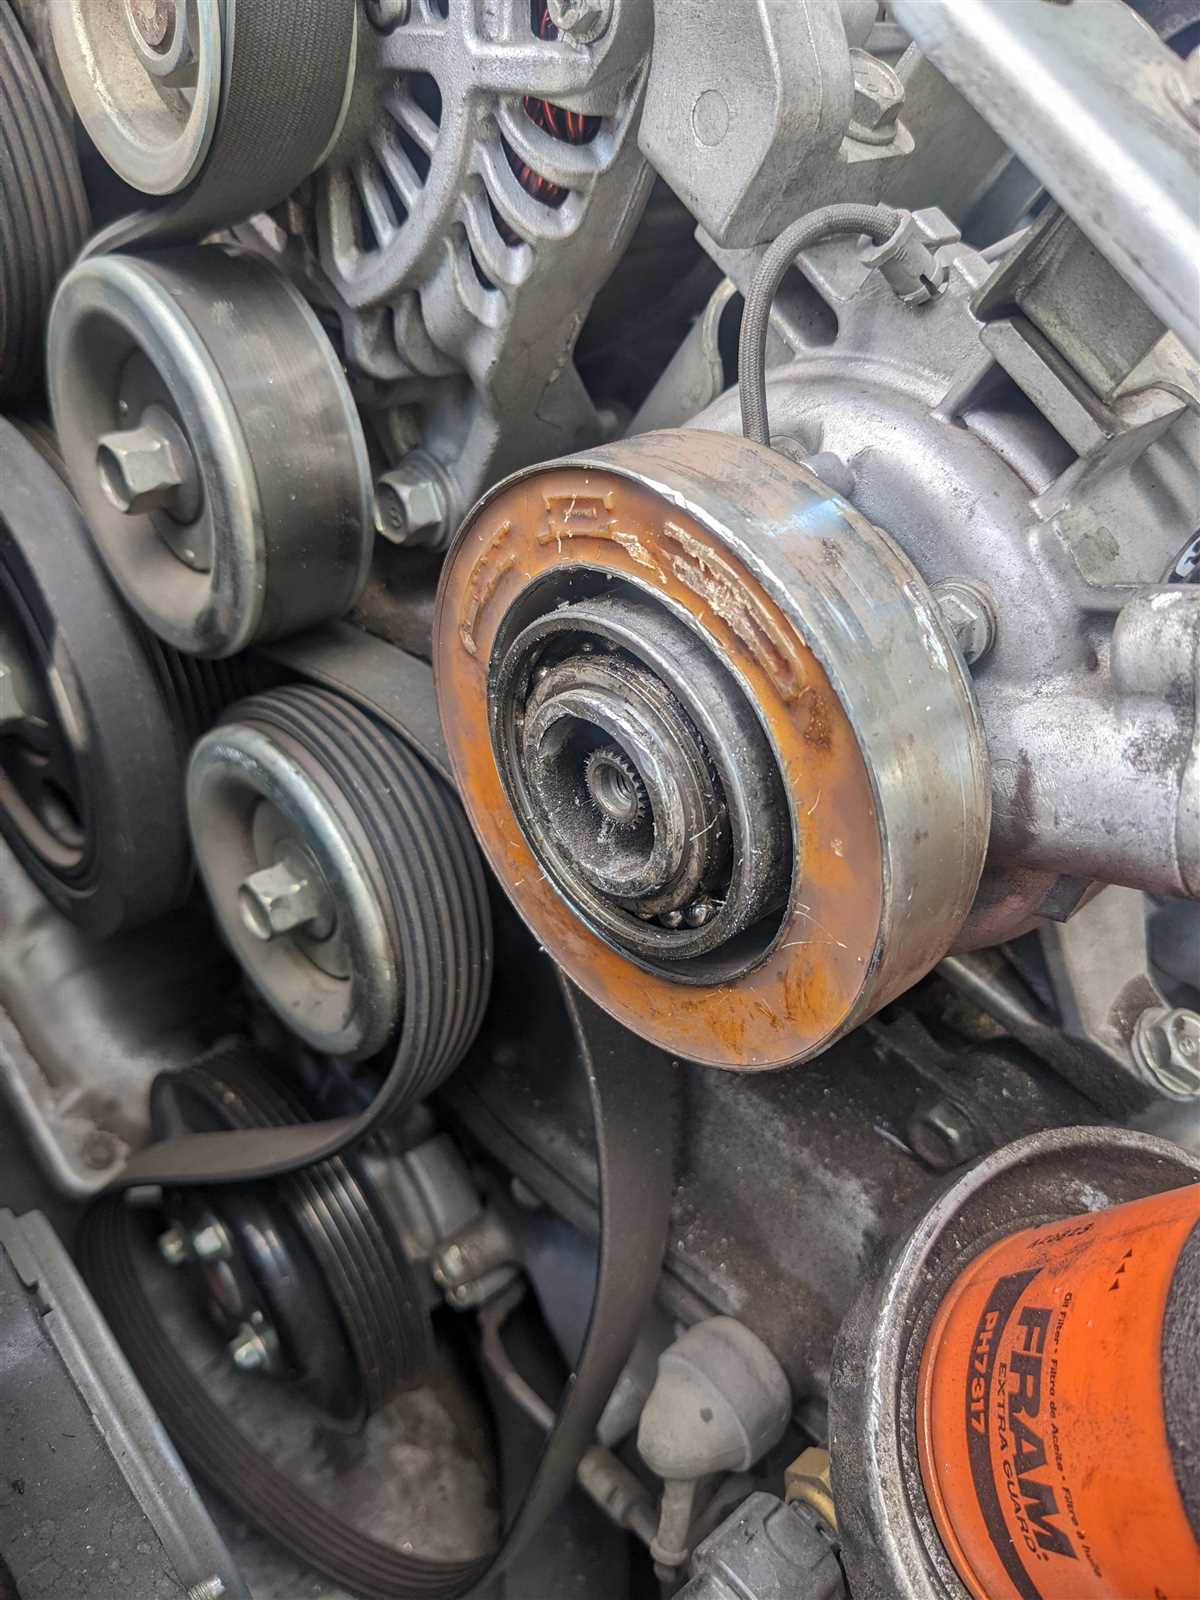
Removing the Pulley from the Motor Shaft
If you need to remove the pulley from an air compressor motor shaft, you can follow these easy steps. It’s important to note that these instructions may vary depending on the specific model of your air compressor, so always consult the owner’s manual for guidance.
Step 1: Disconnect the Air Compressor
Before starting any work on the motor or pulley, make sure that the air compressor is completely disconnected from the power source. This will help prevent any accidents or injuries during the removal process.
Step 2: Inspect the Pulley
Closely examine the pulley and the motor shaft for any signs of damage or wear. If you notice any issues, such as cracks or excessive rust, it’s important to address them before attempting to remove the pulley.
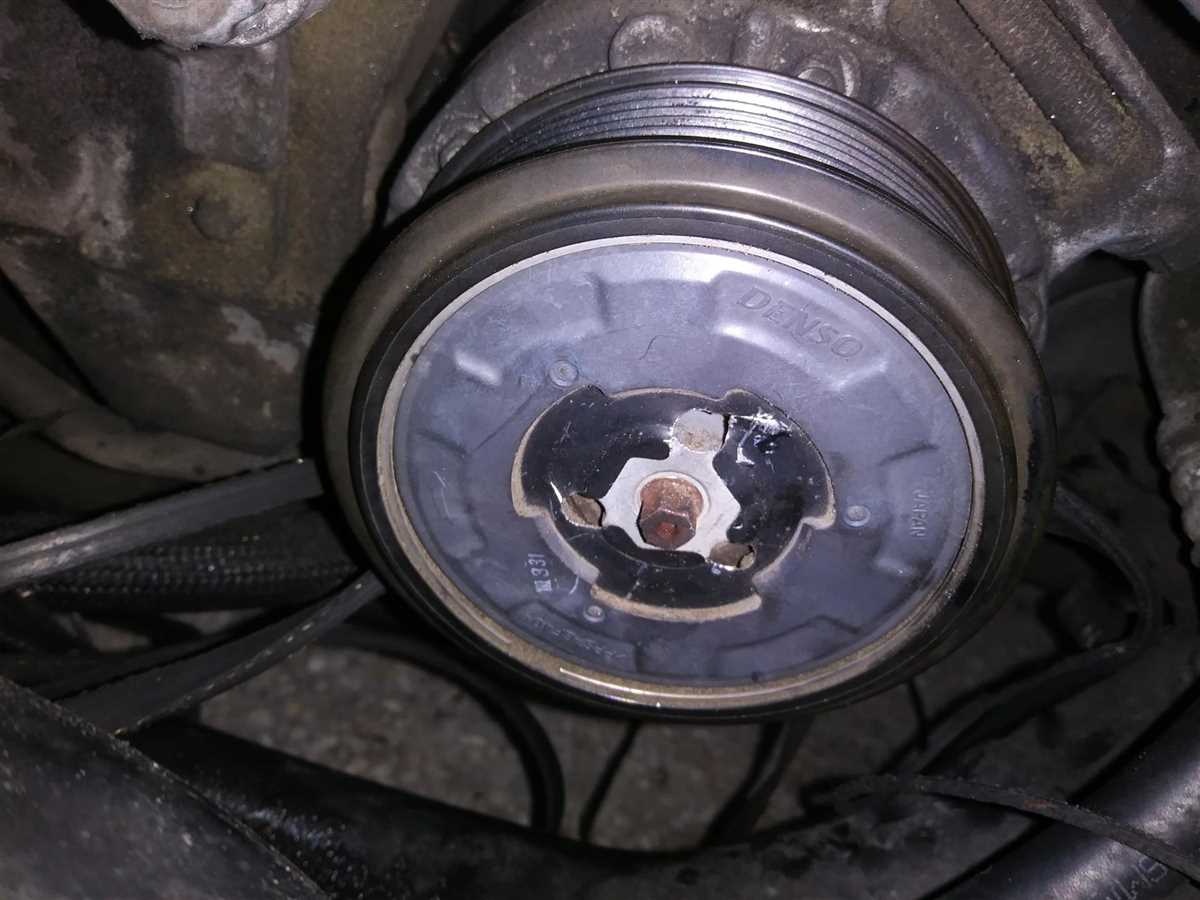
Step 3: Loosen the Set Screw
Most pulleys have a set screw that holds them in place on the motor shaft. Use a proper-sized Allen wrench or screwdriver to loosen this set screw. Be careful not to damage the screw or the surrounding components as you do this.
Step 4: Apply Lubricant
If the pulley is stuck or difficult to remove, you can try applying a small amount of lubricant to the area where it connects to the motor shaft. This can help loosen any rust or debris that may be causing the pulley to stick.
Step 5: Use a Pulley Puller
If the pulley still doesn’t come off easily, you may need to use a pulley puller tool. This tool will help apply steady pressure to the pulley, allowing it to slide off the motor shaft. Follow the manufacturer’s instructions for proper usage of the pulley puller.
Step 6: Verify Motor Shaft Condition
After removing the pulley, take a moment to inspect the motor shaft for any signs of damage or wear. If you notice any issues, it’s important to address them before installing a new pulley onto the motor shaft.
By following these simple steps, you’ll be able to remove the pulley from your air compressor motor shaft with ease. Remember to always exercise caution and consult the owner’s manual for specific instructions related to your air compressor model.
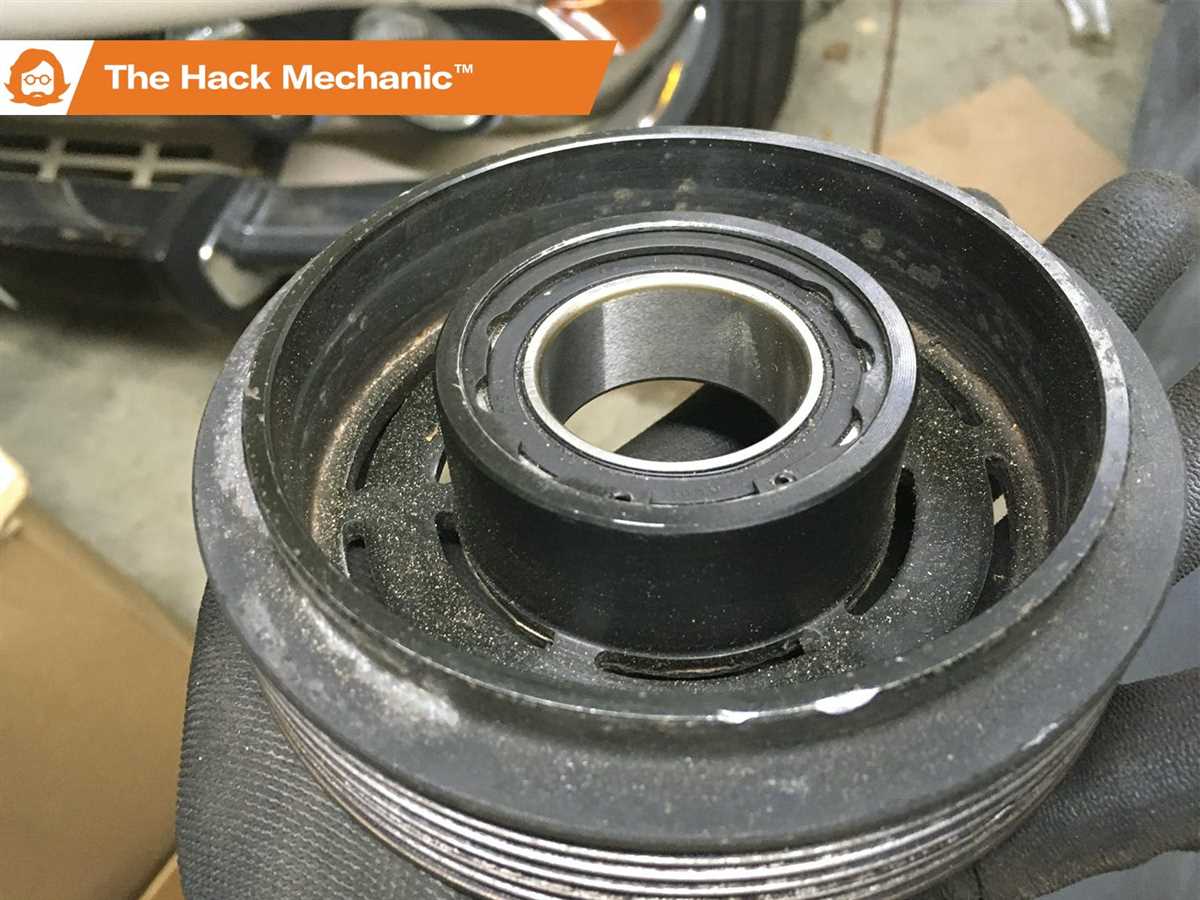
Cleaning and Inspecting the Pulley and Motor Shaft
After removing the pulley from the air compressor motor, it is important to clean and inspect both the pulley and the motor shaft. This will ensure that there is no dirt or debris that could affect the performance of the pulley or cause damage to the motor shaft.
To clean the pulley, you can use a mild detergent and water solution. Gently scrub the pulley with a soft brush to remove any built-up grime or dirt. Be sure to rinse the pulley thoroughly and allow it to dry completely before reattaching it to the motor shaft.
In addition to cleaning the pulley, it is also important to inspect it for any signs of damage or wear. Check for any cracks, chips, or other visible defects that could affect the functioning of the pulley. If you notice any damage, it may be necessary to replace the pulley before reassembling the air compressor.
Inspecting the motor shaft is equally important. Use a clean cloth or rag to wipe down the shaft and remove any dirt or debris that may have accumulated. Check for any signs of wear or damage, such as scratches or dents. If you notice any significant damage to the motor shaft, it is best to consult a professional for further inspection and repair.
Once both the pulley and motor shaft have been cleaned and inspected, you can proceed with the reassembly process. Make sure to follow the manufacturer’s instructions for reattaching the pulley to the motor shaft, ensuring that it is secure and properly aligned.
Regular cleaning and inspection of the pulley and motor shaft is essential for maintaining the performance and longevity of your air compressor. By taking the time to clean and inspect these components, you can prevent potential issues and ensure that your air compressor continues to operate smoothly and efficiently.
FAQ:
What is a pulley and why do I need to remove it from the air compressor motor?
A pulley is a wheel with a grooved rim that a belt or rope can run along, used to transmit power from one shaft to another. You may need to remove it from the air compressor motor for maintenance or repair purposes.
What tools do I need to remove the pulley from the air compressor motor?
You will need a wrench, a socket set, a pulley puller, and possibly a rubber mallet or hammer.
Is it necessary to remove the pulley from the air compressor motor for regular maintenance?
It depends on the specific maintenance required for your air compressor. In some cases, removing the pulley may be necessary to access and clean or replace certain components. However, for general maintenance tasks like cleaning air filters or changing oil, removing the pulley is usually not required.
What precautions should I take when removing the pulley from the air compressor motor?
When removing the pulley, it is important to disconnect the power and release any pressure in the air compressor to prevent accidents. Additionally, use the appropriate tools and follow the instructions provided by the manufacturer to avoid damaging the motor or pulley.
Can I remove the pulley without using a pulley puller?
It depends on the specific pulley and motor setup. In some cases, the pulley may come off easily by hand or with the help of a rubber mallet or hammer. However, if the pulley is tightly secured or stuck, a pulley puller may be necessary to safely remove it without causing damage.
What should I do if the pulley is stuck and won’t come off the air compressor motor?
If the pulley is stuck, you can try using a pulley puller to create pressure and remove it. If that doesn’t work, you may need to consult a professional or refer to the manufacturer’s instructions for further guidance. Attempting to force the pulley off without the proper tools or knowledge can cause damage to the motor or pulley.
Video:


Harrison Clayton
Meet Harrison Clayton, a distinguished author and home remodeling enthusiast whose expertise in the realm of renovation is second to none. With a passion for transforming houses into inviting homes, Harrison's writing at https://thehuts-eastbourne.co.uk/ brings a breath of fresh inspiration to the world of home improvement. Whether you're looking to revamp a small corner of your abode or embark on a complete home transformation, Harrison's articles provide the essential expertise and creative flair to turn your visions into reality. So, dive into the captivating world of home remodeling with Harrison Clayton and unlock the full potential of your living space with every word he writes.


