Easy Steps to Build a Water Trap for an Air Compressor

An air compressor is an essential tool for many applications, from inflating tires to powering pneumatic tools. However, one common issue that arises when using an air compressor is the presence of moisture in the compressed air. This moisture can cause damage to the compressor and affect the performance of the tools being used. To prevent this, it is important to install a water trap in the air compressor system.
A water trap is a device that collects and removes moisture from the compressed air before it reaches the tools. It works by using a combination of cooling and filtration to condense and separate the water droplets from the air. While there are pre-built water traps available in the market, building your own can be a cost-effective solution.
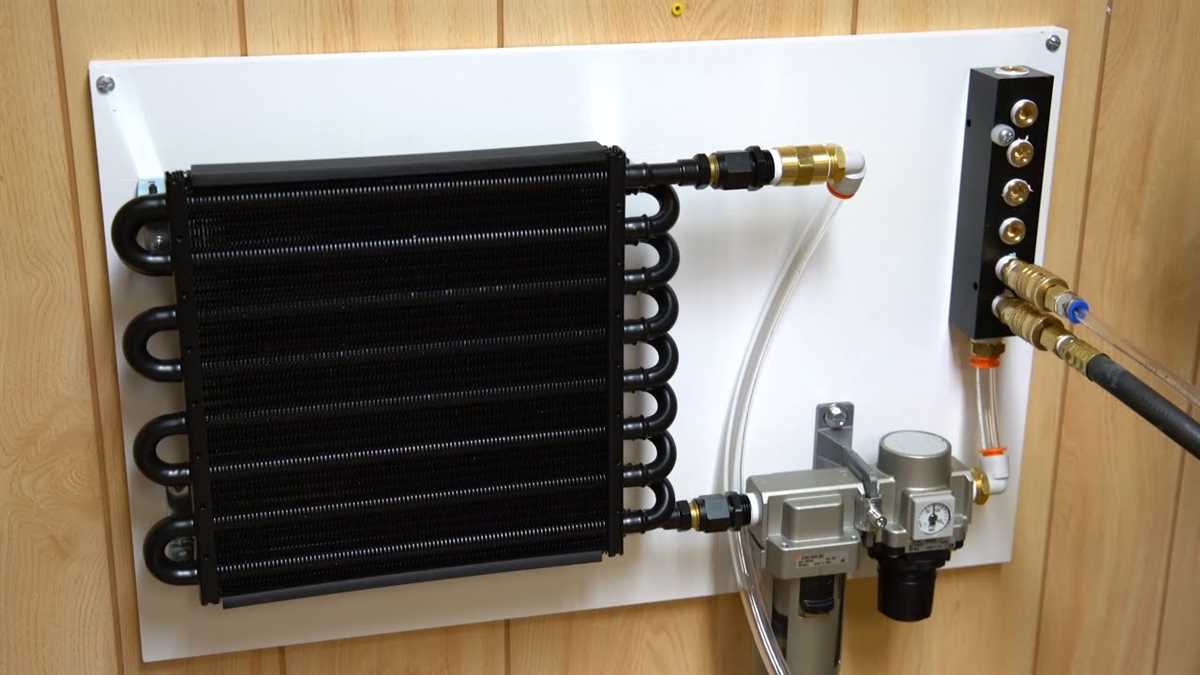
To build a water trap for an air compressor, you will need a few basic materials, such as a metal container, a coiled copper tube, and a water drain valve. The first step is to choose a suitable container that can withstand high pressure and is large enough to hold a significant amount of moisture. The container should have an inlet for the compressed air and an outlet for the filtered air.
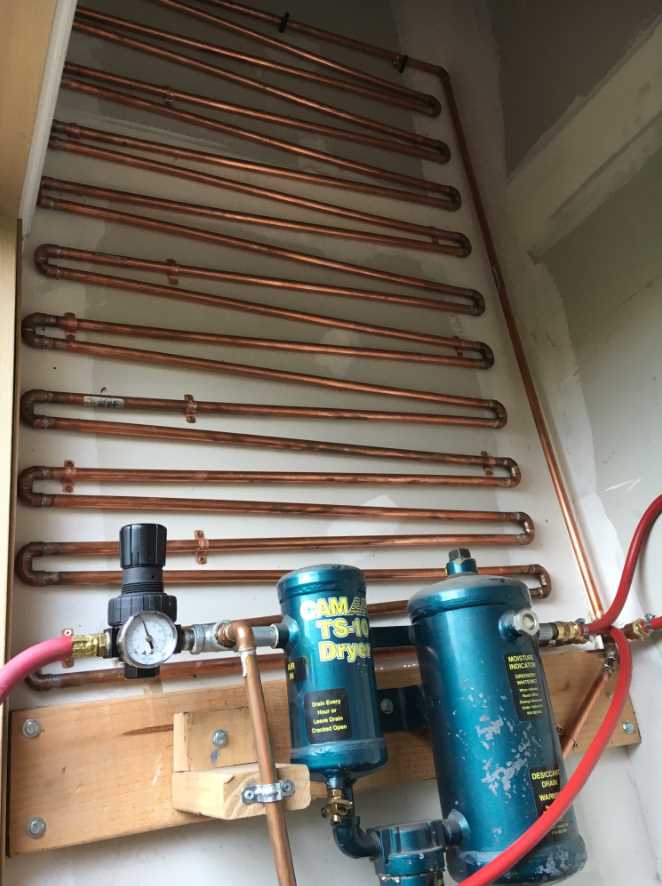
Next, drill a hole in the top of the container for the coiled copper tube. The copper tube acts as a heat exchanger, cooling the compressed air and causing the moisture to condense. Coil the copper tube inside the container, ensuring that it is securely attached to the top. Connect one end of the copper tube to the compressed air inlet and the other end to the filtered air outlet.
Finally, install a water drain valve at the bottom of the container to allow the collected moisture to be drained periodically. This valve should be placed at the lowest point of the container to ensure effective drainage. It is recommended to use a ball valve or a gate valve for this purpose, as they provide better control and sealing.

Overall, building a water trap for an air compressor is a simple process that can greatly improve the performance and lifespan of your compressor. By removing moisture from the compressed air, you can ensure that your tools work efficiently and avoid any potential damage to the compressor. With the right materials and a few easy steps, you can create a water trap that will effectively remove moisture from your air compressor system.
Step 1: Gather the Necessary Tools and Materials
Before you begin building a water trap for your air compressor, it’s important to gather all the necessary tools and materials. Having everything ready will make the process much smoother and ensure that you have everything you need.
Tools:
- Adjustable wrench
- Phillips screwdriver
- Drill
- Drill bits
- Teflon tape
- Pipe cutter
- Wire brush
- Hacksaw
Materials:
- Water trap/filter unit
- Compressor oil
- Pipe fittings
- Air hose
- Mounting brackets
- Reducers
- Plastic tubing
- Clamps
Once you have gathered all the necessary tools and materials, you will be ready to move on to the next step in building your water trap for the air compressor.

Step 2: Prepare the Compressor for Installation
1. Safety first
Before beginning the installation process, it is important to ensure that the air compressor is completely turned off and disconnected from the power source. This will help prevent any accidents or injuries during the installation.
2. Positioning the compressor
Find a suitable location for your air compressor. It is recommended to place it on a flat and stable surface to ensure proper operation. Make sure there is enough space around the compressor for ventilation and easy access to the water trap.
3. Check the intake valve
Inspect the intake valve on the air compressor and ensure it is clean and free from any debris or obstructions. This will help maintain the efficiency and performance of the compressor.
4. Install the water trap bracket
Attach the water trap bracket to the compressor using the provided screws or mounting hardware. Make sure it is securely fastened to prevent any vibrations or movement during operation.
5. Connect the intake hose
Take the intake hose of the water trap and connect it to the intake valve of the air compressor. Ensure a tight and secure connection to prevent any air leaks.

6. Position the water trap
Place the water trap onto the bracket and align it with the intake hose. Make sure it is level and properly seated on the bracket.
7. Connect the outlet hose
Take the outlet hose of the water trap and connect it to the desired location where you want to dispose of the accumulated water. Ensure a tight and secure connection to prevent any water leaks.
8. Test for leaks
Turn on the air compressor and check for any air or water leaks around the connections. If any leaks are found, tighten the connections or replace any faulty components.
Following these steps will help you properly prepare the air compressor for the installation of a water trap. It is important to double-check all connections and ensure that the compressor is in proper working order before moving on to the next step.

Step 3: Install the Water Trap
Once you have gathered all the necessary materials and prepared the air compressor, it is time to install the water trap. The water trap is an essential component that helps remove the moisture from the compressed air and prevent it from causing damage to your tools or equipment.
First, locate the inlet port on the air compressor. This is where the compressed air enters the system. Attach one end of the water trap to the inlet port, making sure it is firmly secured. Use a wrench or pliers to tighten the connection, ensuring there are no air leaks.
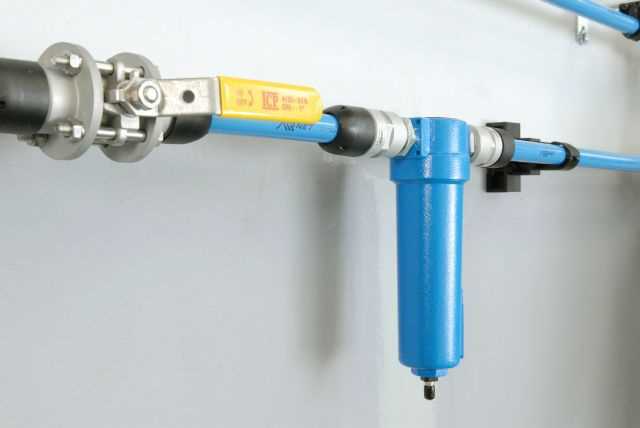
Next, connect the other end of the water trap to the outlet port. This is where the compressed air exits the system. Again, tighten the connection to prevent any air leaks. It is important to note that the water trap should be installed in the correct orientation, with the arrow on the housing pointing towards the outlet port.
Once the water trap is securely installed, it is recommended to test for any air leaks. Turn on the air compressor and listen for any hissing sounds or feel for any air escaping. If you notice any leaks, tighten the connections further or replace any faulty components.

Finally, it is important to properly maintain the water trap to ensure its effectiveness. Regularly check and clean the filter element to remove any accumulated debris or moisture. This will help prevent clogging and maximize the performance of the water trap.
By following these simple steps, you can successfully install a water trap for your air compressor. This will help prolong the lifespan of your tools and equipment, as well as ensure the quality of your compressed air output. Remember to always follow safety guidelines and manufacturer’s instructions when working with air compressors and their accessories.
Step 4: Connect the Water Trap to the Compressor
Once you have assembled your water trap, it’s time to connect it to your air compressor. First, locate the outlet port on your compressor. This is where the air will be released. It is usually located on the side or front of the compressor.
1. Determine the size of the outlet port: Before connecting the water trap, you need to know the size of the outlet port on your compressor. This will determine the size of the fittings you will need. Most air compressors have either a 1/4-inch or 3/8-inch outlet port.

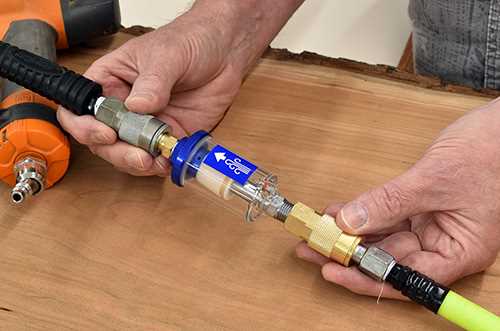
2. Choose the appropriate fittings: Once you know the size of the outlet port, you can choose the appropriate fittings to connect the water trap. These fittings will typically include a male quick-connect fitting that matches the size of the outlet port and a female quick-connect fitting that matches the size of the water trap.
- Example: If your compressor has a 1/4-inch outlet port, you will need a 1/4-inch male quick-connect fitting and a 1/4-inch female quick-connect fitting.
3. Connect the fittings: To connect the water trap to the compressor, simply screw the male quick-connect fitting into the outlet port on the compressor. Then, screw the female quick-connect fitting into the corresponding end of the water trap.
4. Check for leaks: Once the fittings are securely connected, it’s important to check for any air leaks. Apply a solution of soapy water to the connections and look for any bubbles. If you see bubbles, tighten the fittings further until the leaks stop.
With the water trap securely connected to your compressor, you are now ready to use your compressed air with confidence, knowing that any moisture will be effectively trapped and prevented from entering your tools or equipment.
Step 5: Test the Water Trap for Leaks
Once the water trap for the air compressor has been properly installed, it is important to test it for leaks before connecting it to the air compressor. Testing for leaks will ensure that the water trap is functioning correctly and will prevent any potential damage to the air compressor.

To test the water trap for leaks, start by closing the drain valve on the trap. This will prevent any water from flowing out during the test. Next, connect the air compressor to the inlet of the water trap using the appropriate fittings.
Once the air compressor is connected, turn it on and allow it to run for a few minutes. As the air compressor operates, listen for any unusual sounds or vibrations coming from the water trap. These could indicate a leak or an issue with the trap.
After running the air compressor for a few minutes, inspect the water trap and the connections for any signs of water leakage. Look for drips or puddles of water around the trap or the fittings. If any leaks are found, tighten the connections or replace any faulty parts.
It is also important to check the pressure gauge on the water trap to ensure that it is functioning correctly. The pressure gauge should indicate the pressure of the air passing through the trap. If the pressure gauge does not move or shows inaccurate readings, it may need to be replaced.
By performing this test, you can ensure that the water trap for your air compressor is working properly and will effectively remove water from the compressed air. This will help to protect your equipment and improve the performance of your air compressor.
Step 6: Maintain and Clean the Water Trap
Regular maintenance and cleaning of the water trap in your air compressor is essential to ensure its efficient and effective performance. By keeping the water trap clean, you can prevent moisture from contaminating your compressed air and extend the lifespan of your equipment.
1. Check the water trap regularly
Inspect the water trap on a regular basis to identify any potential issues or signs of buildup. Look for water droplets or excessive moisture, as well as any dirt, debris, or oil that may have accumulated. If you notice any of these signs, it’s time for cleaning.
2. Disconnect power and release pressure
Prior to cleaning the water trap, make sure to disconnect the power supply to the air compressor and release any pressure. This will ensure your safety and prevent any accidental injuries.
3. Remove the water trap
Depending on the design of your air compressor, you may need to unscrew or detach the water trap from the system. Refer to the manufacturer’s instructions or user manual for guidance on how to properly remove the water trap.
4. Clean the water trap
Using a mild detergent or cleaning solution, wash the water trap thoroughly to remove any dirt, debris, or oil. You can also use a soft brush or cloth to scrub away stubborn residue. Rinse the water trap with clean water to ensure all the cleaning solution is removed.
5. Inspect and replace any damaged parts
While cleaning the water trap, take the opportunity to inspect its components for any signs of damage or wear. Replace any broken or worn-out parts to maintain the optimal performance of the water trap.
6. Reinstall the water trap
Once the water trap is clean and all damaged parts have been replaced, reattach it to the air compressor according to the manufacturer’s instructions. Make sure all connections are tight and secure to prevent any air or water leaks.
By following these steps and regularly maintaining and cleaning the water trap, you can ensure the longevity of your air compressor and keep your compressed air free from moisture and contaminants.
FAQ:
What is a water trap for an air compressor?
A water trap for an air compressor is a device that is used to remove moisture from the compressed air to prevent damage to the compressor and tools.
Why is it important to have a water trap for an air compressor?
Having a water trap for an air compressor is important because moisture in the compressed air can cause corrosion and damage to the compressor and tools. It also helps to prevent water from entering air-powered tools or equipment, which can affect their performance.
What materials are needed to build a water trap for an air compressor?
To build a water trap for an air compressor, you will need a filter housing, a filter element, a drain valve, piping or tubing, and various fittings and connectors. You may also need Teflon tape or pipe sealant to ensure a watertight seal.
Are there any specific instructions for building a water trap for an air compressor?
Yes, there are specific instructions for building a water trap for an air compressor. First, you need to install the filter housing in the air line after the compressor. Then, connect the piping or tubing to the inlet and outlet of the filter housing. Install the filter element inside the housing and make sure it is properly secured. Finally, connect the drain valve to the bottom of the filter housing and ensure it is easily accessible for draining water.
Can a water trap be used with any type of air compressor?
Yes, a water trap can be used with any type of air compressor. Whether you have a small portable compressor or a larger industrial compressor, a water trap is necessary to remove moisture from the compressed air.
Do I need any special tools to build a water trap for an air compressor?
You may need a few basic tools to build a water trap for an air compressor, such as wrenches or pliers to tighten fittings and connectors, a drill to create mounting holes, and a screwdriver to install the drain valve. However, the specific tools required will depend on the type of filter housing and fittings you are using.
How often should the water trap be drained?
The frequency of draining the water trap will depend on how much moisture is present in the compressed air. In general, it is recommended to drain the water trap at least once a day or whenever you notice a significant amount of water collected. Regular maintenance and inspections of the water trap will help ensure proper functionality.
Video:


Harrison Clayton
Meet Harrison Clayton, a distinguished author and home remodeling enthusiast whose expertise in the realm of renovation is second to none. With a passion for transforming houses into inviting homes, Harrison's writing at https://thehuts-eastbourne.co.uk/ brings a breath of fresh inspiration to the world of home improvement. Whether you're looking to revamp a small corner of your abode or embark on a complete home transformation, Harrison's articles provide the essential expertise and creative flair to turn your visions into reality. So, dive into the captivating world of home remodeling with Harrison Clayton and unlock the full potential of your living space with every word he writes.


