Adjusting the Pressure Switch on an Air Compressor: A Step-by-Step Guide

If your air compressor is not functioning properly or if you need to adjust the pressure settings, it may be necessary to adjust the pressure switch. The pressure switch is a crucial component of an air compressor as it controls when the compressor turns on and off based on the desired pressure levels. By properly adjusting the pressure switch, you can ensure that your air compressor operates efficiently and safely.
Before you begin adjusting the pressure switch, it is important to familiarize yourself with the manufacturer’s instructions and safety guidelines. This will ensure that you understand how the pressure switch works and how to handle it safely. It is also advisable to consult a professional or an experienced technician if you are unsure about any aspect of the adjustment process.
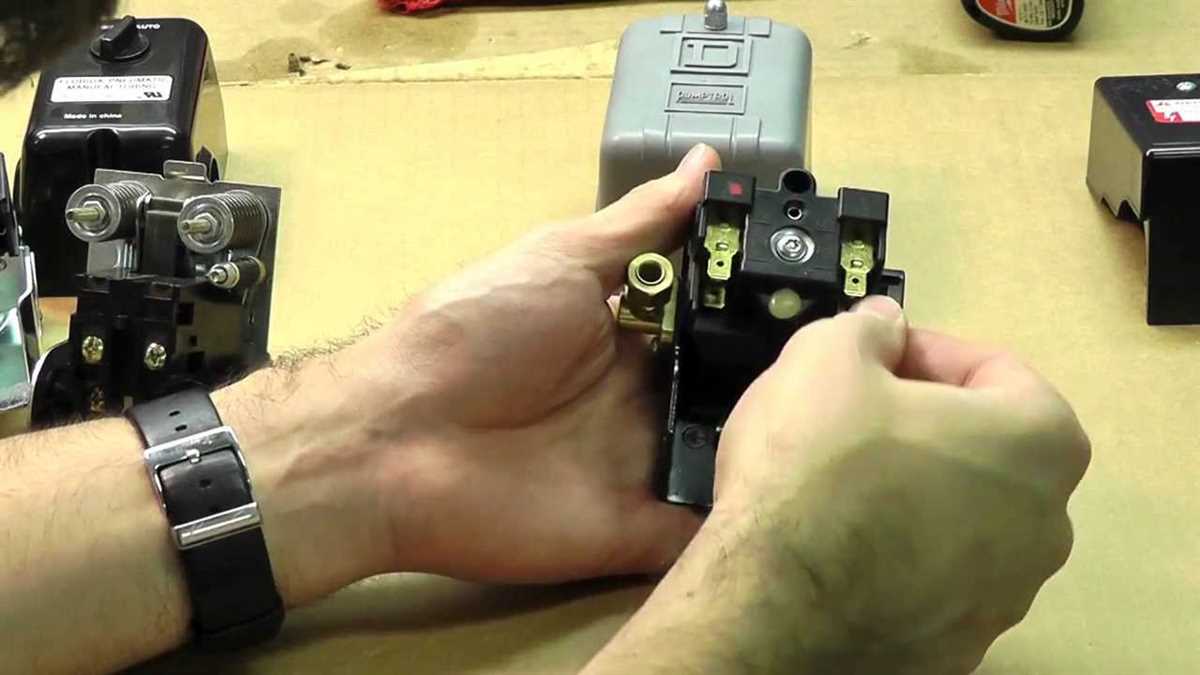
To adjust the pressure switch, start by turning off the power to the air compressor and releasing any pressure from the tank. Once the compressor is completely depressurized, locate the pressure switch. The pressure switch is usually located near the motor and is connected to the compressor tank by a tube or pipe. It may be necessary to remove any protective covers or panels to access the pressure switch.
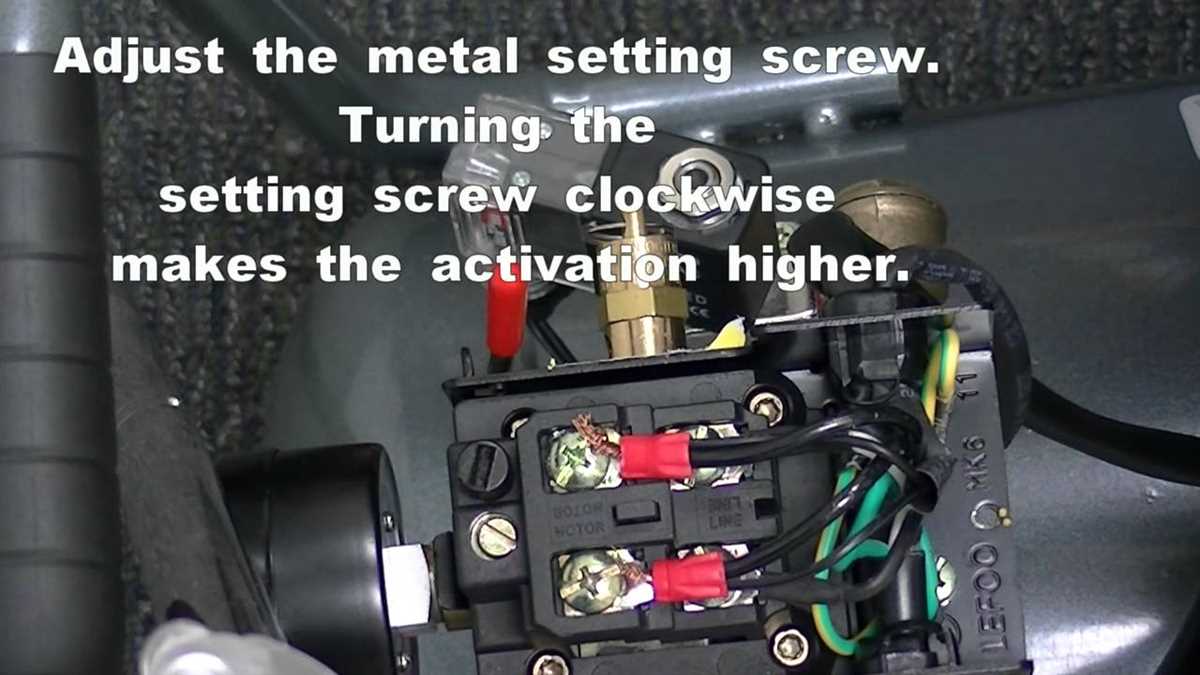
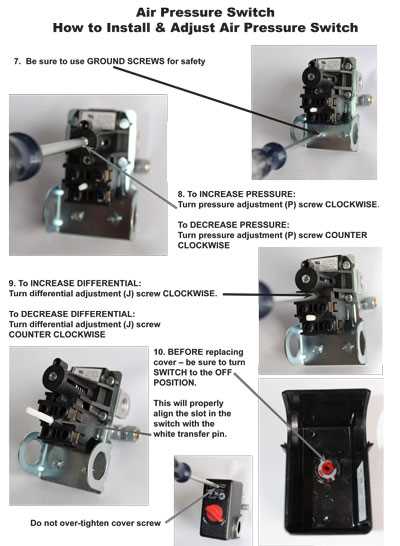
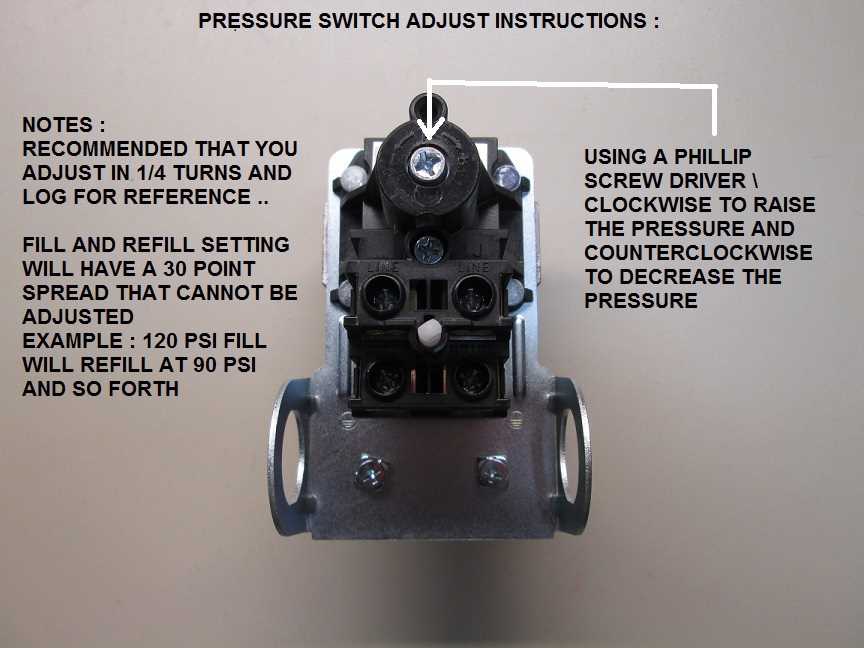
Once you have located the pressure switch, carefully adjust the set screw or knob on the switch. This screw or knob will allow you to increase or decrease the pressure setting. To increase the pressure, turn the screw or knob clockwise. To decrease the pressure, turn the screw or knob counterclockwise. It is important to make small adjustments at a time and test the compressor between adjustments to determine the optimal pressure setting.
After you have made the necessary adjustments, carefully replace any covers or panels that were removed and restore power to the air compressor. Test the compressor to ensure that it turns on and off at the desired pressure levels. It is recommended to wait for a few minutes between each test to allow the compressor to stabilize. If the compressor does not function properly or if you are unsure about the adjustments made, it is advisable to consult a professional for further assistance.

Understanding the Pressure Switch
The pressure switch is a critical component of an air compressor that monitors and regulates the air pressure. It is responsible for automatically turning the compressor on and off based on the desired pressure settings. Understanding how the pressure switch works is essential for adjusting it correctly.
Components of a Pressure Switch
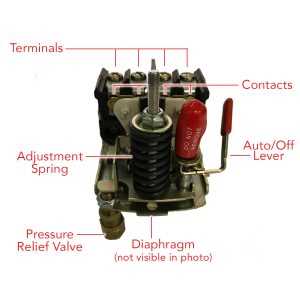
A pressure switch typically consists of several key components, including:
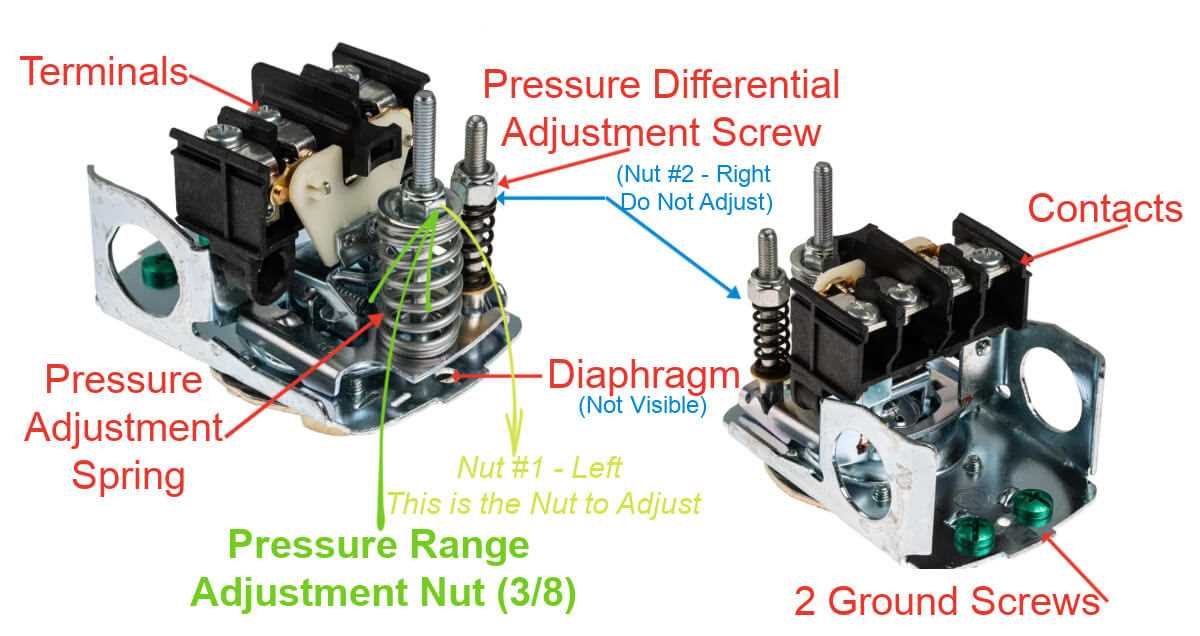
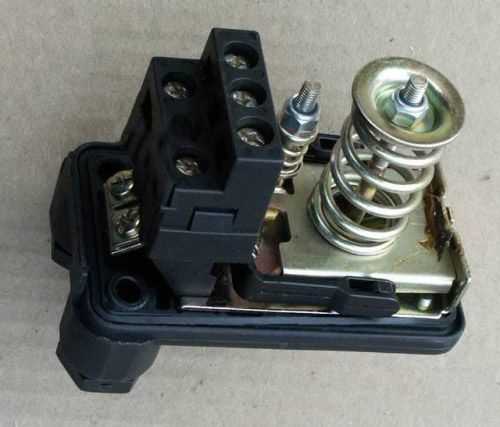
- Diaphragm: This flexible, airtight membrane responds to changes in pressure and triggers the switch to turn the compressor on or off.
- Contacts: These electrical switches open or close depending on the position of the diaphragm. When closed, they allow electricity to flow to the motor and power the compressor.
- Adjustment screws: These screws allow you to set the desired cut-in and cut-out pressure thresholds. The cut-in pressure is the point at which the compressor turns on, while the cut-out pressure is the level at which it shuts off.
Operation of the Pressure Switch
When the pressure in the air compressor tank drops below the cut-in pressure, the diaphragm in the pressure switch detects this and moves, causing the contacts to close. This completes the electrical circuit and starts the motor, which begins compressing air. As the pressure increases, the diaphragm pushes against the adjustment screw. Once the pressure reaches the cut-out threshold, the diaphragm moves back, opening the contacts and stopping the motor.
Importance of Adjusting the Pressure Switch
Adjusting the pressure switch is necessary to ensure that the compressor operates within the desired pressure range. If the pressure is set too low, the compressor may not provide enough air for the intended application. On the other hand, if the pressure is set too high, it may put excessive strain on the compressor and other connected components, leading to potential damage or failure.

By understanding the pressure switch and how it functions, you can effectively adjust it to meet your specific air pressure needs and ensure proper operation of your air compressor.
Safety Precautions and Equipment Needed
1. Safety Precautions
When adjusting the pressure switch on an air compressor, it is important to follow certain safety precautions to avoid accidents and injuries. The following safety measures should be taken:
- Ensure that the air compressor is turned off and unplugged before attempting any adjustments.
- Wear appropriate safety gear, including safety glasses and gloves, to protect against potential hazards such as flying debris and electrical shock.
- Work in a well-ventilated area to prevent the accumulation of harmful gases and fumes.
- Avoid wearing loose clothing or jewelry that could get caught in the machinery.
- Keep all tools and equipment in good working condition to prevent malfunctions or accidents.
2. Equipment Needed
Before adjusting the pressure switch on an air compressor, gather the necessary equipment to ensure a smooth and safe process. The following items are typically needed:
- Screwdriver set: Different sizes and types of screwdrivers may be required to access and adjust the pressure switch.
- Pressure gauge: Use a pressure gauge to accurately measure the current pressure of the air compressor.
- Owner’s manual: Refer to the air compressor’s owner’s manual for specific instructions and guidelines regarding pressure switch adjustment.
- Voltage tester: A voltage tester is essential for checking the electrical connections and ensuring that power is properly disconnected before making any adjustments.
- Lockout/tagout kit: For added safety, use a lockout/tagout kit to secure the air compressor and prevent accidental startup while adjustments are being made.
By following these safety precautions and having the necessary equipment on hand, you can safely and effectively adjust the pressure switch on an air compressor.

Identifying the Pressure Switch
The pressure switch is a crucial component of an air compressor that controls the operation of the compressor motor. To adjust the pressure switch, you need to first identify its location and understand its parts.
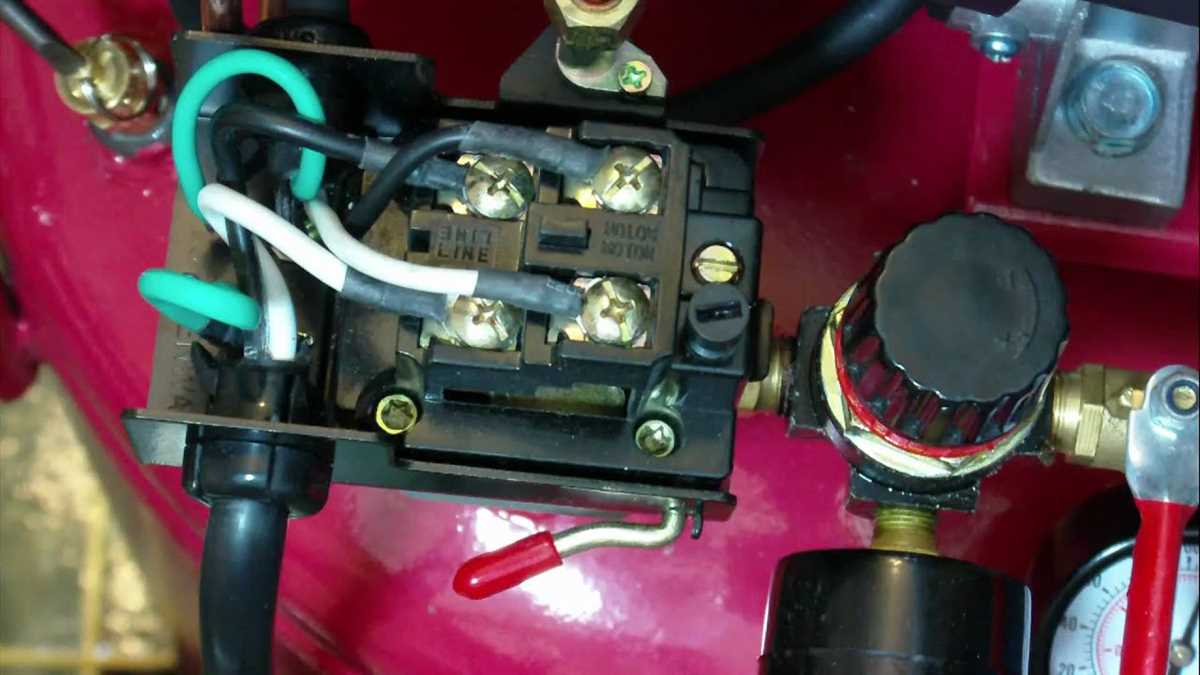
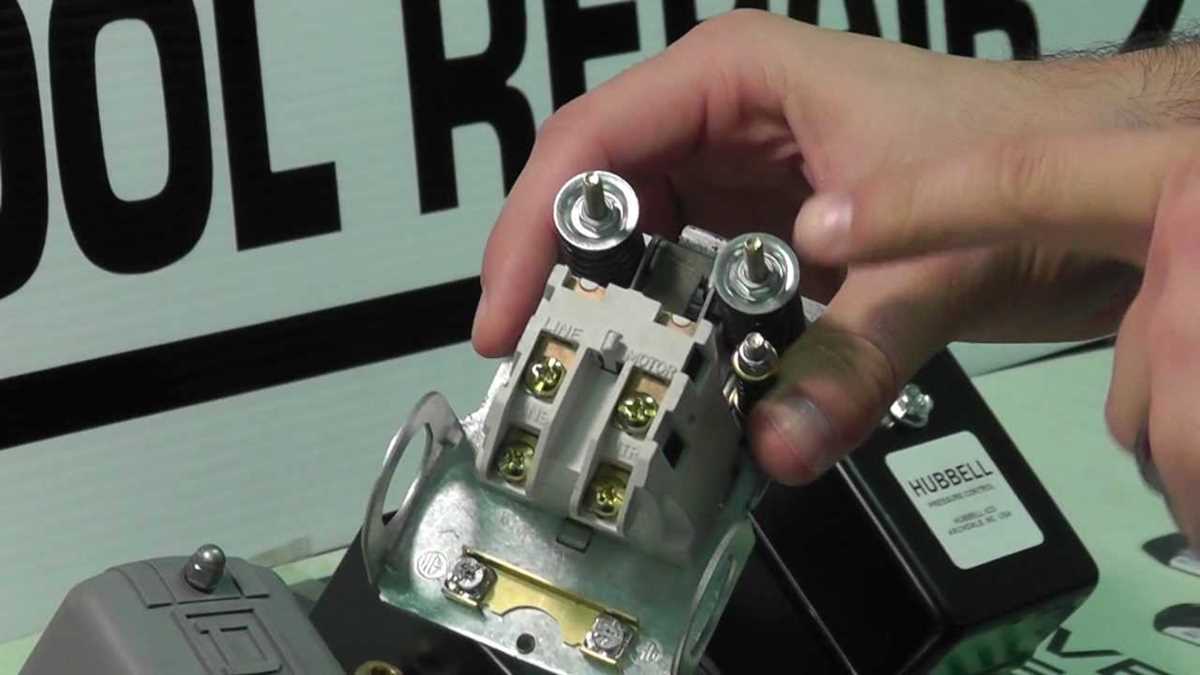
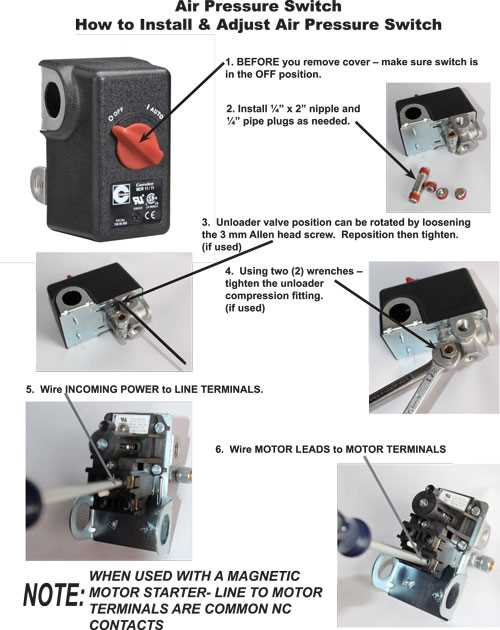
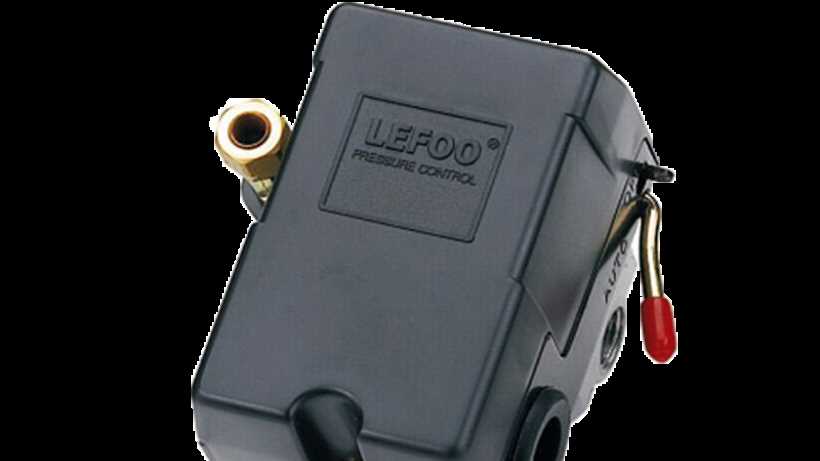
1. Locating the pressure switch: The pressure switch is usually located near the tank or on the compressor pump. It is a small, rectangular or square-shaped device with electrical connections and adjustment knobs.
2. Examining the parts: The pressure switch consists of several key components, including:
- Pressure setting adjustment knobs: These knobs allow you to adjust the cut-in and cut-out pressure levels of the compressor.
- Electrical connections: The pressure switch has electrical connections that are used to connect the switch to the compressor motor.
- Pressure sensor: The pressure switch also contains a pressure sensor that detects the pressure level in the air tank and sends signals to the switch to control the motor operation.
3. Checking the manual: If you are having trouble identifying the pressure switch, refer to the air compressor manual. It should provide information about the pressure switch location and its specific features.
4. Using visual cues: Look for any labels or markings on the compressor that indicate the location of the pressure switch. These labels may include words like “pressure switch” or symbols that represent electrical components.
By properly identifying the pressure switch and understanding its components, you will be better prepared to adjust it to the desired pressure levels for optimal performance of your air compressor.
Turning off the Compressor and Releasing Pressure
To ensure your safety and prevent any accidents, it is crucial to turn off the compressor before making any adjustments or releasing the pressure. Here are the steps to follow:
- Locate the power switch: Most compressors have a power switch that is usually positioned on the control panel or near the motor. Make sure the switch is in the “off” position to cut the power supply to the compressor.
- Release air from the tank: Before attempting to adjust the pressure switch, it is essential to release any air pressure built up in the tank. This can be done by locating the pressure relief valve and opening it by turning it counterclockwise. Keep in mind that the release will result in a loud burst of air, so make sure to stand clear and wear hearing protection.
- Monitor the pressure gauge: Keep an eye on the pressure gauge and wait until it indicates zero pressure. This may take a few minutes depending on the size of the tank and the initial pressure it held.
- Close the pressure relief valve: Once the pressure gauge reaches zero, close the pressure relief valve by turning it clockwise. This will ensure the tank remains pressurized after the adjustments are made.
By following these steps, you can safely turn off the compressor and release any accumulated pressure. This will allow you to proceed with adjusting the pressure switch without any risk of accidents or injury.
Adjusting the Cut-in Pressure
To adjust the cut-in pressure on an air compressor, follow these steps:
1. Locate the pressure switch
The pressure switch on an air compressor is typically located near the motor or on the side of the compressor tank. You may need to refer to the manufacturer’s manual to find the exact location.
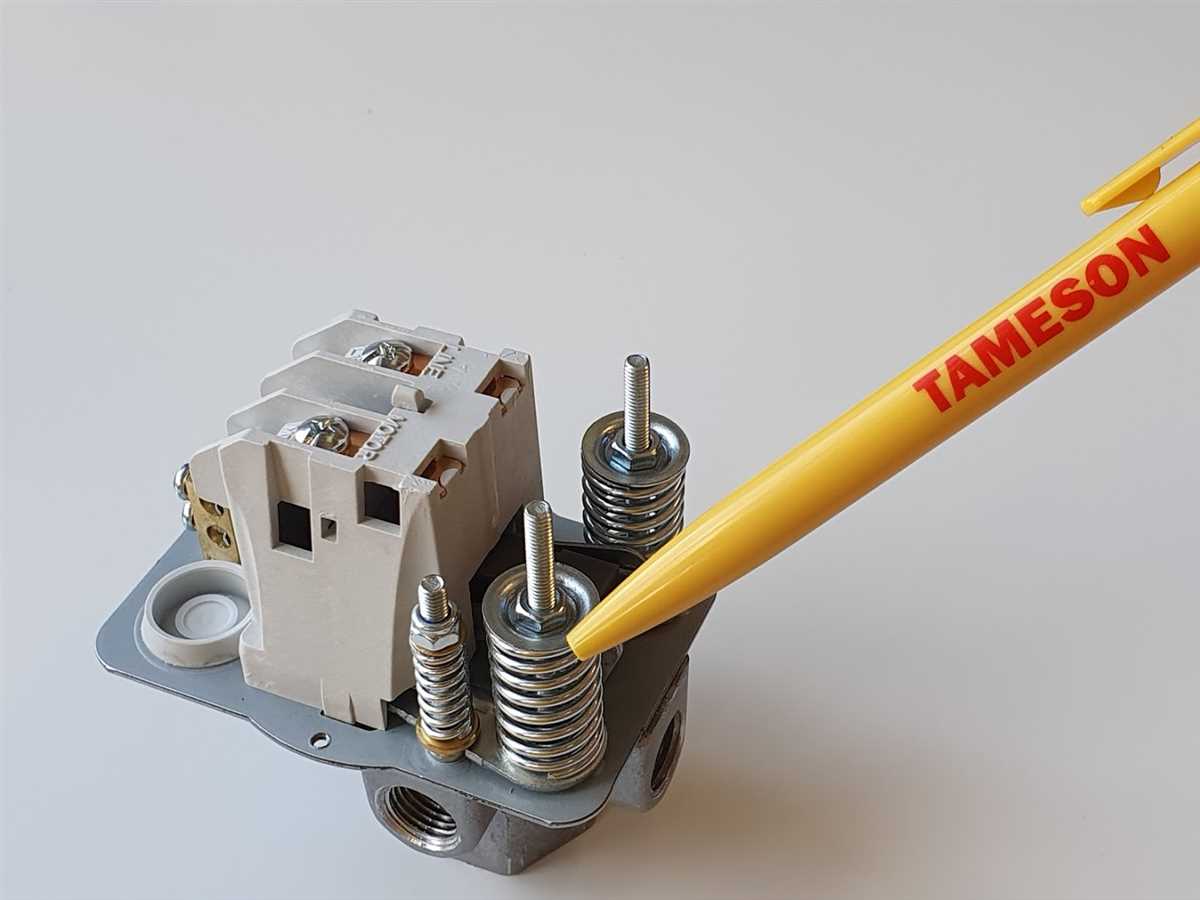
2. Identify the cut-in pressure adjustment screw
The cut-in pressure adjustment screw is usually located on the pressure switch. It is a small screw that can be turned to adjust the cut-in pressure.
3. Turn off the air compressor
Before making any adjustments, ensure that the air compressor is turned off and unplugged from the power source. This will ensure your safety during the adjustment process.
4. Determine the desired cut-in pressure
Consider the specific needs of your air compressor and the tools or equipment you will be using. Determine the ideal cut-in pressure for your applications.
5. Adjust the cut-in pressure
Use a flat-head screwdriver to turn the cut-in pressure adjustment screw clockwise to increase the cut-in pressure or counterclockwise to decrease it. Make small adjustments at a time, testing the compressor’s performance after each adjustment.
6. Test the compressor
After making the necessary adjustments, plug in the compressor and turn it on. Observe the pressure gauge and ensure that the compressor reaches the desired cut-in pressure before automatically shutting off. If the pressure is too low or too high, repeat the adjustment process until the desired cut-in pressure is achieved.
Remember to always follow the manufacturer’s instructions and safety guidelines when adjusting the pressure switch on an air compressor.
Adjusting the Cut-out Pressure
To adjust the cut-out pressure of your air compressor, follow these steps:

- Turn off the compressor: Before making any adjustments, make sure the air compressor is turned off and unplugged for safety.
- Locate the pressure switch: The pressure switch is typically located near the compressor tank and is responsible for controlling the cut-out pressure.
- Adjust the cut-out pressure: Use a screwdriver to turn the adjustment screw on the pressure switch. Turning the screw clockwise will increase the cut-out pressure, while turning it counterclockwise will decrease it.
- Consult the manual: If you’re unsure about the appropriate cut-out pressure for your specific air compressor, consult the manufacturer’s manual or website for guidance.
- Test the pressure: After making adjustments, test the cut-out pressure by turning on the compressor and observing when it reaches the desired pressure before automatically shutting off.
Note: It’s important to be cautious when adjusting the cut-out pressure on your air compressor. Setting the pressure too high can put unnecessary strain on the compressor, while setting it too low may result in insufficient air pressure for your needs.
By following these steps and exercising caution, you can adjust the cut-out pressure of your air compressor to ensure it meets your specific requirements.
Testing the Pressure Switch Settings
1. Visual Inspection
Before testing the pressure switch settings, it is important to visually inspect the switch for any signs of damage or wear. Look for any cracks or signs of burning on the contacts. If any damage is found, it may be necessary to replace the pressure switch before proceeding with testing.
2. Using a Pressure Gauge
To test the pressure switch settings, you will need a pressure gauge. Attach the pressure gauge to the air compressor’s tank using the appropriate fittings. Make sure the pressure gauge is properly calibrated and in good working condition.
Start the air compressor and allow it to build up pressure in the tank. Observe the pressure gauge as the compressor runs. The pressure switch should automatically shut off the compressor once it reaches the desired pressure level, as indicated by the pressure gauge.
3. Adjusting the Cut-In and Cut-Out Settings
If the pressure switch does not shut off or turn on at the desired pressure levels, it may be necessary to adjust the cut-in and cut-out settings. Refer to the manufacturer’s instructions for your specific air compressor model to determine how to adjust these settings.
Using a screwdriver or similar tool, locate the adjustment screws on the pressure switch. Turn the screws clockwise to increase the pressure setting and counterclockwise to decrease it. Test the pressure switch settings again using the pressure gauge until the desired cut-in and cut-out pressures are achieved.
4. Repeat Testing
After adjusting the pressure switch settings, it is important to repeat the testing process to ensure that the switch is functioning correctly. Run the air compressor and observe the pressure gauge to verify that the pressure switch is shutting off and turning on at the desired pressure levels.
If necessary, make further adjustments to the pressure switch settings until the desired pressure levels are consistently achieved. It may take a few iterations to find the optimal settings for your specific needs.
Reassembling and Restarting the Air Compressor
Once you have successfully adjusted the pressure switch on your air compressor, it is time to reassemble the unit and restart it to ensure everything is functioning properly.
Step 1: Replace the Cover
Start by carefully placing the cover back onto the air compressor. Make sure it is aligned correctly and securely fastened in place. This will help protect the internal components from any potential damage and ensure the unit operates efficiently.
Step 2: Connect Power Supply
Next, reconnect the power supply to the air compressor. Ensure that the power cord is securely plugged into a grounded electrical outlet. Double-check that all connections are tight and in good condition to avoid any electrical issues.
Step 3: Check Oil Level
Before starting the air compressor, check the oil level and add more if necessary. Refer to the user manual for instructions on how to check and change the oil. Proper lubrication is essential for the smooth operation and longevity of the compressor.
Step 4: Test Run
Now you are ready to start the air compressor and perform a test run. Switch the power button to the “On” position and adjust the pressure settings accordingly. Observe the compressor as it starts and listen for any unusual sounds or vibrations.
Step 5: Monitor the Pressure
While the air compressor is running, closely monitor the pressure gauge to ensure that the pressure switches are functioning correctly. The pressure should rise and fall within the desired range without any sudden fluctuations or excessive build-up.
Step 6: Final Check
After a few minutes of operation, check the air compressor for any signs of leaks, unusual smells, or abnormal behavior. If everything appears normal, you have successfully reassembled and restarted the air compressor.
Remember to always follow the manufacturer’s instructions and safety guidelines when working on or operating an air compressor. If you encounter any issues or are unsure about any steps in the process, consult a professional for assistance.
FAQ:
Why is it important to adjust the pressure switch on an air compressor?
Adjusting the pressure switch on an air compressor is important because it allows you to control the cut-in and cut-out pressures of the compressor. By adjusting the pressure switch, you can set the desired pressure range for your specific needs.
How do I know if the pressure switch on my air compressor needs to be adjusted?
If you notice that your air compressor is not turning on or off at the desired pressure levels, it could be an indication that the pressure switch needs to be adjusted. You can also use a pressure gauge to measure the actual pressure and compare it to the settings on the pressure switch.
What tools do I need to adjust the pressure switch on my air compressor?
To adjust the pressure switch on an air compressor, you will need a screwdriver and a pressure gauge. The screwdriver is used to loosen or tighten the adjustment screws on the pressure switch, while the pressure gauge is used to measure the actual pressure.
Can I adjust the pressure switch on my air compressor without any prior experience?
Adjusting the pressure switch on an air compressor can be done by anyone, even without any prior experience. However, it is important to read and follow the instructions provided by the manufacturer. If you are unsure, it is recommended to consult the user manual or seek assistance from a professional.
Video:


Meet Harrison Clayton, a distinguished author and home remodeling enthusiast whose expertise in the realm of renovation is second to none. With a passion for transforming houses into inviting homes, Harrison's writing at https://thehuts-eastbourne.co.uk/ brings a breath of fresh inspiration to the world of home improvement. Whether you're looking to revamp a small corner of your abode or embark on a complete home transformation, Harrison's articles provide the essential expertise and creative flair to turn your visions into reality. So, dive into the captivating world of home remodeling with Harrison Clayton and unlock the full potential of your living space with every word he writes.


