Step-by-Step Guide: How to Set Up a Wood Lathe

If you’re a woodworking enthusiast, one of the most valuable tools you can have in your workshop is a wood lathe. Whether you’re a beginner or an experienced woodworker, a wood lathe can open up a world of possibilities for creating intricate and beautiful woodturning projects.
But before you can start turning your own bowls, pens, and other wood items, you need to know how to properly set up your wood lathe. In this step-by-step guide, we’ll walk you through the process, from assembling your lathe to adjusting the necessary settings for optimal performance.
First, you’ll need to gather all the necessary tools and materials. This includes your wood lathe, lathe tools, a face shield or safety glasses, and the wood you’ll be working with. Make sure you have a sturdy workbench or table to mount your lathe on, as well as enough space to move around comfortably.
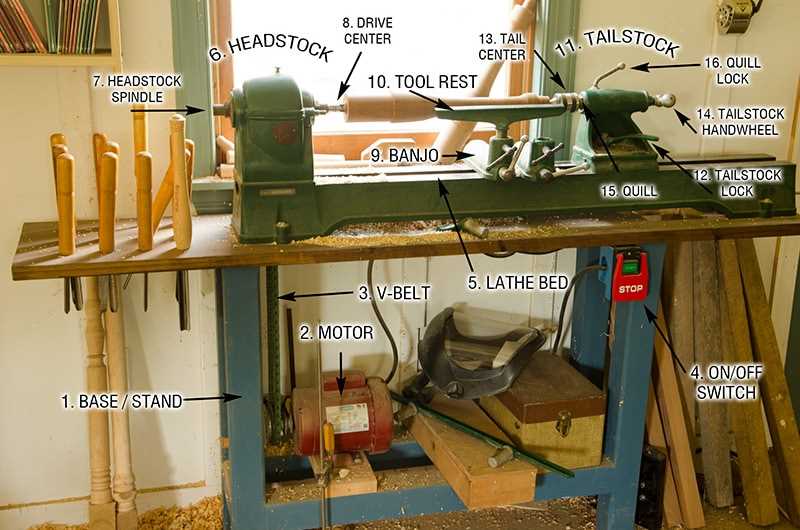
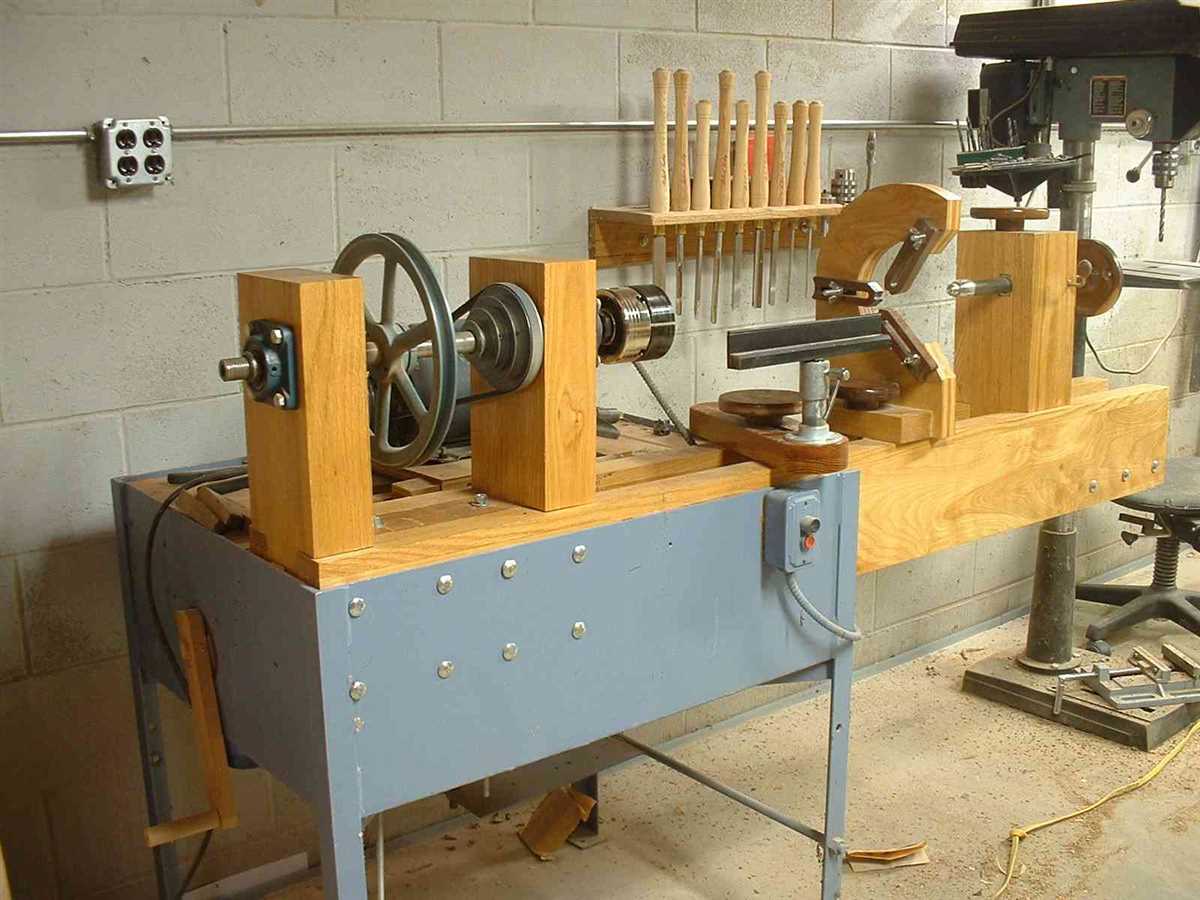
Next, begin by assembling your wood lathe according to the manufacturer’s instructions. This typically involves attaching the lathe bed to the stand, mounting the headstock and tailstock, and securing any additional attachments or accessories. It’s important to follow the instructions carefully to ensure a safe and sturdy setup.
Once your lathe is assembled, it’s time to focus on adjusting the settings. Start by checking the alignment of the headstock and tailstock. They should be parallel to each other and centered on the lathe bed. Use a straightedge or calipers to measure the distance between the centers of the two pieces, and adjust as necessary.

Next, you’ll need to install your lathe tools. This typically involves attaching the tool rest to the lathe bed and securing the tool rest banjo in the desired position. Make sure the tool rest is level and centered, and adjust the banjo accordingly.
Finally, before you begin turning, it’s important to establish a safe working environment. Put on your face shield or safety glasses to protect your eyes from flying wood chips, and make sure your lathe is positioned in a well-lit area. Keep your work area clean and organized, and always be aware of your surroundings.
With your wood lathe properly set up, you’re now ready to start turning! Begin by practicing basic turning techniques on scrap wood before tackling more complex projects. Remember to always work at a slow speed and let the lathe do the work, rather than forcing the wood against the tool.
By following this step-by-step guide, you’ll be well on your way to mastering the art of woodturning with your wood lathe. With time and practice, you’ll be creating stunning wood pieces that showcase your craftsmanship and creativity.
How to Set Up a Wood Lathe: Step-by-Step Guide
Step 1: Safety First
Before setting up your wood lathe, it’s important to prioritize safety. Make sure you have proper eye protection, such as safety glasses or a face shield. Remove any loose clothing or jewelry that could get caught in the lathe. Additionally, ensure that the lathe is on a stable, level surface to prevent it from tipping over during operation.

Step 2: Assemble the Lathe Components
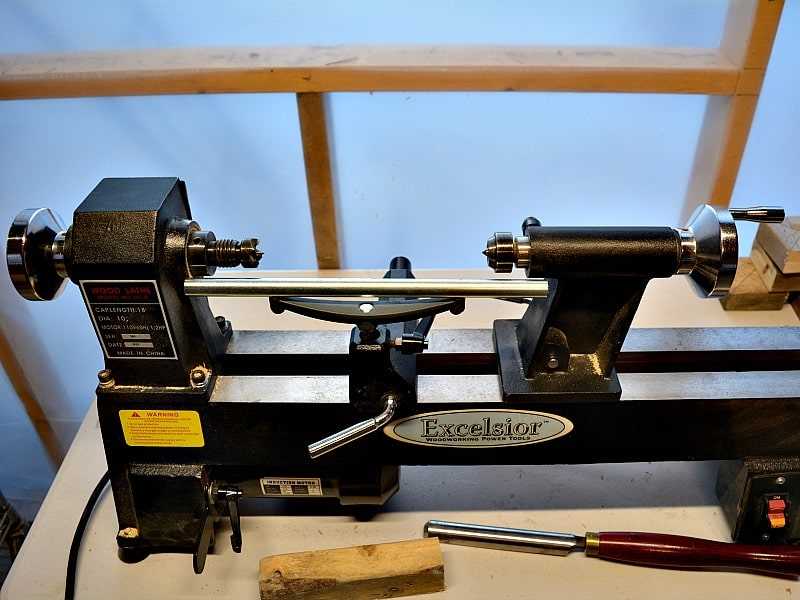
Begin by assembling the lathe components according to the manufacturer’s instructions. This typically involves attaching the lathe bed to the lathe stand, securing the headstock and tailstock, and installing any accessories such as tool rests or faceplates.
Step 3: Mount the Wood Blank
Once the lathe is assembled, you can mount a wood blank onto the lathe. Start by securing the headstock against the wood blank, using the appropriate sized drive center or faceplate. Ensure that the wood blank is securely tightened to prevent it from coming loose during turning.
Step 4: Adjust the Tool Rest and Tailstock
Position the tool rest at a suitable height and distance from the wood blank. The tool rest should be close enough to the wood to allow for easy and precise tool control, but not so close that the tool hits the rest during turning. Adjust the tailstock to provide additional support to the wood blank if needed.
Step 5: Set the Lathe Speed
Select the appropriate lathe speed based on the type of wood and the desired cutting or shaping operation. Refer to the lathe’s user manual for recommended speed settings. Adjust the speed using the lathe’s speed control mechanism, usually located on the headstock.
Step 6: Start Turning
You are now ready to start turning the wood. Stand to the side of the lathe, keeping a firm grip on the turning tools. Ease the tool onto the wood blank, making light cuts and gradually increasing the depth as needed. Take your time and remember to maintain control of the tool at all times. Keep the lathe speed constant and avoid stalling or forcing the tool into the wood.

Step 7: Finishing and Sanding
Once you have shaped the wood to your desired form, switch off the lathe and remove any excess wood using a bandsaw or other cutting tool. Then, use sandpaper or sanding tools to smooth and finish the wood’s surface. Start with coarse-grit sandpaper and gradually work your way up to finer-grit sandpaper for a smooth finish.
Step 8: Clean Up
After you have finished turning and sanding, it’s important to clean up any wood chips or debris from the lathe and work area. This will prevent buildup and ensure the lathe remains in good working condition. Dispose of the wood chips safely and store your turning tools and accessories in a designated place.
Step 9: Practice and Explore
Setting up a wood lathe is just the beginning. The more you practice and explore different techniques, the better you will become at woodturning. Experiment with different wood species, shapes, and finishes to develop your skills and create unique woodturned projects.
Remember to always follow safety guidelines and use proper techniques when working with a wood lathe. With time and experience, you will be able to unlock the full potential of this versatile woodworking tool.

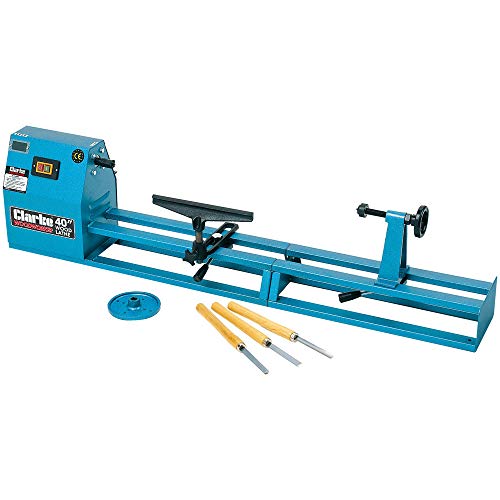
Gather Required Tools
- Wood Lathe
- Chisels or gouges
- Faceplate or chuck
- Live center
- Drive center
- Calipers
- Parting tool
- Safety goggles
- Dust mask
- Hearing protection
Before you can start setting up your wood lathe, it is important to gather all the necessary tools. The tools you’ll need may vary depending on the specific project you are working on, but here is a list of the basic tools that are commonly required:
- Wood Lathe: This is the main tool that you will be using to shape and turn the wood.
- Chisels or gouges: These tools are used to carve and shape the wood as it spins on the lathe.
- Faceplate or chuck: This is used to attach the wood to the lathe securely.
- Live center: This tool supports the opposite end of the wood piece and helps to keep it stable and centered.
- Drive center: This center is attached to the headstock of the lathe and helps to drive the wood piece as it spins.
- Calipers: Calipers are used to measure the diameter of the wood piece and make accurate cuts and measurements.
- Parting tool: This tool is used to create grooves and parting cuts in the wood.
- Safety goggles: Safety goggles are essential to protect your eyes from flying wood chips and debris.
- Dust mask: A dust mask is necessary to protect your lungs from inhaling wood dust.
- Hearing protection: Wood lathes can be quite loud, so using hearing protection is important to protect your ears.
Having all these tools ready before you start setting up your wood lathe will help ensure a smooth and safe turning process.
Choose the Right Work Area
Before setting up your wood lathe, it is important to choose the right work area that will provide a safe and comfortable environment for working on your projects. Here are some considerations to keep in mind:
Space
Make sure you have enough space to accommodate the wood lathe and other necessary equipment. The lathe should have enough elbow room around it for you to work comfortably and move freely. It is also important to have space for additional tools and accessories that you may need during the turning process.

Lighting
A well-lit work area is essential for safe and accurate woodturning. Make sure you have sufficient lighting that illuminates the workpiece and the lathe bed. Natural light, such as a window, can be helpful, but also consider installing additional overhead or task lighting to ensure proper visibility.
Ventilation
Woodworking can generate a significant amount of dust and debris, which can be harmful if inhaled. To protect your health, ensure that your work area has adequate ventilation to keep the air clean and prevent the accumulation of hazardous particles. Consider using a dust collection system or wearing a respirator if necessary.
Stability
When selecting the work area, choose a stable and level surface that can support the weight of the wood lathe and withstand the vibrations that occur during operation. Avoid placing the lathe on a wobbly table or uneven floor as this can affect the accuracy of your work and pose a safety risk.
Accessibility

Consider the accessibility of your work area, especially if you have any physical limitations. Ensure that you can easily reach the lathe controls, tools, and workpiece without straining or compromising your posture. Having a comfortable and ergonomically designed work area will make your woodturning experience more enjoyable and reduce the risk of injuries.
By carefully selecting the right work area, you can create a safe, efficient, and comfortable space for using your wood lathe. This will enhance your woodworking experience and enable you to produce high-quality turned projects.
Prepare the Wood Lathe
Before you can start using your wood lathe, you’ll need to properly prepare it. Follow these steps to get your wood lathe ready for use:
- Find a suitable location: Choose a well-ventilated area with ample space. Make sure there are no flammable materials nearby.
- Secure the lathe: Place the lathe on a stable workbench or stand. Ensure that it is securely fastened to prevent any movement during operation.
- Inspect the lathe: Check the lathe for any visible damage or loose components. Ensure that all parts are in working order and tightened properly.
- Connect the power: Plug in the lathe to a suitable power source. Make sure the power cord is in good condition and can reach the outlet without being stretched or tangled.
- Adjust the tool rest: Position the tool rest at a comfortable height and angle for your specific turning needs. Make sure it is securely tightened in place.
- Install the lathe accessories: Attach any necessary accessories, such as a faceplate or chuck, according to the manufacturer’s instructions. Ensure they are properly aligned and secured.
- Check the lathe speed: Set the lathe to the appropriate speed for your project. Refer to the lathe’s manual for guidance on speed settings based on the diameter and type of wood you’ll be turning.
- Prepare the turning blanks: Select appropriate wood blanks for your project. Make sure they are properly squared and securely mounted on a faceplate or between centers.
Once you have completed these steps, your wood lathe should be ready for use. Take the time to familiarize yourself with the lathe’s controls and safety features before starting your first turning project.

Mount the Turning Blank
Once you have your lathe set up and ready to go, it’s time to mount your turning blank. A turning blank is a piece of wood or other material that you will shape and carve using the lathe.
Steps to mount the turning blank:
- Choose a suitable turning blank. It should be a solid piece of wood that is free from defects and cracks.
- Measure and mark the center of the blank on both ends using a ruler or a marking gauge.
- Use a drive center and a live center to hold the blank securely in place. The drive center has sharp points that will dig into the top end of the blank, while the live center supports the bottom end.
- Align the marked center of the blank with the center of the lathe’s headstock and tailstock.
- Slide the drive center into the headstock spindle and tighten it in place using the lathe’s locking mechanism.
- Slide the live center into the tailstock and tighten it to hold the bottom end of the blank securely.
- Make sure the blank is positioned correctly and tighten the tailstock to secure it in place.
Note: It’s important to ensure that the blank is securely mounted and properly centered before you start turning. This will help prevent any wobbling or vibrations during the turning process.
Set Up the Tool Rest
Once you have your wood lathe set up and ready to go, the next step is to set up the tool rest. The tool rest is an important component of a wood lathe, as it provides support for your turning tools while you work. It should be positioned correctly to ensure safety and accuracy in your turning projects.
1. Locate the tool rest

The tool rest is typically a metal bar that attaches to the lathe bed or banjo. It should be included with your lathe and can usually be found in the accessory kit that came with your lathe or stored in a dedicated compartment on the lathe itself. Take a few moments to find the tool rest and familiarize yourself with its components.
2. Choose the appropriate tool rest size
Depending on the size of your lathe and the type of turning work you plan to do, you may have different tool rest sizes to choose from. It’s important to select the appropriate size for your project to ensure stability and proper support for your turning tools. Refer to your lathe’s manual or consult with a knowledgeable woodturner if you’re unsure which size to use.
3. Attach the tool rest to the banjo
Once you have selected the correct size tool rest, attach it to the banjo. The banjo is a metal bracket that slides along the lathe bed and allows you to position the tool rest at the desired height and distance from the wood. The tool rest typically attaches to the banjo using a clamp or other tightening mechanism, which allows for easy adjustment as needed.
4. Adjust the height of the tool rest
Position the tool rest at a height that is convenient for your turning stance and allows for proper tool control. The tool rest should be slightly below center height, allowing for the proper cutting angle for your turning tools. Make sure the tool rest is securely tightened and does not wobble or move during use.
5. Adjust the distance from the wood
Position the tool rest at a distance from the wood that allows for comfortable and effective tool control. The exact distance will depend on the size and shape of your turning project, as well as the preferences of the woodturner. Experiment with different distances to find the one that works best for you.
Once you have set up the tool rest, you are ready to begin using your wood lathe for turning projects. Remember to always follow safety guidelines and use proper technique when operating a wood lathe.
Adjust the Lathe Speed
Adjusting the speed of the wood lathe is an important step to ensure safe and accurate turning. The speed at which the lathe spins can affect the quality of the turning and the safety of the operator.
Here is a step-by-step guide on how to adjust the lathe speed:
- Refer to the lathe manufacturer’s instructions to determine the appropriate speed range for the specific type of wood you will be turning. Different types of wood require different speeds to achieve the best results.
- Locate the speed control mechanism on your lathe. This can be a dial, lever, or digital display, depending on the model of your lathe.
- If your lathe has a dial or lever, adjust it to the desired speed within the recommended range. If your lathe has a digital display, use the controls to set the speed.
- Start the lathe at the lowest speed possible and gradually increase the speed until you reach the desired setting. This will prevent any sudden movements or accidents.
- Ensure that the lathe is running smoothly and that there are no vibrations or wobbling. If you notice any abnormalities, stop the lathe immediately and inspect for any loose or damaged parts.
It is important to note that different turning applications may require different lathe speeds. For example, roughing cuts may require lower speeds, while finish cuts may require higher speeds. Experiment and practice with different speeds to find what works best for your specific projects.
Remember to always wear appropriate safety gear, such as protective goggles and a face shield, when working with a wood lathe. Additionally, keep long hair, loose clothing, and jewelry secured and away from the spinning lathe.
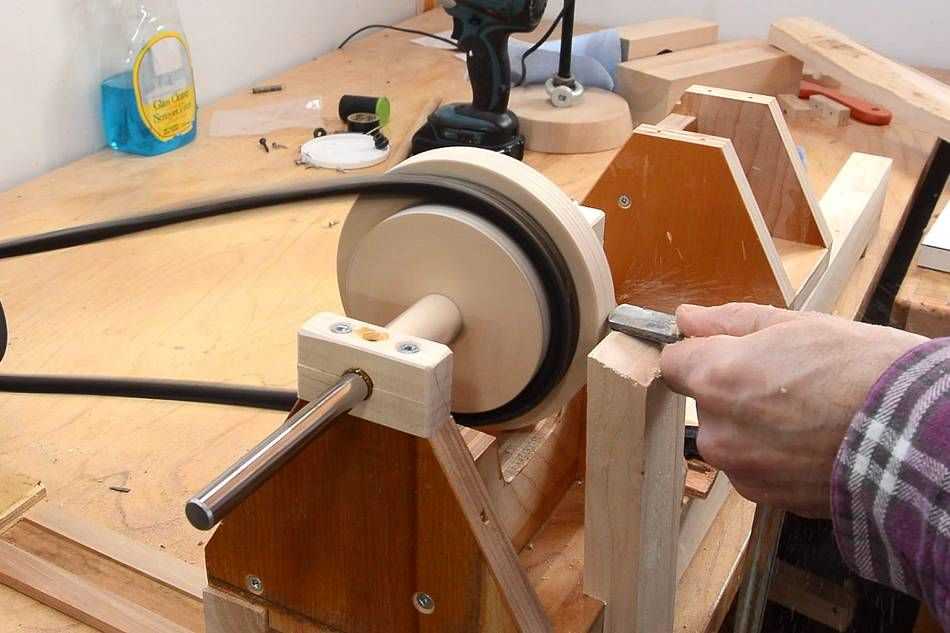
Start Turning the Wood
- Mount the wood piece securely onto the lathe using a faceplate or a chuck. Make sure the wood is centered and balanced.
- Adjust the tool rest so that it is close to the turning piece, but does not touch it. This will provide support and prevent the tool from catching on the wood.
- Switch on the lathe and set the speed to a moderate level. Start with a slow speed if you are a beginner.
- Hold the turning tool firmly and place it on the tool rest, just above the spinning wood.
- Bring the tool slowly towards the wood, making sure it is in contact with the wood before you start cutting.
- Using a light touch, begin shaping the wood by gently moving the tool back and forth along the surface. Take your time and focus on maintaining control.
- As you become more comfortable, gradually increase the pressure and speed of your cuts to remove more wood and shape the piece according to your intended design.
- Continue turning the wood, occasionally stopping to check the progress and make any necessary adjustments.
- Remember to always keep your hands and fingers away from the spinning wood and use the appropriate safety gear, such as safety glasses and a dust mask.
- Experiment with different techniques and cuts to achieve various shapes and designs on the wood.
- Once you have finished turning the wood, switch off the lathe and allow the wood to come to a complete stop before removing it from the lathe.
By following these steps and practicing regularly, you will be able to create beautiful turned wood pieces with your lathe. Enjoy the process and embrace your creativity!
Finishing and Sanding the Wood
Finishing and sanding the wood on a lathe is an important step in the woodworking process. It helps to smooth out any rough spots and bring out the natural beauty of the wood. Here are the steps to properly finish and sand the wood on a lathe:
1. Prepare the Wood
Before you can begin finishing and sanding, make sure the wood is properly prepared. This includes removing any excess bark or debris from the surface and checking for any cracks or defects that need to be addressed.
2. Choose the Right Sandpaper
When it comes to sanding the wood on a lathe, it’s important to choose the right sandpaper grit. Start with a lower grit, such as 80 or 100, to remove any rough spots or tool marks. Then, gradually work your way up to a higher grit, such as 220 or 320, for a smoother finish.
3. Sand with the Grain
When sanding the wood on a lathe, always sand with the grain. Sanding against the grain can cause tear-out and leave unsightly marks on the wood. Take your time and sand in a smooth, consistent motion to achieve the best results.
4. Use a Sanding Pad
To help evenly distribute pressure and avoid creating flat spots, use a sanding pad while sanding the wood on a lathe. This will help to maintain a consistent surface and prevent uneven sanding.
5. Clean and Inspect
After sanding, take the time to clean and inspect the wood. Use a brush or cloth to remove any sanding dust, and check for any remaining rough spots or imperfections. If necessary, repeat the sanding process with a higher grit sandpaper.
6. Apply a Finish
Once the wood is properly sanded, it’s time to apply a finish. The type of finish you choose will depend on the desired look and feel of the wood. Common finishes for lathe-turned wood include varnish, oil, or wax. Follow the manufacturer’s instructions for the chosen finish and apply it evenly to the surface of the wood.
7. Allow the Finish to Dry
After applying the finish, allow it to dry completely before handling or using the wood. This may take several hours or even overnight, depending on the type of finish used. Be patient and avoid touching the wood until it is completely dry to avoid smudging or damaging the finish.
8. Buff and Polish (Optional)
If you want to achieve an even smoother and shinier finish, you can optionally buff and polish the wood after the finish has dried. Use a soft cloth or polishing pad to gently buff the surface in a circular motion. This will help to remove any residual imperfections and bring out the luster of the wood.
By following these steps, you can effectively finish and sand the wood on a lathe, creating a smooth and beautiful final product.
FAQ
What is a wood lathe and how does it work?
A wood lathe is a machine that is used to shape pieces of wood into various forms such as bowls, vases, and spindles. It works by rotating the wood while a cutting tool is held against it, allowing the woodworker to shape and form the wood in a controlled manner.
What are the different components of a wood lathe?
A wood lathe consists of several components, including the headstock, which holds and rotates the wood; the tailstock, which supports the other end of the wood; the tool rest, which provides support for the cutting tools; and the motor, which powers the rotation of the wood.
What safety precautions should I take when setting up a wood lathe?
When setting up a wood lathe, it is important to wear appropriate safety gear, such as safety glasses and ear protection. It is also important to ensure that the lathe is securely mounted to a stable surface and that all guards and safety features are in place. Additionally, it is important to familiarize yourself with the operation of the lathe and to follow proper technique when using the cutting tools.
How do I choose the right wood lathe for my needs?
When choosing a wood lathe, there are several factors to consider. These include the size of the projects you plan to work on, the available space in your workshop, and your budget. It is also important to consider the features and specifications of different lathes, such as the maximum turning diameter and distance between centers. It can be helpful to read reviews and seek recommendations from other woodworkers before making a decision.
What are some common woodturning techniques that can be performed on a lathe?
Some common woodturning techniques include spindle turning, bowl turning, and hollow form turning. Spindle turning involves shaping long, thin pieces of wood into items like chair legs or table legs. Bowl turning involves shaping a block of wood into a bowl shape. Hollow form turning involves creating hollow shapes, such as vases or goblets, by removing the center of a piece of wood.
What are some beginner-friendly projects that can be done on a wood lathe?
For beginners, some simple projects that can be done on a wood lathe include making wooden pens, bottle stoppers, and small bowls. These projects can help beginners to practice basic woodturning techniques and get familiar with the operation of the lathe.
Video

How to wrap hexagon box

Meet Harrison Clayton, a distinguished author and home remodeling enthusiast whose expertise in the realm of renovation is second to none. With a passion for transforming houses into inviting homes, Harrison's writing at https://thehuts-eastbourne.co.uk/ brings a breath of fresh inspiration to the world of home improvement. Whether you're looking to revamp a small corner of your abode or embark on a complete home transformation, Harrison's articles provide the essential expertise and creative flair to turn your visions into reality. So, dive into the captivating world of home remodeling with Harrison Clayton and unlock the full potential of your living space with every word he writes.