Step-by-Step Guide on Building a Treadle Lathe for Woodworking

Woodworking enthusiasts, both amateur and professional, often find themselves in need of a reliable and versatile lathe. A treadle lathe, operated by foot power, is a traditional tool that offers a great deal of flexibility and precision in woodworking projects. Building your own treadle lathe can be a rewarding experience, allowing you to customize the design to meet your specific needs and preferences.
In this step-by-step guide, we will walk you through the process of building a treadle lathe from scratch, using readily available materials and basic woodworking tools. Whether you are a seasoned woodworker looking to add a new tool to your workshop or a beginner eager to embark on your first major woodworking project, this guide will provide you with all the information and instructions you need to successfully build your own treadle lathe.
Throughout the guide, we will cover various aspects of the construction process, including selecting the right materials, preparing the necessary tools, and assembling the lathe components. We will also provide tips and recommendations to help you troubleshoot common issues and ensure the final product is sturdy, functional, and safe to use. By following our step-by-step instructions and taking the time to understand the principles behind each construction step, you will gain the skills and knowledge necessary to build a high-quality treadle lathe that will serve you well for years to come.
So, whether you are looking to save money by building your own lathe or simply enjoy the satisfaction of creating your own woodworking tools, join us on this exciting journey as we delve into the world of treadle lathe construction!
Choosing a Design for Your Treadle Lathe

When building a treadle lathe for woodworking, it’s important to choose a design that suits your needs and preferences. There are several factors to consider when selecting a design, such as functionality, cost, and complexity. Here are some tips to help you choose the right design for your treadle lathe:
1. Determine your woodworking needs
Before selecting a design, consider the type of woodworking projects you plan to undertake using the lathe. Different projects may require specific features or capacities, so it’s important to choose a design that can accommodate your needs.
2. Research different designs
Take the time to research and explore various treadle lathe designs. Look for designs that have been proven to work effectively and have positive reviews from other woodworkers. It can be helpful to consult woodworking forums, books, or online resources to get ideas and inspiration.
3. Consider your budget
Setting a budget is an important step in choosing a treadle lathe design. The cost of materials and components can vary greatly depending on the design and quality you choose. Consider how much you are willing to spend and try to find a design that fits within your budget.
4. Evaluate the complexity of the design
Consider your woodworking skill level and the amount of time and effort you are willing to invest in building the treadle lathe. Some designs may be more complex and require advanced woodworking skills and tools, while others may be simpler and more suitable for beginners. Choose a design that aligns with your skill level and available resources.

5. Seek expert advice
If you’re unsure about which design to choose, don’t hesitate to seek advice from experienced woodworkers or professionals in the field. They can provide valuable insights and help you make an informed decision based on your specific requirements.
6. Consider future expansions or modifications
Think about the potential for future expansions or modifications to your treadle lathe. If you anticipate needing additional features or capabilities in the future, choose a design that can be easily modified or upgraded. Flexibility is an important factor to consider, especially if you plan to use the lathe for a long time.
By considering these factors and taking the time to research and evaluate different designs, you can select a treadle lathe design that meets your woodworking needs and preferences. Remember to prioritize functionality, cost, and complexity to ensure a successful and enjoyable woodworking experience.
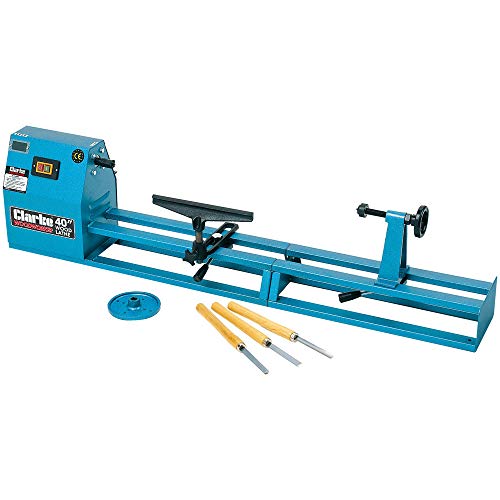
Gathering the Necessary Tools and Materials
Tools
- Table saw or circular saw
- Drill press or hand drill
- Jigsaw
- Router
- Miter saw or handsaw
- Chisels
- Woodcarving gouges
- Hand plane
- Clamps
- Screwdrivers
- Measuring tape
- Pencil
Materials
- 2×4 lumber
- 3/4-inch plywood
- 1/2-inch plywood
- Wood screws
- Wood glue
- Sandpaper
- Wood finish (stain, paint, or varnish)
- Treadle mechanism (purchased or homemade)
Optional Materials
- Lathe accessories (chucks, faceplates, tool rests)
- Dovetail or dowel joinery
- Metal hardware (hinges, screws, and washers)
- Wooden dowels
- Wood stain or paint
- Wood varnish or lacquer
Safety Equipment
- Safety goggles
- Dust mask
- Hearing protection
- Gloves
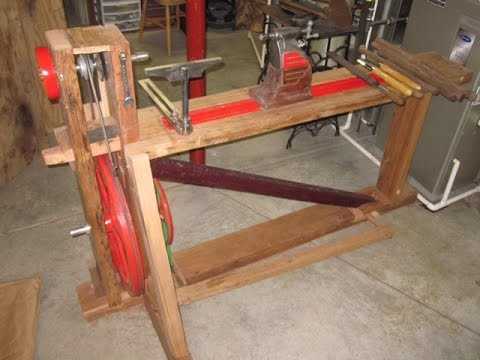
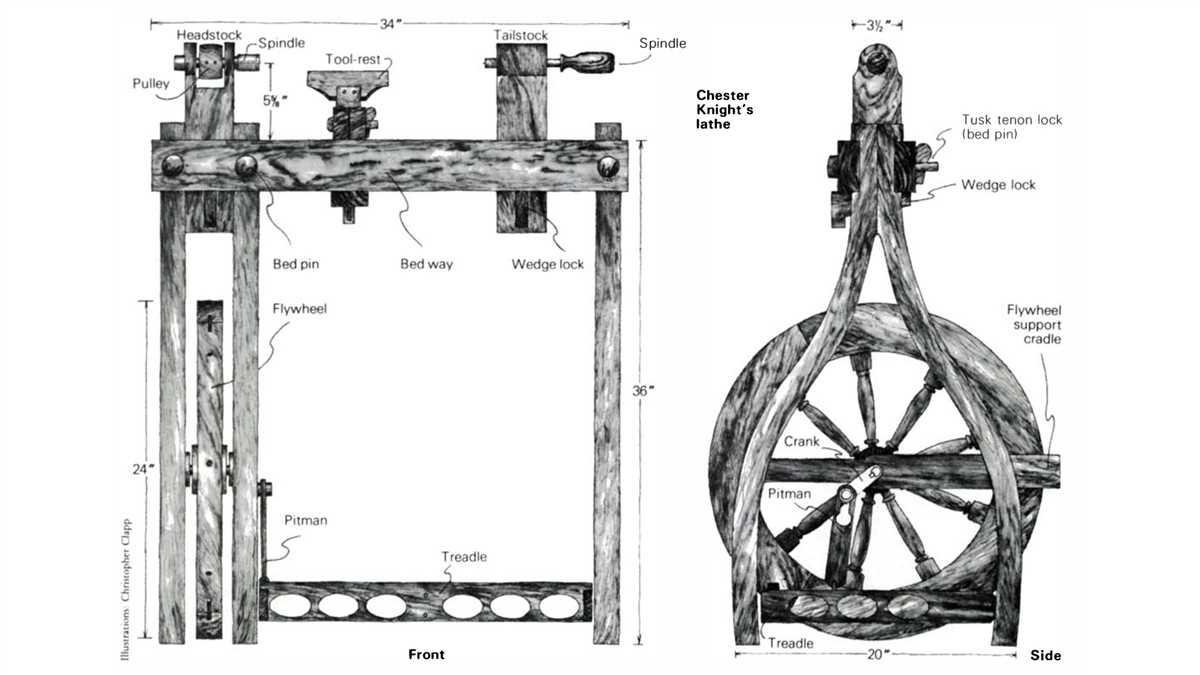
Building the Frame and Bed of the Lathe

The frame and bed of the lathe form the foundation of the machine and provide stability and support for the other components. Follow these steps to build the frame and bed:
Materials Needed
- 2×4 lumber for the frame
- Plywood for the bed
- Screws
- Wood glue
Step 1: Design the Frame
Begin by designing the frame of the lathe. Determine the desired dimensions and measurements for the frame based on the size of the lathe you want to build. Sketch out the design and make a list of the necessary lumber pieces.
Step 2: Cut the Lumber
Using a saw, cut the 2×4 lumber according to the measurements you determined in the previous step. Cut two long pieces for the sides of the frame and two shorter pieces for the front and back.
Step 3: Assemble the Frame
Assemble the frame by attaching the two longer pieces vertically to the ends of the shorter pieces using screws and wood glue. Make sure the corners are squared and the frame is sturdy.
Step 4: Add the Bed
Place the plywood sheet on top of the frame to serve as the bed of the lathe. Adjust the positioning until it’s centered and secure it to the frame using screws.

Step 5: Reinforce the Structure
To ensure stability, reinforce the frame by adding additional support beams or braces as needed. This will help prevent any wobbling or movement during operation.
Step 6: Sand and Finish
Once the frame and bed are assembled, sand any rough edges or surfaces. Apply a finish or sealant to protect the wood and enhance its appearance.
Building the frame and bed of the lathe is a crucial step in creating a stable and reliable machine. Take the time to measure accurately and assemble the components securely to ensure a high-quality final product.
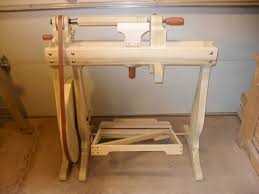
Installing the Headstock and Tailstock
Once you have completed the base and legs of your treadle lathe, it’s time to install the headstock and tailstock. These components are crucial for holding and rotating the workpiece, allowing you to shape and form it with your tools.
1. Position the Headstock
Start by positioning the headstock on the bed of the lathe. The headstock is the stationary part of the lathe that holds the workpiece. Place it at one end of the lathe bed, ensuring that it is centered and aligned with the bed’s axis. Secure it in place using clamps or screws.

2. Attach the Headstock to the Bed
Using the appropriate hardware (screws or bolts), attach the headstock to the bed. Make sure to tighten the screws or bolts securely to ensure that the headstock remains stable during operation.
3. Install the Tailstock
The tailstock is the movable part of the lathe, which holds the opposite end of the workpiece. Position the tailstock on the lathe bed, ensuring that it is aligned with the headstock and centered along the bed’s axis. Secure it in place using clamps or screws.
4. Attach the Tailstock to the Bed
Similar to the headstock, use screws or bolts to attach the tailstock securely to the lathe bed. Tighten the hardware to ensure that the tailstock remains stable during operation.
5. Align the Headstock and Tailstock
Before moving forward, it’s essential to align the headstock and tailstock properly. This alignment ensures that the workpiece spins smoothly and without wobbling. Use a straightedge or a lathe alignment tool to check and adjust the alignment if necessary.
6. Lubricate the Headstock and Tailstock
Apply lubricant to the moving parts of both the headstock and tailstock. This lubrication will reduce friction and allow for smoother operation.
7. Test the Headstock and Tailstock
Once everything is in place and aligned, test the headstock and tailstock by rotating the workpiece manually. Ensure that they move smoothly and without any obstructions. If any issues are detected, make the necessary adjustments before proceeding.
With the headstock and tailstock properly installed and aligned, your treadle lathe is now ready for use. You can now proceed with mounting the tool rest and other necessary components, enabling you to start turning wood with your foot-powered lathe.
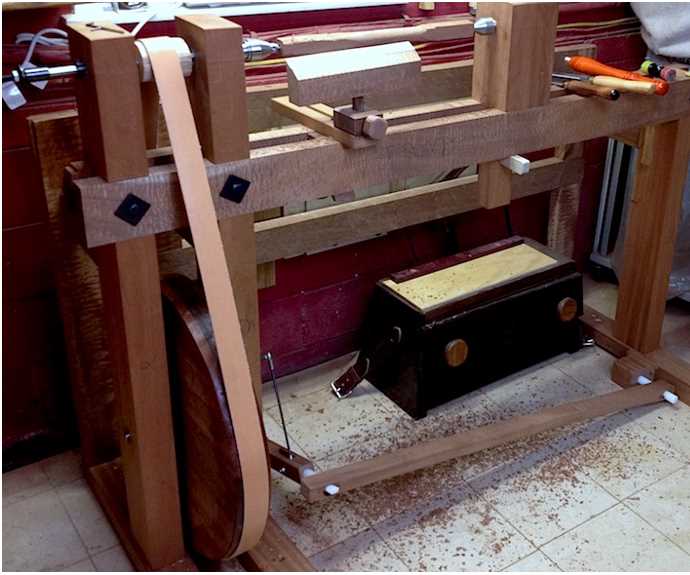
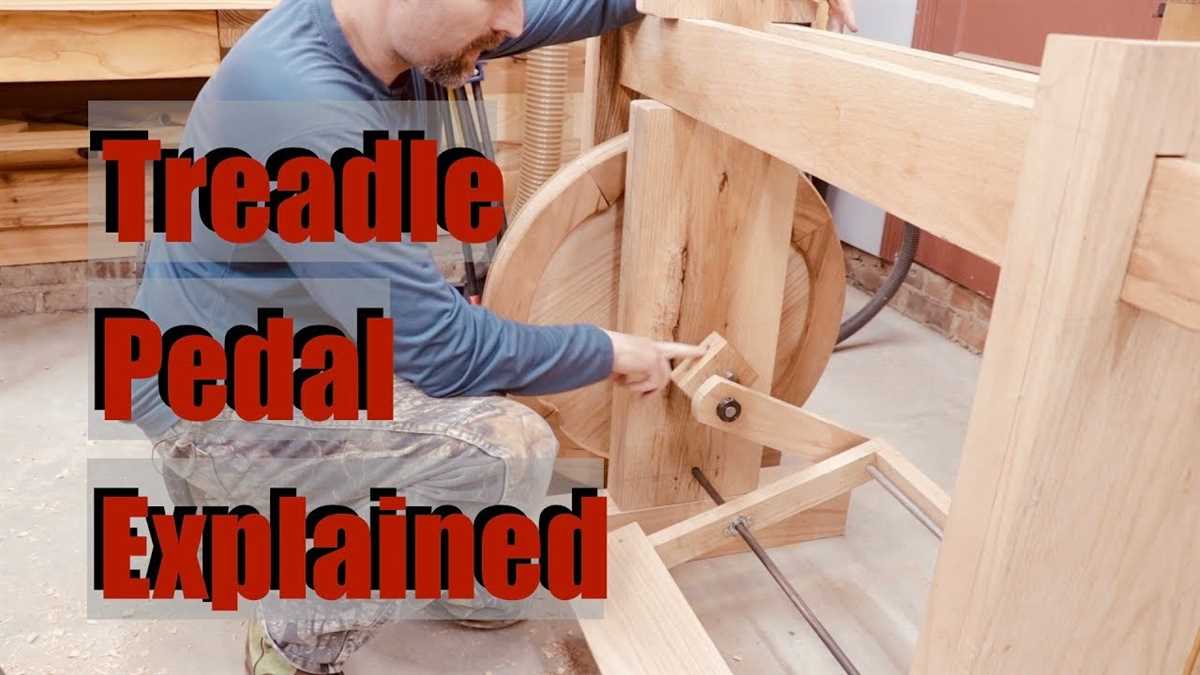
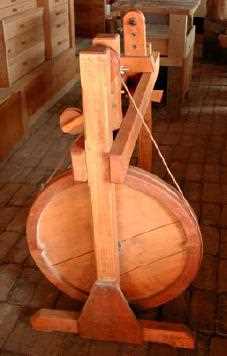
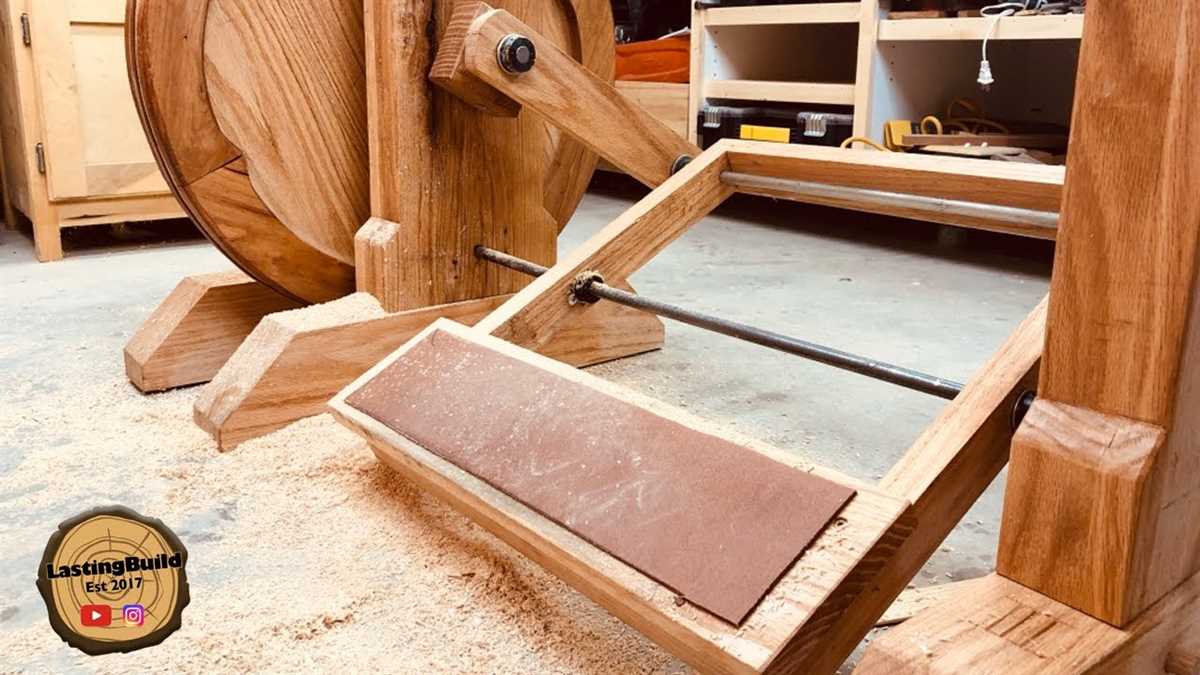
Creating the Treadle and Flywheel Mechanism
Materials Needed
- Two wooden planks, 2×4 inches, 3 feet long
- Wood screws
- Treadle pedal
- Steel rod, 1/2 inch diameter, 4 feet long
- Pulley wheel
- Drive belt
Step 1: Assembling the Treadle Frame
- Place the two wooden planks parallel to each other, with a distance of 3 feet between them.
- Attach the planks together using wood screws, ensuring that they are securely fastened.
- Measure and mark the center point of the wooden planks.
Step 2: Installing the Treadle Pedal
- Attach the treadle pedal to the center point on the wooden planks using wood screws.
- Make sure the treadle pedal is securely fastened and can pivot freely.
Step 3: Adding the Flywheel Mechanism
- Insert the steel rod through the wooden planks, aligning it with the center point.
- Attach the pulley wheel to one end of the steel rod using screws.
- Place the drive belt over the pulley wheel and secure it in place.
Step 4: Testing the Treadle Lathe
Once the treadle and flywheel mechanism are assembled, you can test the functionality of your treadle lathe. Make sure the treadle pedal moves smoothly and allows the flywheel to rotate freely. Adjust any components if necessary.
With the treadle and flywheel mechanism in place, your treadle lathe is now ready for use. You can proceed to connect the lathe spindle and tailstock, as well as attach cutting tools for woodworking projects.
Attaching the Spindle and Tool Rest
Once you have built the main frame and the flywheel of your treadle lathe, you are ready to attach the spindle and tool rest. The spindle is the rotating part of the lathe that holds the workpiece, and the tool rest is used to support the cutting tool.
Step 1: Attach the Spindle
Start by attaching the spindle to the main frame of the lathe. The spindle should be mounted on the headstock, which is located at the front of the lathe. Use the provided hardware and follow the manufacturer’s instructions to securely attach the spindle.
Step 2: Install the Tool Rest
After the spindle is attached, it’s time to install the tool rest. The tool rest is typically a metal bar that slides into a support bracket on the lathe. Position the tool rest at the desired height and tighten the locking mechanism to secure it in place.
Step 3: Adjust the Tool Rest
Once the tool rest is installed, you’ll need to adjust its position to fit the specific work you are doing. Adjust the height of the tool rest so that it is slightly below the centerline of the spinning workpiece. This will allow you to safely and effectively use your cutting tools on the workpiece.
Step 4: Secure the Tool Rest
After adjusting the tool rest, make sure to tighten any locking mechanisms to securely hold it in place. It’s important that the tool rest does not move while you are using the lathe, as this could cause accidents or affect the quality of your work.
Step 5: Check for Stability
Before using the lathe, double-check that both the spindle and the tool rest are securely attached and stable. Give them a gentle tug to make sure they won’t come loose while in use. If anything feels loose or unstable, stop and re-secure the necessary components before proceeding.
Attaching the spindle and tool rest is a crucial step in setting up your treadle lathe for woodworking. With these components properly installed, you’ll be ready to start turning wood and creating beautiful projects.
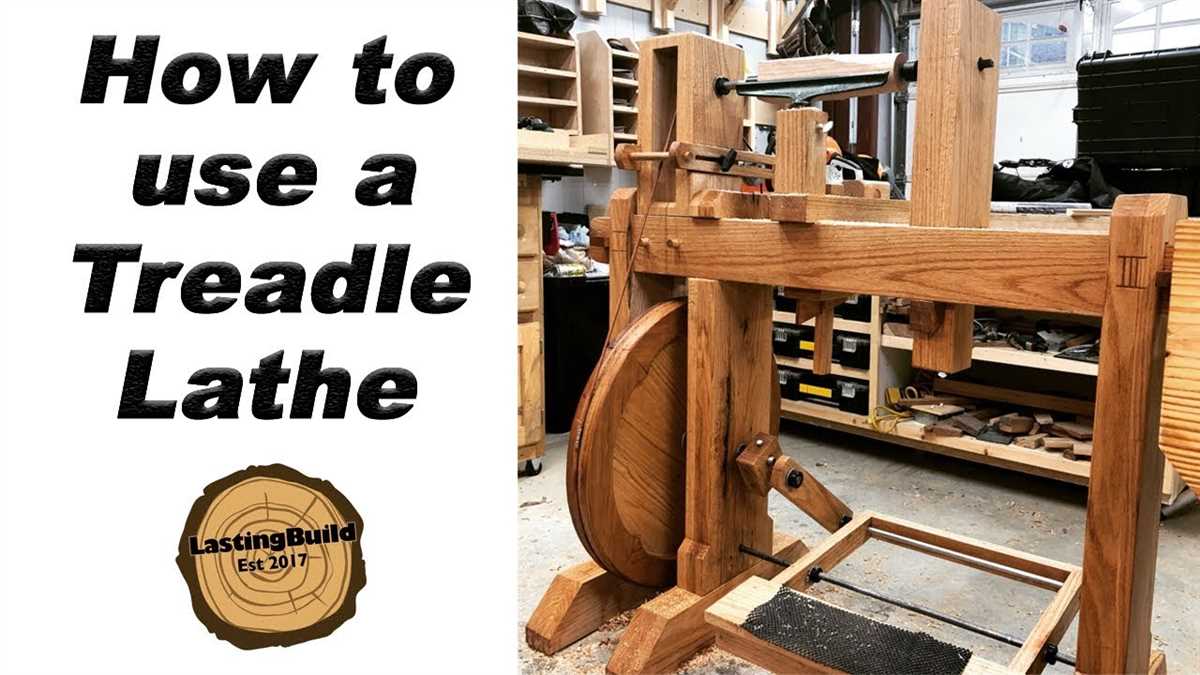
Assembling the Treadle Lathe
Once you have gathered all the necessary materials and prepared the different components of the treadle lathe, it is time to assemble them. Follow these steps to assemble your treadle lathe:
- Attach the headstock: Start by attaching the headstock, which holds the workpiece, to the bed. Place the headstock on the bed in the desired position and secure it using screws or bolts.
- Install the tailstock: Next, install the tailstock, which provides support for the opposite end of the workpiece. Position it on the bed and secure it with screws or bolts.
- Mount the tool rest: Attach the tool rest to the bed, ensuring that it is positioned at the appropriate distance from the workpiece. The tool rest should be parallel to the bed and adjustable to different heights and angles.
- Connect the treadle mechanism: Attach the treadle mechanism to the lathe. This mechanism usually consists of a pedal, a connecting rod, and a flywheel. Follow the manufacturer’s instructions or design specifications to properly connect these components.
- Adjust the belt tension: Depending on the type of treadle lathe you are building, you may need to adjust the belt tension. This can typically be done by adjusting the position of the flywheel or using a tensioning mechanism provided with the lathe.
- Check for proper alignment: Once the treadle lathe is fully assembled, check for proper alignment of all components. Ensure that the headstock, tailstock, and tool rest are all in line with each other and parallel to the bed.
- Test the treadle lathe: Before using the treadle lathe for woodworking projects, it is important to test it for smooth operation. Pedal the treadle to make sure the flywheel turns freely and there are no obstructions or unusual vibrations.
By following these steps, you will be able to assemble your treadle lathe and prepare it for woodworking projects. Remember to refer to the manufacturer’s instructions or design specifications for any specific details or adjustments required for your particular treadle lathe.
Testing and Adjusting the Lathe for Woodworking
Once you have built your treadle lathe for woodworking, it’s important to test and adjust it before using it on your projects. This will ensure that the lathe is functioning properly and is safe to use.
1. Checking the Alignment
Start by checking the alignment of the lathe components. Make sure that the headstock, tailstock, and tool rest are all aligned parallel to each other. This can be done by using a straight edge or a square. If any adjustments are needed, loosen the bolts that hold the components in place and make the necessary adjustments. Once everything is properly aligned, re-tighten the bolts.
2. Testing the Spindle and Bearings
Next, test the spindle and bearings to make sure they are running smoothly. Start by spinning the spindle with your hand to see if it turns freely. If there is any resistance or grinding noise, there may be an issue with the bearings. In this case, you may need to reassemble the bearings or replace them if necessary.
You can also test the bearings by mounting a piece of scrap wood on the lathe and turning it at a slow speed. Observe the movement of the wood and listen for any unusual noises. If there are any vibrations or wobbling, there may be an issue with the spindle or bearings that needs to be addressed.
3. Checking the Treadle Mechanism
Make sure the treadle mechanism is functioning properly. Push on the treadle to see if it moves smoothly and returns to its starting position without any issues. Check for any loose or worn-out parts that may need to be tightened or replaced.
4. Testing the Speed Control
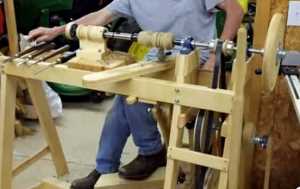
Test the speed control of the lathe by operating the treadle and observing the speed at which the spindle rotates. Make sure you are able to adjust the speed smoothly and that the lathe maintains a consistent speed while in use.
5. Ensuring Safety Measures
Before using the lathe for woodworking, ensure that all safety measures are in place. This includes wearing appropriate safety gear such as safety glasses and ear protection. Make sure to keep your fingers and loose clothing away from the moving parts of the lathe. It’s also important to have a clear workspace and a stable and secure workbench.
By thoroughly testing and adjusting your treadle lathe before using it for woodworking, you can ensure that it is functioning properly and safely. This will allow you to focus on your woodworking projects with peace of mind.
FAQ
What materials do I need to build a treadle lathe?
To build a treadle lathe, you will need materials such as wood, metal rods, bearings, a wooden bed, a foot pedal, and various woodworking tools.
Is building a treadle lathe difficult?
Building a treadle lathe can be a challenging project, especially if you don’t have much experience with woodworking or metalworking. However, by following a step-by-step guide and taking your time, it is definitely achievable for a beginner.
How long does it take to build a treadle lathe?
The time required to build a treadle lathe can vary depending on your skill level and the amount of time you can dedicate to the project. On average, it may take several days to a couple of weeks to complete.
Can I use a treadle lathe for professional woodworking?
While a treadle lathe can certainly be used for professional woodworking, it may not be as efficient or precise as a modern power lathe. However, it can still be a viable option for smaller projects or for those who prefer a more traditional approach.
Video


Meet Harrison Clayton, a distinguished author and home remodeling enthusiast whose expertise in the realm of renovation is second to none. With a passion for transforming houses into inviting homes, Harrison's writing at https://thehuts-eastbourne.co.uk/ brings a breath of fresh inspiration to the world of home improvement. Whether you're looking to revamp a small corner of your abode or embark on a complete home transformation, Harrison's articles provide the essential expertise and creative flair to turn your visions into reality. So, dive into the captivating world of home remodeling with Harrison Clayton and unlock the full potential of your living space with every word he writes.