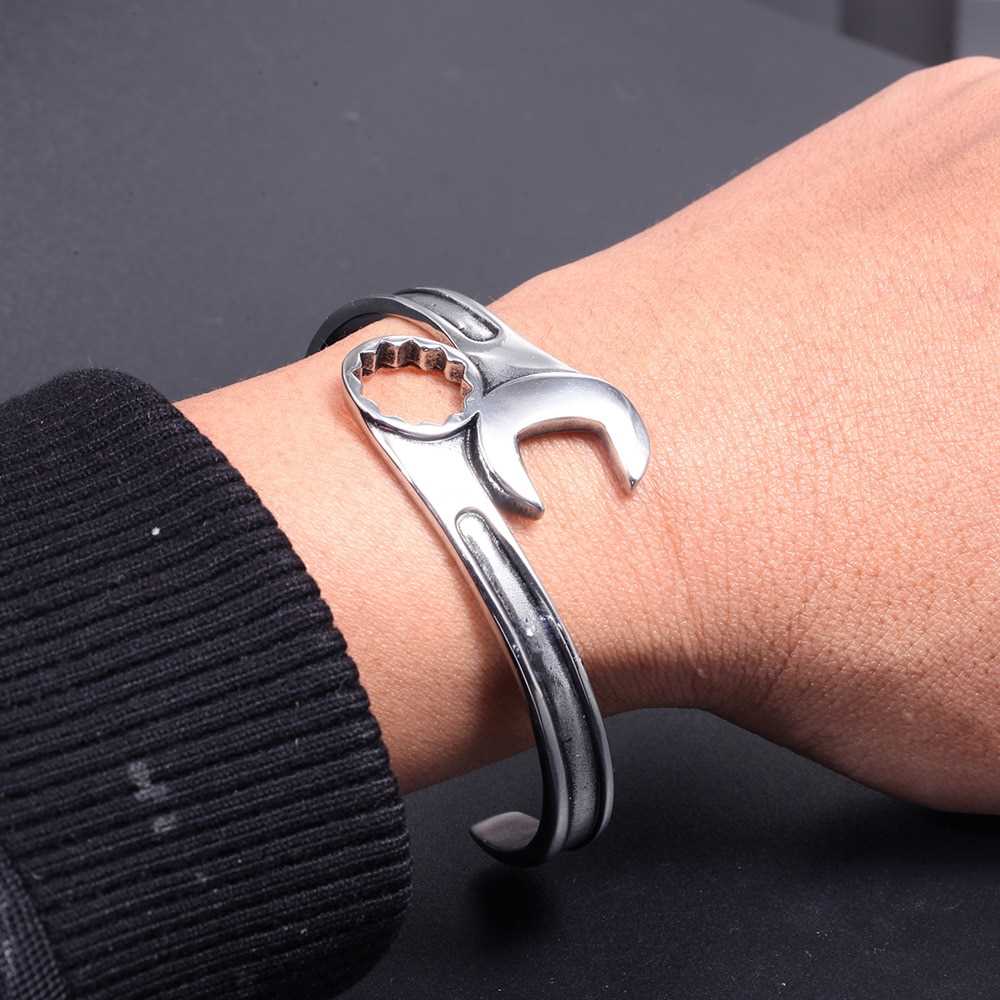
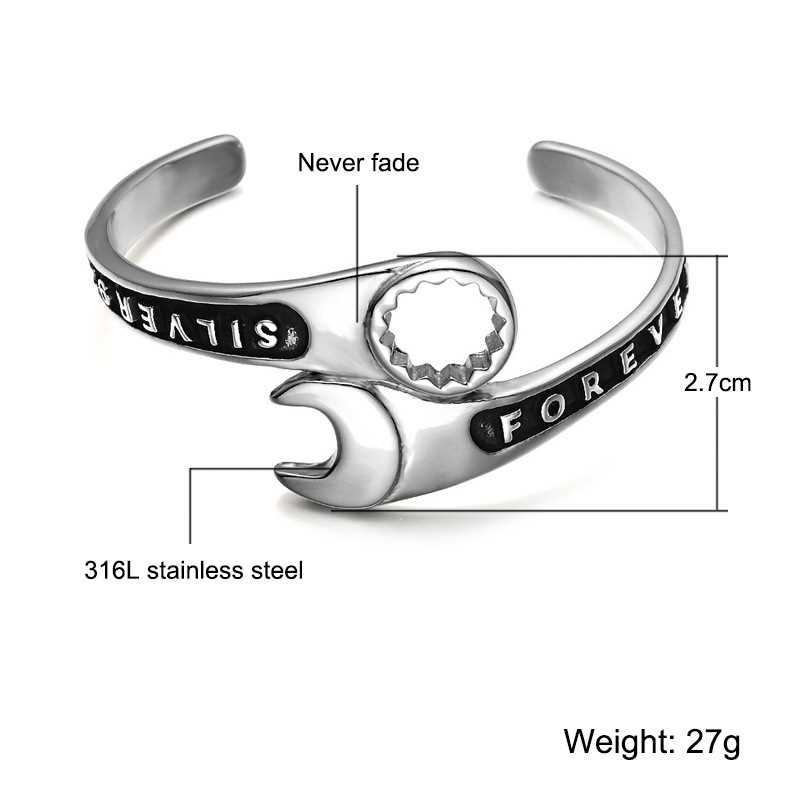
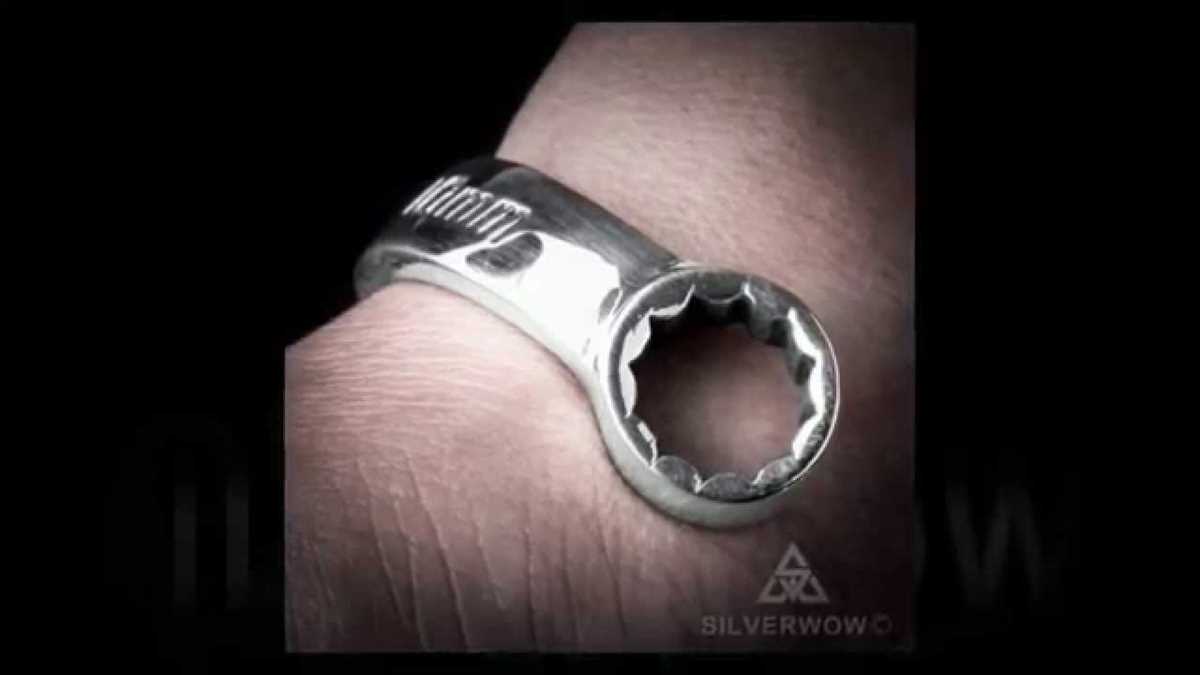
How to Make a Wrench Bracelet: Step-by-Step Guide

If you’re looking for a unique and stylish accessory that shows off your love for tools, then a wrench bracelet might be the perfect project for you. With just a few simple steps, you can transform an ordinary wrench into a fashionable piece of jewelry that will certainly make a statement. Whether you’re an experienced crafter or just starting out, this step-by-step guide will help you create a one-of-a-kind wrench bracelet that you can wear with pride.
Step 1: Gather your materials
Before you begin, make sure you have all the necessary materials on hand. You’ll need a wrench of your desired size, a metal file, sandpaper, a jeweler’s saw, a drill with a small bit, a hammer, and some pliers. Additionally, you’ll need some leather or nylon cord, a few jump rings, and a lobster clasp for the closure.
Step 2: Prepare the wrench
Start by carefully cleaning the wrench with a mild detergent to remove any dirt or grease. Once the wrench is clean and dry, use a metal file to smooth out any rough edges or burrs. Next, use sandpaper to remove any remaining rust or imperfections, creating a smooth surface for the bracelet to be worn comfortably.

Step 3: Cut and shape the wrench
Using a jeweler’s saw, carefully cut off one end of the wrench. This will create the perfect opening for your bracelet. After cutting, use a file to smooth the edges and shape the end of the wrench to your desired design. Take your time with this step to ensure a precise and clean cut.
Step 4: Drill holes for the closure
Using a drill with a small bit, carefully drill two small holes near the end of the wrench opposite the cut end. These holes will be used to attach the jump rings and lobster clasp for the closure. Make sure the holes are evenly spaced and large enough for the jump rings to fit securely.
Step 5: Attach the closure

Take one end of the leather or nylon cord and thread it through one of the jump rings. Then, loop the cord back through itself, creating a secure knot. Repeat this process with the other end of the cord and the second jump ring. Once both jump rings are attached, add the lobster clasp to one of the jump rings to complete the closure.
Step 6: Finishing touches
Before wearing your new wrench bracelet, take a moment to inspect it for any sharp edges or rough spots. Use pliers to carefully bend and shape any areas that may cause discomfort. Additionally, consider adding some personal touches such as engraving your initials or adding decorative beads or charms to make the bracelet truly your own.
Now that you have completed all the steps, your wrench bracelet is ready to be worn and admired. Whether you wear it as a fashion statement or a symbol of your love for tools, this unique accessory is sure to catch the eye and spark conversations wherever you go.
Gather the necessary materials
In order to make a wrench bracelet, you will need the following materials:

- A wrench
- A vice grip
- A hacksaw
- A metal file
- A drill
- A metal file
- Sandpaper
- Optional: paint or enamel for decoration
Make sure you have all these materials ready before starting the process. It’s important to have everything on hand to avoid interruptions during the bracelet making process.
Prepare the wrench
Before you start making your wrench bracelet, you’ll need to gather the necessary materials and prepare the wrench.
Materials:
- A wrench – preferably one with a wider handle for easier bending.
- A metal file or sandpaper – to smooth out any rough edges on the wrench.
Steps:
- Start by selecting a wrench that fits comfortably around your wrist. Make sure it is a size that you can easily shape into a bracelet.
- Use a metal file or sandpaper to smooth out any rough edges or burrs on the wrench. This will help prevent any injuries while wearing the bracelet.
Remove any unwanted elements
Before you start making your wrench bracelet, make sure to remove any unwanted elements from the wrench. This includes any nuts, bolts, or attachments that may be on the wrench.

By removing these elements, you’ll have a clean and smooth surface to work with, making it easier to manipulate the wrench into a bracelet.
Here are the steps to remove any unwanted elements:
- Inspect the wrench for any nuts, bolts, or attachments. These may be located on the handle or the jaw of the wrench.
- Use a wrench or pliers to loosen and remove any nuts or bolts that are visible.
- If there are any attachments that cannot be easily removed, consider using a saw or grinder to cut them off. Be sure to take necessary safety precautions when using these tools.
Once you have removed all unwanted elements, you’ll be ready to move on to the next step in creating your wrench bracelet.
Remember to double-check that all unwanted elements have been removed before proceeding, as any remaining elements may affect the final appearance and comfort of the bracelet.
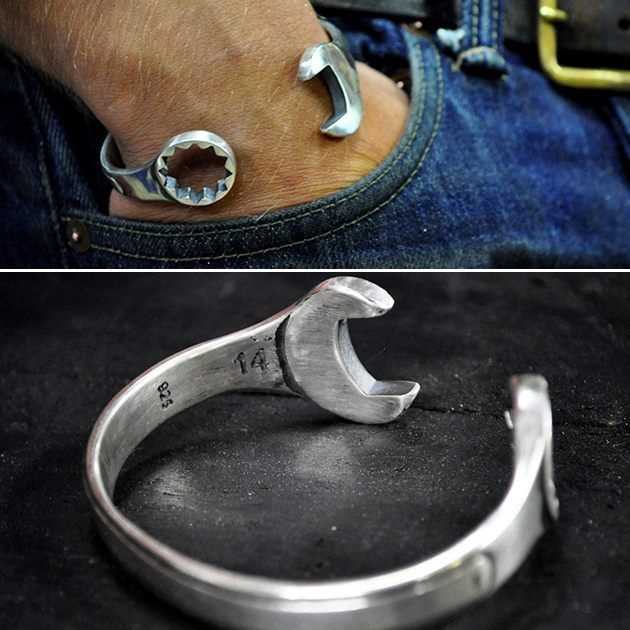
Shape the wrench into a bracelet
Now that you have gathered all the necessary materials and prepared the wrench, it’s time to start shaping it into a bracelet. Follow these steps to make the perfect wrench bracelet:

- Measure your wrist: Before you start shaping the wrench, measure your wrist to ensure the bracelet will fit comfortably. Use a flexible tape measure or a piece of string to determine the circumference of your wrist.
- Bend the wrench: Hold the wrench firmly and use pliers to gradually bend it into a circular shape. Start by bending one end of the wrench to form the clasp of the bracelet. Use the measurements you took earlier to determine the size of the bracelet and adjust the bending process accordingly.
- Smooth the edges: After bending the wrench, use sandpaper or a metal file to smooth out any sharp edges or rough surfaces. This will ensure that the bracelet is comfortable to wear and reduces the risk of scratches or injuries.
- Refine the shape: Take a close look at the overall shape of the bracelet and make any necessary adjustments. You can use pliers or your hands to tweak the curve and alignment of the wrench to achieve the desired shape.
- Polish the bracelet: Once you are satisfied with the shape, clean the bracelet thoroughly with soap and water to remove any dirt or debris. Then, use a metal polish or a polishing cloth to give the bracelet a shiny finish.
After completing these steps, you will have successfully shaped the wrench into a bracelet. You can now proudly wear your unique and stylish piece of jewelry!
Smooth out any rough edges
After bending the wrench into a bracelet shape, it’s important to smooth out any rough edges that may cause irritation or discomfort when wearing the bracelet. Follow these steps to ensure a smooth finish:
- Use a metal file or sandpaper to gently rub along the edges of the wrench bracelet.
- Hold the metal file or sandpaper at a slight angle and move it along the edges in a back-and-forth motion.
- Be careful not to press too hard, as it may damage the surface of the wrench.
- If there are any sharp corners or jagged areas, use a small grinding tool or a rotary tool with a grinding attachment to carefully grind down the sharp edges.
- Wear safety goggles and gloves to protect yourself from metal shavings.
- Hold the grinding tool at a slight angle and apply light pressure to smoothen the rough areas.
- Periodically check the edges with your fingers to ensure they are smooth and comfortable.
- Once you have smoothed out all the edges, wipe the bracelet with a clean cloth to remove any metal shavings or debris. This will help prevent any irritation or discomfort when wearing the bracelet.
- If desired, you can also use a polishing cloth or metal polish to give the bracelet a shiny finish.
- Gently rub the polishing cloth on the surface of the bracelet in a circular motion to remove any remaining scratches and bring out the natural shine of the metal.
- Alternatively, apply a small amount of metal polish onto a clean cloth and rub it onto the surface of the bracelet.
- After polishing, wipe the bracelet again with a clean cloth to remove any residue from the polishing process.
By following these steps, you can ensure that your wrench bracelet is smooth and comfortable to wear. Remember to take your time and be careful when handling sharp tools or metal files.
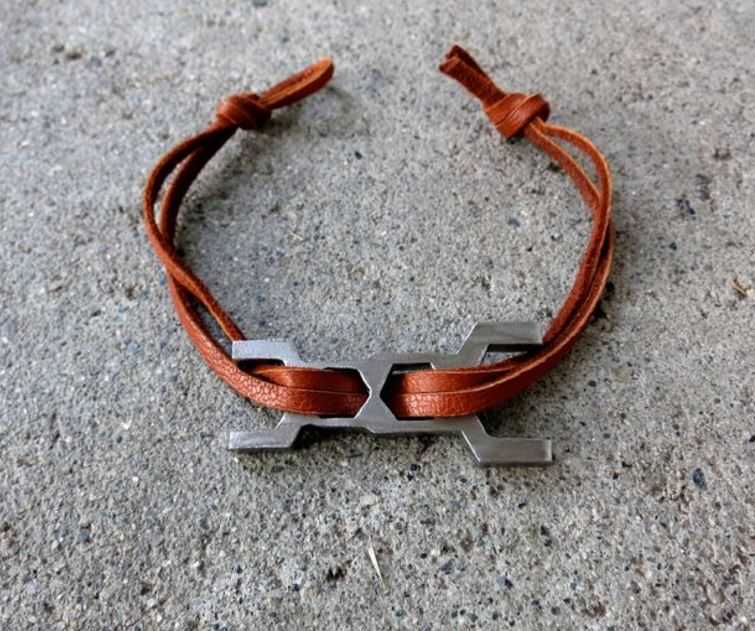
Add a personal touch
Adding a personal touch to your wrench bracelet can make it even more special. Here are a few ideas to consider:
1. Engraving
Consider engraving a message or your initials onto the wrench bracelet. This can be done by taking the bracelet to a professional engraver who can add a custom touch to your jewelry. Whether it’s a special date, a meaningful quote, or your name, engraving adds a personal and sentimental touch to your bracelet.
2. Charms
Add small charms that represent your interests or personality to your wrench bracelet. You can find a wide variety of charms, including shapes like hearts, animals, symbols, and more. Choose charms that hold meaning to you and attach them to the bracelet using small jump rings. This will create a unique and personalized look.
3. Beads
Create a beaded bracelet by adding beads to the wrench bracelet. Choose beads in colors and patterns that align with your personal style or represent something meaningful to you. You can use a variety of bead sizes and shapes to create a unique and eye-catching design.
4. Paint or color
If you want to add a pop of color to your wrench bracelet, consider using paint or colored markers. You can paint the entire bracelet or add small details and designs using different colors. Make sure to use paint or markers that are suitable for metal surfaces to ensure durability.
5. Ribbon or fabric
Attach a ribbon or fabric strip to your wrench bracelet to add a soft and feminine touch. Choose a ribbon or fabric that complements the color of the metal and tie it securely onto the bracelet. This will add texture and visual interest to your bracelet.
Remember, the goal is to personalize your wrench bracelet to make it unique to you. Get creative and think about what represents you best.
Apply a protective coating
Once your wrench bracelet is polished and buffed, it’s time to protect its finish with a protective coating. This will help prevent tarnish and keep the bracelet looking shiny for longer. There are several options for protective coatings:
Choose the coating that best suits your preferences and the materials you have on hand. Follow the instructions on the packaging to apply the protective coating evenly and let it dry completely before wearing the bracelet. Remember to reapply the protective coating periodically to maintain the shine and finish of your wrench bracelet. |
Allow the bracelet to dry and wear it!

Once you have finished painting the wrench bracelet, you will need to allow it to dry completely before wearing it. This will ensure that the paint has fully adhered to the metal and will not smudge or chip off.
It is recommended to place the bracelet on a clean surface and let it air dry for at least 24 hours. This will give enough time for the paint to dry and cure. Avoid touching or moving the bracelet during this time to prevent any accidental smudging or damage to the paint.
After the bracelet has dried, you can try it on and see how it looks. Adjust the size if necessary by gently bending it to fit your wrist comfortably. The great thing about these wrench bracelets is that they can be customized and personalized to your liking.
Once you have sized the bracelet to your preference, you can proudly wear it on your wrist as a unique and fashionable accessory. It is a great way to show off your creativity and DIY skills.
Remember to take care of the bracelet to ensure its longevity. Avoid exposing it to excessive moisture or harsh chemicals. If needed, you can gently clean it with a soft cloth to remove any dirt or dust.
In conclusion, making a wrench bracelet can be a fun and creative project. By following this step-by-step guide, you can create a unique and stylish accessory that will surely catch the attention of others. So go ahead, allow your bracelet to dry, and wear it with pride!
FAQ
What materials do I need to make a wrench bracelet?
To make a wrench bracelet, you will need a wrench, sandpaper, a vice or clamp, a mallet or hammer, a metal file, a jewelry saw or metal-cutting tool, a drill, a metal file, a mandrel or cylindrical object, polishing materials, and a metal polish.
How do I start making a wrench bracelet?
To start making a wrench bracelet, you will first need to clean the wrench using sandpaper or a wire brush to remove any rust or dirt. Then, secure the wrench in a vice or clamp, and use a mallet or hammer to flatten the curved handle of the wrench.
What should I do after flattening the wrench?
After flattening the wrench, use a jewelry saw or metal-cutting tool to cut off the rounded end of the wrench handle. Then, use a metal file to smooth the cut edge and shape the bracelet. Next, drill a hole near the cut end of the bracelet to attach a jump ring or clasp.
Are there any additional steps to finish the wrench bracelet?
Yes, there are a few additional steps to finish the wrench bracelet. Use a polishing tool or sandpaper to smooth any rough edges on the bracelet. Then, use a metal polish to clean and shine the bracelet. Finally, attach a jump ring or clasp to the drilled hole in the bracelet for easy wearing.
Can I personalize the wrench bracelet?
Yes, you can personalize the wrench bracelet by adding engravings, stamps, or other decorative elements. You can also choose to apply a patina or paint to the bracelet for a unique look. The possibilities for personalization are endless!
Video


Meet Harrison Clayton, a distinguished author and home remodeling enthusiast whose expertise in the realm of renovation is second to none. With a passion for transforming houses into inviting homes, Harrison's writing at https://thehuts-eastbourne.co.uk/ brings a breath of fresh inspiration to the world of home improvement. Whether you're looking to revamp a small corner of your abode or embark on a complete home transformation, Harrison's articles provide the essential expertise and creative flair to turn your visions into reality. So, dive into the captivating world of home remodeling with Harrison Clayton and unlock the full potential of your living space with every word he writes.