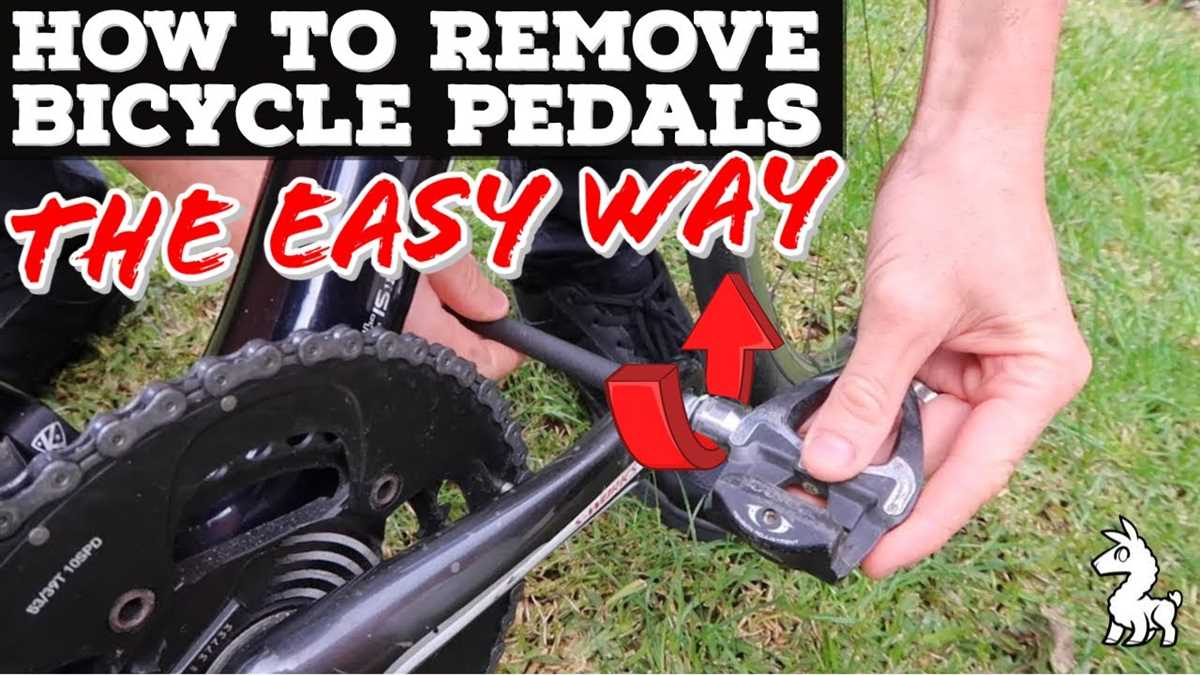
Easy Steps to Remove Bike Pedals without a Pedal Wrench

Removing bike pedals may seem like a daunting task, especially if you don’t have a pedal wrench on hand. However, there are a few easy steps you can follow to remove your bike pedals without the need for a specialized tool.
Firstly, it’s important to determine the type of bike pedals you have. Most modern bikes have either flat pedals or clipless pedals. Flat pedals can be removed using a simple wrench or an adjustable wrench, while clipless pedals require a bit more finesse.
Once you’ve identified your pedal type, you can begin the removal process. For flat pedals, start by positioning the wrench on the pedal spindle, which is the part that connects the pedal to the crank. Use a clockwise motion to loosen the pedal and continue turning until it’s loose enough to be unscrewed by hand.
Clipless pedals, on the other hand, require a different approach. Begin by locating the release mechanism on the pedal, which is usually a small lever or button. Engage the release mechanism by either pressing the lever or pushing the button, depending on your pedal model. This will loosen the tension between the pedal and the cleat, allowing you to easily unscrew the pedal by hand.
By following these simple steps, you’ll be able to remove your bike pedals without a pedal wrench in no time. Just remember to exercise caution and take your time, as forcing the pedals can cause damage to both the pedals and the bike.

Step 1: Prepare Your Tools
Before you begin removing your bike pedals, make sure you have the necessary tools on hand. Here are the tools you will need:
- A wrench (adjustable or Allen key wrench)
- A pedal wrench (optional, but helpful)
- A rag or towel
Having the right tools will make the process of removing your bike pedals much easier and more efficient. The adjustable wrench or Allen key wrench can be used to loosen the pedals, while the pedal wrench, if available, provides a more secure and stable grip.
The rag or towel is useful for wiping away any dirt or debris that may be present on the pedal threads, making it easier to remove the pedals.
Step 2: Positioning the Bike
Before removing the pedals, it is important to position the bike correctly to ensure stability and ease of access to the pedals.

Here are the steps to properly position your bike:
- Find a flat and stable surface to place your bike on.
- Ensure that the bike is in a vertical position, with the seat and handlebars aligned vertically.
- If your bike has a kickstand, make sure it is securely engaged.
- If your bike does not have a kickstand, you can lean it against a wall or have someone hold it steady for you.
- Make sure the pedals are facing forward, parallel to the ground.
- Ensure that the bike is balanced and not in danger of tipping over while you work on it.
By positioning your bike correctly, you will have a stable and accessible workspace, making it easier to remove the pedals without a pedal wrench.
Step 3: Loosen the Pedal
Once you have located the correct pedal that needs to be removed, it’s time to loosen it from the crank arm. Here’s how you can do it:
- Position your bike correctly: Make sure your bike is standing upright and stable. You can use a bike stand or lean it against a wall or another stable object.
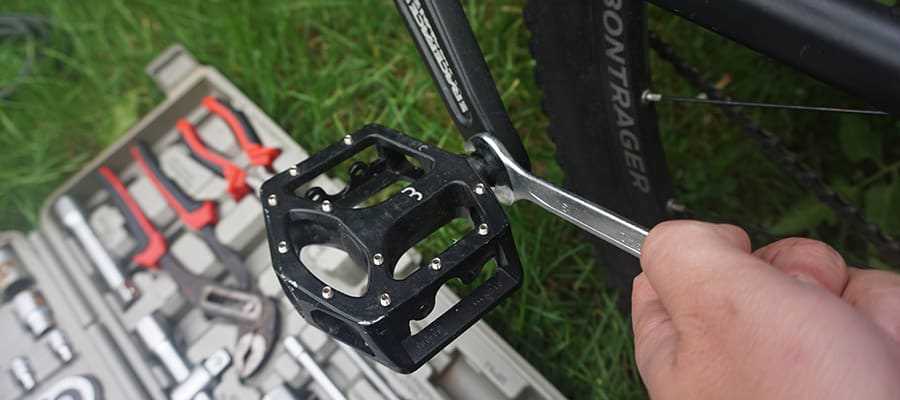
- Choose the right tool: If you don’t have a pedal wrench, you can use an adjustable wrench or a regular wrench that fits the pedal nut size. Ensure that the wrench or tool has a strong grip and is suitable for applying significant force.
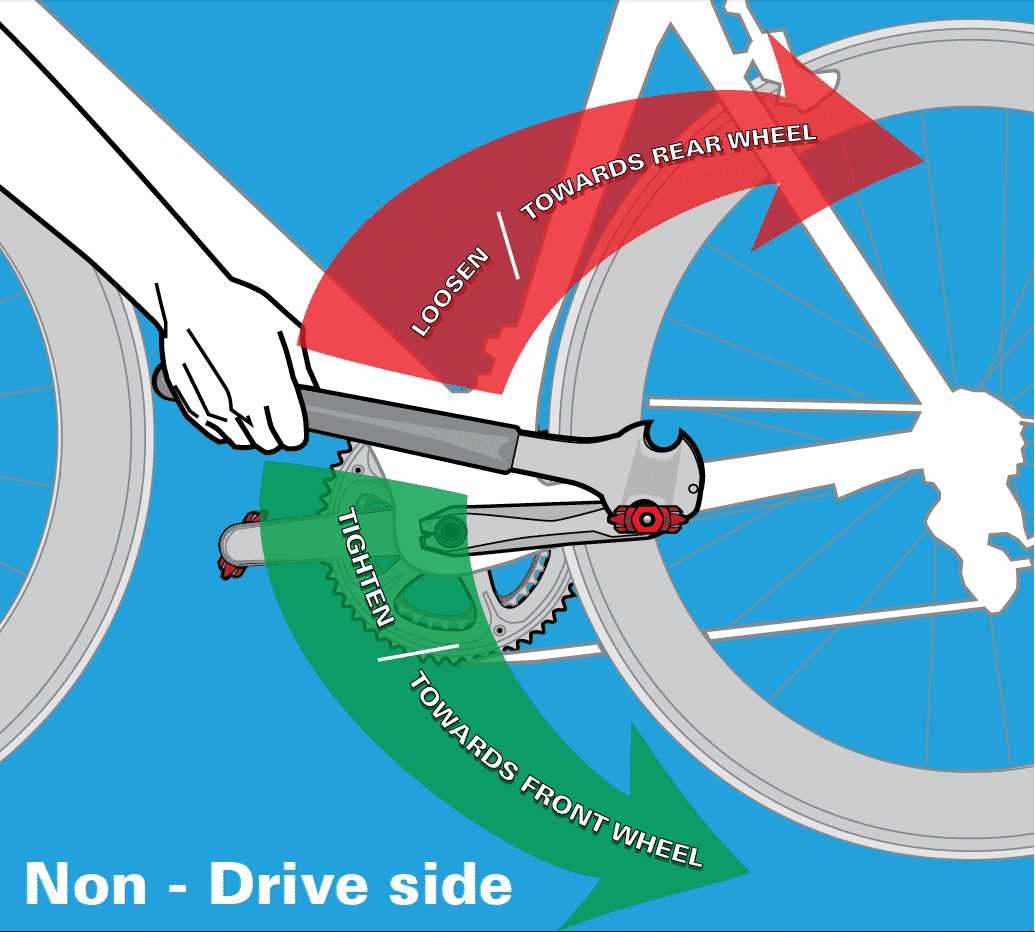
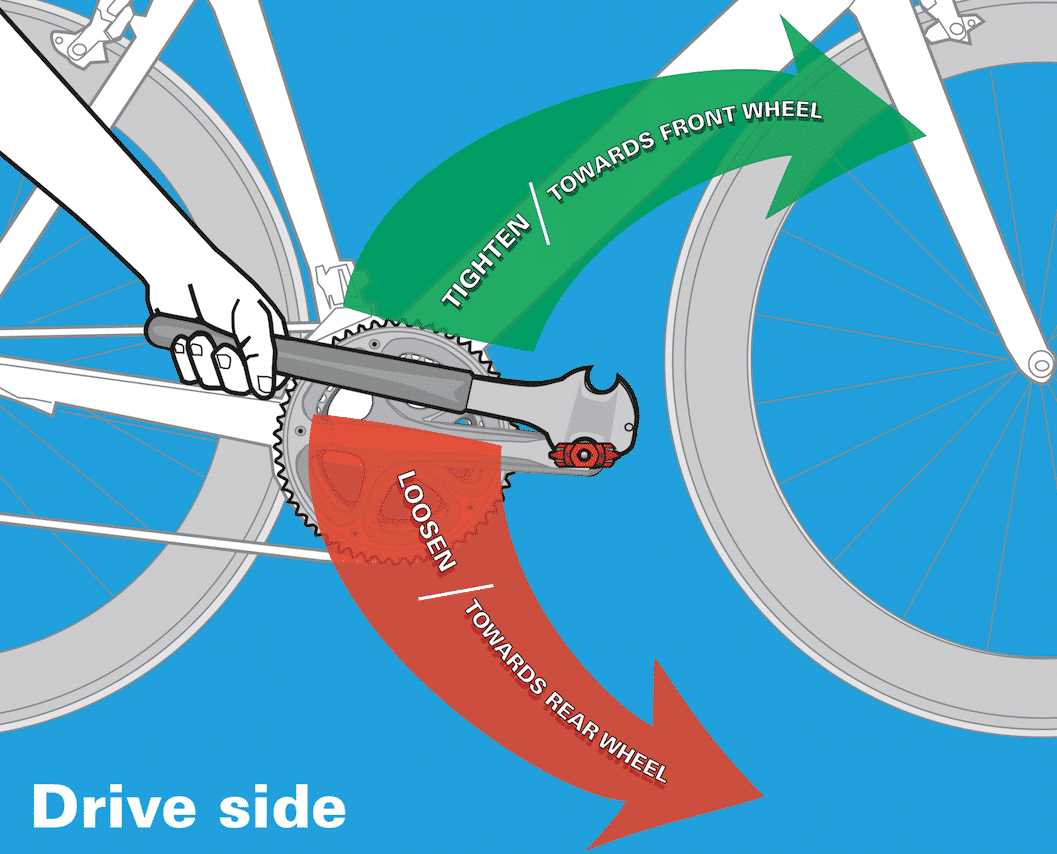
- Attach the wrench: Place the wrench on the flats of the pedal axle. The flats are the non-threaded surfaces of the pedal that are opposite to the side with the threads.
- Apply force in the correct direction: To loosen the pedal, turn the wrench counterclockwise. Remember that the left pedal is reverse threaded, so you need to turn it clockwise to loosen it.
- Use a longer wrench for leverage: If the pedal is tightly secured, you may need to use a longer wrench to increase your leverage. This will make it easier to loosen the pedal.
- Apply steady and firm pressure: Once the wrench is properly attached and positioned, use steady and firm pressure to turn it. If the pedal is stubborn, you can try gently tapping the wrench with a rubber mallet or a hammer to help break any rust or corrosion.
- Continue loosening until the pedal is free: Keep turning the wrench counterclockwise until the pedal is fully loosened. At this point, you should be able to remove the pedal by unscrewing it by hand.
Now that you have successfully loosened the pedal, you can proceed to the next step to completely remove it from the crank arm.
Step 4: Remove the Pedal

Once the pedal is loose, you can easily remove it from the crank arm. Hold onto the crank arm with one hand to keep it steady.
With your other hand, grasp the pedal near the spindle and pull it away from the bike. It should come off easily, but you may need to use a little force if it’s stuck.
Be careful when removing the pedal, as the spindle can be sharp and cause injury if you’re not careful. It’s a good idea to wear gloves for added protection.
Repeat these steps for the other pedal, and you’ll have successfully removed both pedals without a pedal wrench!

Step 5: Inspect the Pedal Threads
Once you have successfully removed the bike pedals, it is important to inspect the pedal threads. The threads are the spiral ridges on the pedals that allow them to screw into the crank arms.
Inspecting the pedal threads is important because any damage or wear to the threads can affect the performance and stability of your bike. Here are a few steps to help you inspect the pedal threads:
- Clean the threads: Use a clean cloth or a small brush to remove any dirt, debris, or old grease from the threads. This will help you get a clear view of the threads and spot any potential issues.
- Check for wear and tear: Look closely at the threads to check for any signs of wear and tear. This could include stripped threads, visible damage, or unevenness in the threads. If you notice any of these issues, it may be necessary to replace the pedals.
- Inspect the crank arms: While you’re inspecting the pedal threads, take a moment to inspect the crank arms as well. Look for any signs of damage or wear on the crank arms, as this can also affect the performance of the pedals. If you notice any issues, it may be necessary to replace the crank arms.
By inspecting the pedal threads and crank arms, you can ensure that your bike is in good working condition and avoid any potential issues while riding. If you are unsure about the condition of your pedal threads or crank arms, it is always best to consult a professional bike mechanic for further inspection and assistance.
Step 6: Clean and Grease the Threads
After removing the bike pedals, it is important to clean the threads to remove any dirt, debris, or old grease. This will ensure smooth installation and prevent any damage to the threads.

Here are the steps to clean and grease the threads:
- Use a clean cloth or a brush to wipe off any dirt or debris from the pedal threads.
- Apply a degreaser or a mild solvent to a cloth or brush and scrub the threads to remove any old grease or stubborn residue.
- Rinse the threads with water to remove any remaining degreaser or solvent.
- Dry the threads thoroughly with a clean cloth.
- Once the threads are clean and dry, apply a small amount of bicycle-specific grease to the threads.
- Use your fingers to spread the grease evenly over the threads.
Greasing the threads will help prevent corrosion, reduce friction, and make it easier to install or remove the bike pedals in the future.
Step 7: Install the New Pedals
Installing the new pedals on your bike is a straightforward process. Follow the steps below:
- Start by identifying the left and right pedals. The left pedal should have markings or an “L” on it, while the right pedal may have markings or an “R.”
- Apply a small amount of lubricant to the threads on the pedals. This will help prevent them from seizing over time.
- Insert the left pedal into the left crank arm and turn it clockwise (righty-tighty) to install it. Use your hands to start threading the pedal into the crank arm. Make sure it goes in smoothly and threads correctly. Once it is threaded in, use a pedal wrench or an Allen wrench (if applicable) to tighten it securely.
- Repeat the process for the right pedal, making sure to insert it into the right crank arm and turn it counterclockwise (lefty-loosey) to install it. Again, use your hands to start threading the pedal into the crank arm and then use a wrench to tighten it securely.
- Double-check that both pedals are tightened securely by giving them a gentle tug. They should be snug and not wobble or move excessively.
Once you have successfully installed the new pedals, you can take your bike for a test ride to ensure everything feels secure and functions properly. Enjoy your ride!
Step 8: Final Check
After removing the pedals from your bike, it’s important to do a final check to ensure everything is in order. Follow these steps to complete the removal process:
- Inspect the pedals: Take a close look at the removed pedals to check for any signs of damage or wear. If you notice any cracks, dents, or loose parts, it’s best to replace the pedals before reinstalling.
- Check the threads: Examine the threads on the crank arm where the pedals were removed. Look for any signs of damage or cross-threading. If the threads appear worn or damaged, it’s recommended to have a professional inspect and repair the crank arm before reattaching new pedals.
- Clean the crank arms: Use a clean cloth or brush to remove any dirt, debris, or grease from the crank arms. This will ensure a clean surface for the new pedals to be installed.
- Apply grease: Before installing the new pedals, apply a small amount of bicycle grease to the threads of the pedal spindle. This will help prevent corrosion and make it easier to remove the pedals in the future.
- Install the new pedals: Carefully thread the new pedals into the crank arms by hand. Make sure they are tightened securely but avoid overdoing it, as this can cause damage to the threads. Refer to the manufacturer’s instructions for the recommended torque specifications.
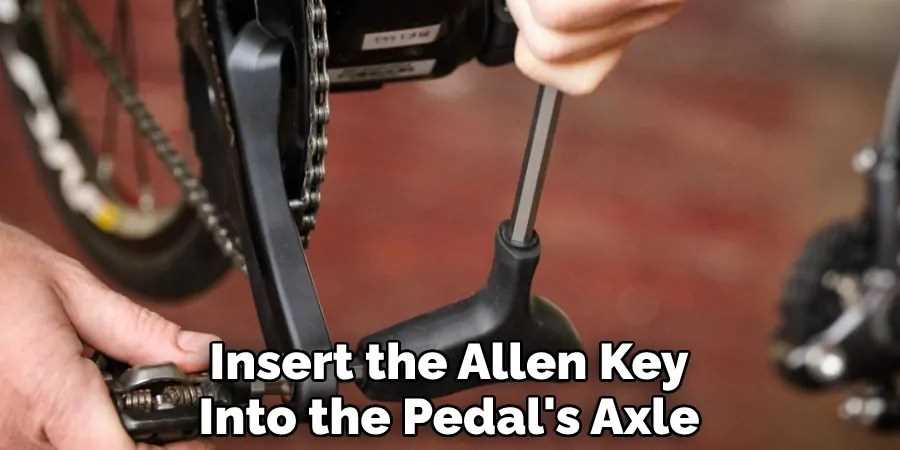
- Double-check the tightness: Using a pedal wrench or Allen key, give the pedals a final tighten to ensure they are securely attached. Be careful not to overtighten, as this can strip the threads or damage the crank arm.
By completing these final checks, you can have confidence that your bike pedals are properly installed and ready for your next ride. Enjoy your cycling adventures!
FAQ
What is a pedal wrench?
A pedal wrench is a specialized tool designed specifically for removing and installing bike pedals. It features a long handle and a narrow, adjustable wrench head that fits onto the pedal axle.
Can I remove bike pedals without a pedal wrench?
Yes, you can remove bike pedals without a pedal wrench. There are a few alternative methods that you can use, such as using an adjustable wrench or a hex wrench, or even using a piece of wood or a hammer to provide leverage.
How do I remove bike pedals with an adjustable wrench?
To remove bike pedals with an adjustable wrench, you’ll first need to adjust the wrench to fit snugly onto the pedal axle. Then, apply force in a counterclockwise direction to loosen the pedal. Once the pedal is loose, you can remove it by unscrewing it completely.
What is the easiest way to remove bike pedals?
The easiest way to remove bike pedals is by using a pedal wrench. However, if you don’t have a pedal wrench, you can use an adjustable wrench or a hex wrench. These methods may require a bit more effort, but they can still get the job done.
Is it possible to remove bike pedals without any tools?
Removing bike pedals without any tools can be quite challenging, but it is possible. One method is to use a hammer and a piece of wood. Place the wood against the pedal axle, and use the hammer to apply force in a counterclockwise direction. This can provide enough leverage to loosen the pedal and remove it.
Do I need to remove bike pedals for maintenance?
Removing bike pedals can be necessary for certain maintenance tasks, such as replacing pedal bearings or greasing the pedal threads. However, for regular maintenance tasks like cleaning the bike or adjusting the derailleur, you usually won’t need to remove the pedals.
Video


Meet Harrison Clayton, a distinguished author and home remodeling enthusiast whose expertise in the realm of renovation is second to none. With a passion for transforming houses into inviting homes, Harrison's writing at https://thehuts-eastbourne.co.uk/ brings a breath of fresh inspiration to the world of home improvement. Whether you're looking to revamp a small corner of your abode or embark on a complete home transformation, Harrison's articles provide the essential expertise and creative flair to turn your visions into reality. So, dive into the captivating world of home remodeling with Harrison Clayton and unlock the full potential of your living space with every word he writes.


