How to Organize Drill Bits: A Step-by-Step Guide
Organizing your drill bits is an essential step in maintaining a well-functioning workshop. With a proper organization system in place, you can easily locate the right bit for any job and avoid wasting time searching through a jumbled mess of tools. In this step-by-step guide, we will walk you through the process of organizing your drill bits.
Step 1: Assess Your Collection
Before you begin organizing your drill bits, take a moment to assess your collection. Sort through your bits and check for any damaged or dull ones that need to be replaced. This will help you determine the size and types of storage solutions you will need.
Step 2: Categorize Your Bits
Next, categorize your drill bits based on their size, type, and purpose. You can use dividers or separate containers to group your bits together. For example, you can have separate sections for twist bits, spade bits, and hole saws. This will make it easier to find the right bit when you need it.

Step 3: Choose an Organization System
There are several organization systems you can use to store your drill bits. One popular option is to use a pegboard or a wall-mounted panel with hooks. This allows you to hang your bits and easily see what you have. Another option is to use a drawer organizer with separate compartments for each category of drill bits. Choose a system that works best for your space and preferences.
Step 4: Label and Arrange
Once you have chosen your organization system, label each section or compartment to indicate the type and size of the bits it contains. This will help you quickly identify the right bit for the job. Arrange your bits in a logical order, such as by size or frequency of use, so you can easily access them when needed.
Step 5: Maintain and Update

Finally, make it a habit to maintain and update your drill bit organization system regularly. Clean and inspect your bits after each use, and return them to their designated spots. If you add new bits to your collection, make sure to update your labeling and arrangement accordingly. This will ensure that your drill bits are always ready for use.
By following these simple steps, you can easily organize your drill bits and create a functional and efficient workshop. With a well-organized collection, you can spend less time searching for the right bit and more time completing your projects.
Understanding Drill Bits
A drill bit is a cutting tool used to create holes in various materials. It is attached to a drill or drilling machine and rotates to generate sufficient force to penetrate the material it is being used on. Drill bits come in various shapes and sizes, each designed for specific purposes and materials.
Types of Drill Bits
There are several types of drill bits available, each with its own unique characteristics and applications:
- Twist Drill Bits: These are the most common type of drill bits and are used for drilling holes in metal, wood, plastic, and other materials. They have a spiral or twist shape that helps in removing the material while drilling.
- Brad-Point Drill Bits: These bits have a pointed tip and are primarily used for drilling clean and precise holes in wood. They are often used in woodworking projects where accuracy is essential.
- Auger Drill Bits: These bits are designed for drilling deep, large-diameter holes in wood. They have a spiral shape with a threaded point that helps in removing the wood chips from the hole.
- Forstner Drill Bits: These bits are used for drilling flat-bottomed holes with smooth sides in wood. They are commonly used for making holes for hinges, dowels, and other woodworking applications.
- Masonry Drill Bits: These bits are specifically designed for drilling into masonry, such as brick, concrete, and stone. They usually have a carbide tip for increased hardness and drilling capability.
Choosing the Right Drill Bit
When choosing a drill bit, consider the material you are drilling into and the desired hole size. Different materials and hole sizes require different types and sizes of drill bits.

It is important to select a drill bit that matches the speed and power capabilities of your drill. Using the wrong drill bit can result in poor drilling performance, damaged bits, and potential safety hazards.
Caring for Drill Bits
To ensure the longevity and performance of your drill bits, it is important to take proper care of them:
- Clean and Sharpen: After each use, clean the drill bits to remove any debris or material buildup. You can use a brush or compressed air to clean the flutes. Sharpen dull bits with a drill bit sharpener or replace them if they are beyond repair.
- Proper Storage: Store drill bits in a proper storage case or organizer to keep them organized and protected from damage. This will also make it easier to find the right drill bit when needed.
- Keep Away from Moisture: Moisture can cause rust and corrosion, so store your drill bits in a dry place to prevent damage.
- Avoid Excessive Heat: High temperatures can affect the hardness and performance of drill bits. Keep them away from direct sunlight or any heat source.
Conclusion
Understanding the different types of drill bits and their applications is crucial for achieving successful drilling results. By choosing the right drill bit for the job and properly caring for them, you can ensure efficient and accurate drilling operations.
Sorting Drill Bits by Size
Sorting drill bits by size is an essential step in organizing your drill bit collection. By organizing them in a systematic way, you can easily find the right drill bit for your projects, saving both time and frustration.
To sort drill bits by size, follow these steps:

- Gather all your drill bits in one place to assess the range of sizes you have.
- Sort the drill bits into groups based on their size. You can use a ruler or a drill bit gauge to measure the diameter of each bit.
- Create separate containers or compartments for each size group. This can be done using a drill bit index or a storage case with removable dividers.
- Label each container or compartment with the corresponding drill bit size. This will make it easier to identify and retrieve the right bit quickly.
- If you have a large number of drill bits, consider using a drill bit index or a storage case with index cards. This will allow you to locate the size you need at a glance without rummaging through all the compartments.
Keep in mind that it’s important to keep your drill bits clean and free from debris. After each use, wipe them down with a clean cloth and store them in their designated compartments. This will help to prolong their lifespan and ensure they are always ready for use.
| Size | Container |
|---|---|
| 1/16 inch | Container 1 |
| 1/8 inch | Container 2 |
| 3/16 inch | Container 3 |
| 1/4 inch | Container 4 |
| 5/16 inch | Container 5 |
By sorting your drill bits by size and keeping them organized, you’ll have a well-structured drill bit collection that is easy to navigate and ensures you have the right size bit for any task.
Categorizing Drill Bits by Type

Organizing your drill bits by type is crucial for a well-organized and efficient workshop. By categorizing your drill bits, you can easily find the right tool for the job, saving you time and frustration. Here are the steps to categorize your drill bits by type:

1. Evaluate your collection
Start by gathering all your drill bits in one place. Take a moment to evaluate your collection and identify the different types of drill bits you have. Some common types include twist bits, spade bits, hole saws, masonry bits, and driver bits.
2. Determine your categories
Next, determine the categories for your drill bits. You can choose to categorize them by their purpose, material, or size. For example, you may decide to have categories like wood drilling, metal drilling, masonry drilling, or small, medium, and large size drill bits.
3. Create a system
Once you have determined your categories, create a system to organize your drill bits accordingly. You can use a combination of toolboxes, drawer dividers, or wall-mounted racks to store your drill bits. It’s important to ensure that each drill bit has its own designated spot to minimize the risk of damage.
4. Label and arrange
Label each category with clear and visible labels, either by creating your own labels or using pre-made ones. Arrange your drill bits within each category based on size or any other relevant criteria. This will make it easier to quickly locate the drill bit you need.
5. Regular maintenance
Regularly assess your drill bit collection to ensure that each bit is in good condition. Remove any damaged or dull drill bits and replace them as needed. This will help keep your collection organized and ensure that you always have reliable drill bits on hand.
| Category | Types of Drill Bits |
|---|---|
| Wood Drilling | Twist bits, spade bits |
| Metal Drilling | HSS bits, cobalt bits |
| Masonry Drilling | Masonry bits, hammer bits |
| Size | Small, medium, large bits |
By categorizing your drill bits by type, you can easily find the right bit for the job, saving you time and effort. Make sure to maintain your organization system and regularly assess your collection to keep it in top shape.
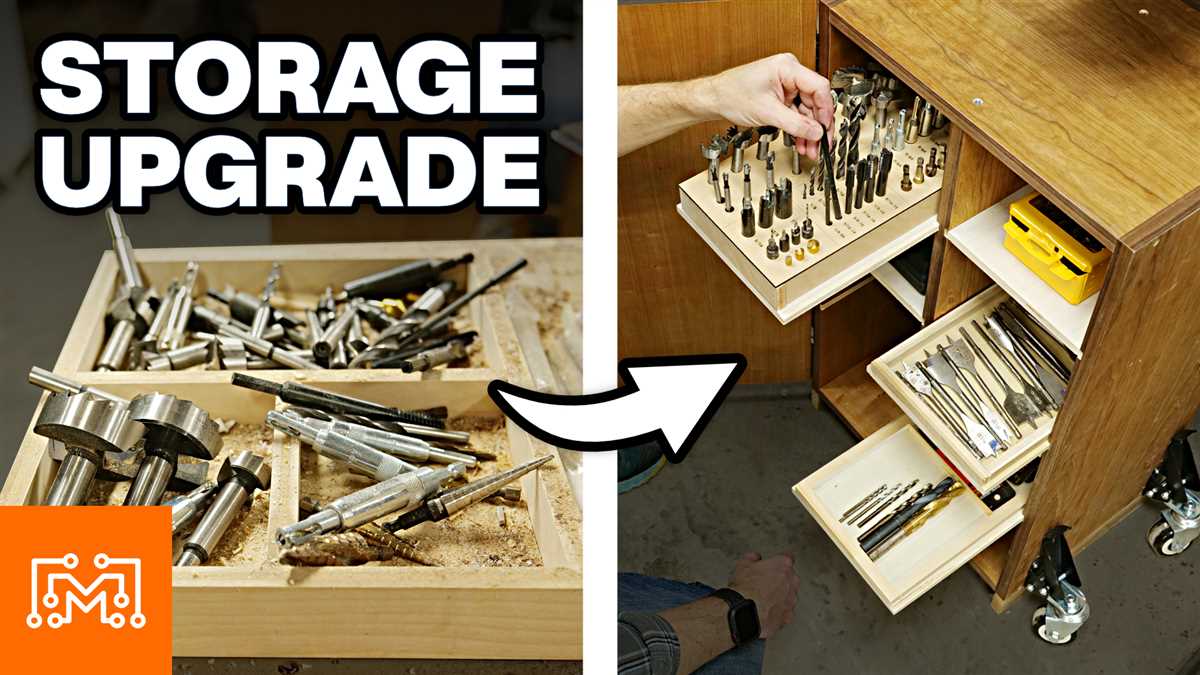
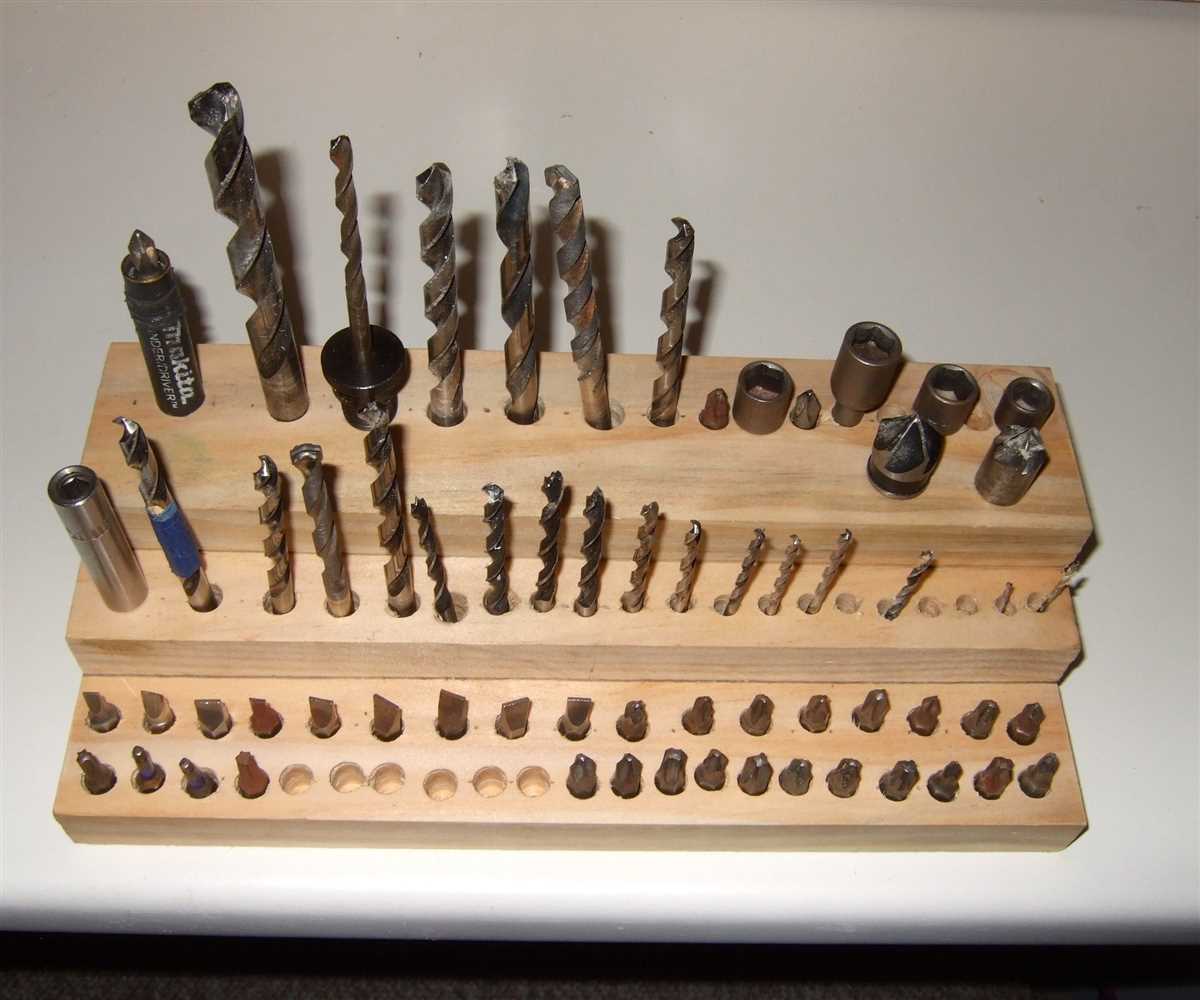
Creating a Storage System
Having a well-organized and efficient storage system for your drill bits is essential for easy access and maintenance. Here are some steps to help you create a storage system that works for you.
1. Evaluate Your Needs
Before diving into organizing your drill bits, take some time to evaluate your needs. Consider factors such as the number of drill bits you have, the types of drill bits you own, and the available space in your workshop.
2. Choose a Storage Solution
Once you have a clear understanding of your needs, choose a storage solution that best fits your requirements. There are several options to consider:
- Toolbox: A toolbox is a versatile option that allows you to store your drill bits along with other tools. Look for a toolbox with compartments or removable trays to keep your drill bits organized.
- Pegboard: A pegboard provides a customizable storage solution for your drill bits. Install a pegboard on the wall and use hooks or clips to hang your drill bits. Label each hook or clip to easily identify and retrieve the desired drill bit.
- Drawer Inserts: If you have a dedicated drawer for your drill bits, consider using drawer inserts. These inserts have compartments of various sizes to accommodate different types of drill bits and keep them organized.
- Wall-mounted Racks: Wall-mounted racks are another great option for organizing your drill bits. These racks usually have pre-drilled holes or slots to hold your drill bits securely.
3. Sort and Categorize
Before placing your drill bits in the chosen storage solution, sort and categorize them. Group them based on their type, size, or any other criteria that make sense for your needs. This will make it easier to find the right drill bit when you need it.
4. Label Your Storage System
Labeling your storage system is crucial to maintaining its organization. Use a label maker or write directly on your storage containers to clearly identify the contents. This will save you time and effort when searching for a specific drill bit.
5. Maintain Regular Maintenance
Once you have set up your storage system, it is important to regularly maintain it. Periodically check for any missing or damaged drill bits and replace them if necessary. Also, take the time to reorganize and clean your storage system to ensure everything is in its proper place.
By following these steps, you can create an efficient storage system for your drill bits. Remember to regularly assess your needs and make any necessary adjustments to keep your storage system organized and functional.
Labeling Drill Bit Containers
Labeling your drill bit containers is an important step in keeping them organized and easily accessible. Here is a step-by-step guide on how to label your drill bit containers:
- Choose a labeling system: There are a few different options for labeling your drill bit containers. You can use labels with the size of the drill bit, labels with the type of drill bit, or a combination of both. The most important thing is to choose a system that works for you and makes it easy to quickly find the drill bit you need.
- Gather the necessary materials: To label your drill bit containers, you will need adhesive labels or a label maker, a marker or pen, and a clean surface on the containers where you can apply the labels.
- Clean the containers: Before applying the labels, make sure the surfaces of the drill bit containers are clean and dry. This will ensure that the labels adhere properly and stay in place.
- Prepare the labels: If you are using adhesive labels, write or print the necessary information on them using a marker or pen. If you have a label maker, create labels with the desired information.
- Apply the labels: Carefully apply the labels to the designated areas on the drill bit containers. Make sure they are straight and secure.
- Organize the containers: Once the labels are applied, arrange the drill bit containers in a way that makes sense to you. You can organize them by size, type, or any other system that works for your needs.
Tips:
- Consider using color-coded labels to make it even easier to quickly identify the drill bit you need.
- Regularly check the labels to ensure they are still legible and in good condition. Replace any damaged or worn-out labels as needed.
- If you frequently use specific drill bits, consider keeping them in a separate container labeled “Frequently Used” for easy access.
By following these steps and maintaining your labeling system, you can keep your drill bit containers organized and save time when working on your projects.
Storing Drill Bits Properly
Properly storing your drill bits not only helps keep them organized and easily accessible, but it also helps extend their lifespan and prevents damage. Here are some steps to help you store your drill bits properly.
Step 1: Sort and group
The first step in storing your drill bits properly is to sort and group them. Start by gathering all your drill bits and sorting them by size and type. This will make it easier to find the right drill bit when you need it.
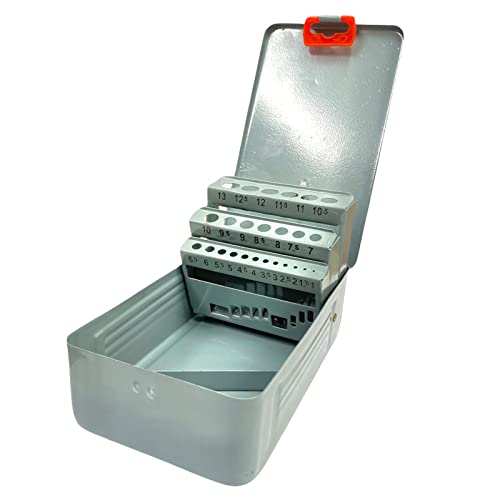
Step 2: Use a storage case or box
Invest in a storage case or box specifically designed for drill bits. These cases usually have individual slots or compartments for each drill bit, keeping them secure and organized. Choose a case that is sturdy and has a secure latch or closure to prevent the bits from falling out.
Step 3: Label the slots or compartments

To further enhance organization and ease of use, label the slots or compartments in your storage case. You can use a label maker or simply write the size and type of each drill bit on a piece of tape and attach it to the corresponding slot or compartment.
Step 4: Keep them in a cool and dry place
Store your drill bits in a cool and dry place to prevent rust and other damage. Avoid storing them in areas with high humidity or extreme temperatures, such as basements or attics. A garage or workshop cabinet is an ideal location.
Step 5: Consider a drill bit organizer
If you have a large collection of drill bits, you might want to consider investing in a drill bit organizer. These organizers typically have different compartments or trays and allow you to easily see and access each drill bit. They can be wall-mounted or kept on a countertop.
Step 6: Regularly clean and inspect
Regularly clean your drill bits to remove any debris or residue. You can use a wire brush or a cleaning solution specifically designed for drill bits. After cleaning, inspect each bit for any signs of damage, such as dull edges or chipped tips. Replace any damaged bits to maintain optimal performance.
By following these steps, you can ensure that your drill bits are stored properly, organized, and in good condition for your future drilling projects.
Maintaining Drill Bits
Proper maintenance of your drill bits is essential to ensure their longevity and optimal performance. Follow these steps to maintain your drill bits in good condition:
- Clean the Drill Bits: After each use, remove any debris or materials that may have accumulated on the drill bits. Use a brush or compressed air to carefully clean the flutes and shanks of the drill bits.
- Inspect the Drill Bits: Regularly inspect your drill bits for signs of wear or damage. Check for any dullness, chips, or cracks that may affect the drilling performance. If you notice any issues, consider sharpening or replacing the drill bit.
- Sharpen the Drill Bits: Over time, drill bits can become dull and less effective. To sharpen them, use a drill bit sharpener or a bench grinder. Follow the manufacturer’s instructions for safe and proper sharpening.
- Store the Drill Bits Properly: When not in use, store your drill bits in a designated storage container or case. This will keep them organized and protected from damage or loss. Ensure that the storage area is clean and dry.
- Use the Right Drill Bit for the Job: Using the correct drill bit for the specific application is crucial. Using the wrong drill bit can lead to poor performance, damage to the bit, or even accidents. Always consult the manufacturer’s recommendations or seek professional advice when uncertain.
- Oil and Lubrication: For metal drill bits, consider using cutting oil or lubricants to reduce heat and friction during the drilling process. This can help prolong the life of the drill bits and improve their performance.
- Replace Worn or Damaged Drill Bits: If a drill bit is worn out, damaged, or no longer performs as expected, it is important to replace it. Using worn or damaged drill bits can result in poor drilling results or even accidents.
By following these maintenance steps, you can ensure that your drill bits remain in good condition and provide you with effective drilling performance for years to come.
Finding the Right Drill Bit Easily
When it comes to starting a new project and needing a drill bit, it can be frustrating to find the right one in a sea of different sizes and types. However, with a few simple steps, you can easily find the drill bit you need for any job.
Step 1: Determine the Material You are Working With
The first step in finding the right drill bit is to determine the material you will be working with. Different materials require different types of drill bits in order to achieve the best results. For example, drilling into wood requires a different type of bit than drilling into metal or concrete.
Step 2: Consider the Size of the Hole You Need
Next, consider the size of the hole you need to drill. Drill bits come in a range of sizes, from small bits for tiny holes to larger bits for bigger holes. It is important to choose the right size in order to achieve the desired result.
Step 3: Identify the Type of Drill Bit You Need
After determining the material and size, it is important to identify the type of drill bit you need. There are various types of drill bits available, such as twist bits, spade bits, hole saws, and masonry bits. Each type has its own purpose and is designed for specific tasks.
Step 4: Check Your Drill Bit Organizer
If you have a drill bit organizer, check to see if you already have the bit you need. Having a well-organized storage system for your drill bits can save you time and frustration when searching for the right one.
Step 5: Purchase or Borrow the Drill Bit
If you don’t have the drill bit you need, you can purchase one from a hardware store or borrow one from a friend or neighbor. Make sure to select the correct size and type of drill bit based on your project requirements.
Step 6: Store Your Drill Bits Properly
Once you have found the right drill bit, it is important to store it properly for future use. Investing in a drill bit organizer or using a labeled storage container can help you easily locate the bit you need for your next project.
By following these steps, you can easily find the right drill bit for any project. Whether you are a DIY enthusiast or a professional, having an organized and efficient system for your drill bits will make your work much easier and more enjoyable.
FAQ:
What should I do before organizing my drill bits?
Before organizing your drill bits, it is important to gather all your drill bits together and inspect them for any damage or wear. You should also clean them to remove any dust or debris.
What are some common methods for organizing drill bits?
There are several common methods for organizing drill bits. You can use a drill bit index or case, a wall-mounted storage rack, or a drawer organizer. Each method has its own advantages, so you can choose the one that suits your needs and space.
How do I organize my drill bits in a drill bit index case?
To organize your drill bits in a drill bit index case, you should first determine the size and type of each drill bit. Then, place each drill bit in the corresponding slot or compartment in the case. Make sure to arrange them in a logical order, such as by size or type, for easy retrieval.
What is the advantage of using a wall-mounted storage rack to organize drill bits?
A wall-mounted storage rack allows you to easily see and access your drill bits. It also frees up valuable drawer or shelf space. Additionally, a wall-mounted rack can be customized to accommodate different sizes and types of drill bits, making it a versatile option for organization.
Video:


Meet Harrison Clayton, a distinguished author and home remodeling enthusiast whose expertise in the realm of renovation is second to none. With a passion for transforming houses into inviting homes, Harrison's writing at https://thehuts-eastbourne.co.uk/ brings a breath of fresh inspiration to the world of home improvement. Whether you're looking to revamp a small corner of your abode or embark on a complete home transformation, Harrison's articles provide the essential expertise and creative flair to turn your visions into reality. So, dive into the captivating world of home remodeling with Harrison Clayton and unlock the full potential of your living space with every word he writes.


