Mastering the Art of Nail Drill Bits: A Comprehensive Guide

When it comes to achieving perfect nails, a nail drill is an essential tool in every professional nail technician’s arsenal. From shaping and filing to buffing and polishing, a nail drill can help you achieve flawless results. But without the right drill bits, your nail drill is just a fancy paperweight. To take your nail game to the next level, it’s important to understand the different types of nail drill bits and their uses.
First, let’s talk about the most common types of nail drill bits. One of the most versatile and widely used bits is the diamond bit. This bit is perfect for removing and smoothing out acrylic or gel enhancements. Its coarse texture allows for efficient and quick filing, making it an essential tool for any nail technician. Another popular bit is the carbide bit, which is ideal for removing hard gel or acrylic. Its sharp and durable design allows for precise and controlled filing.
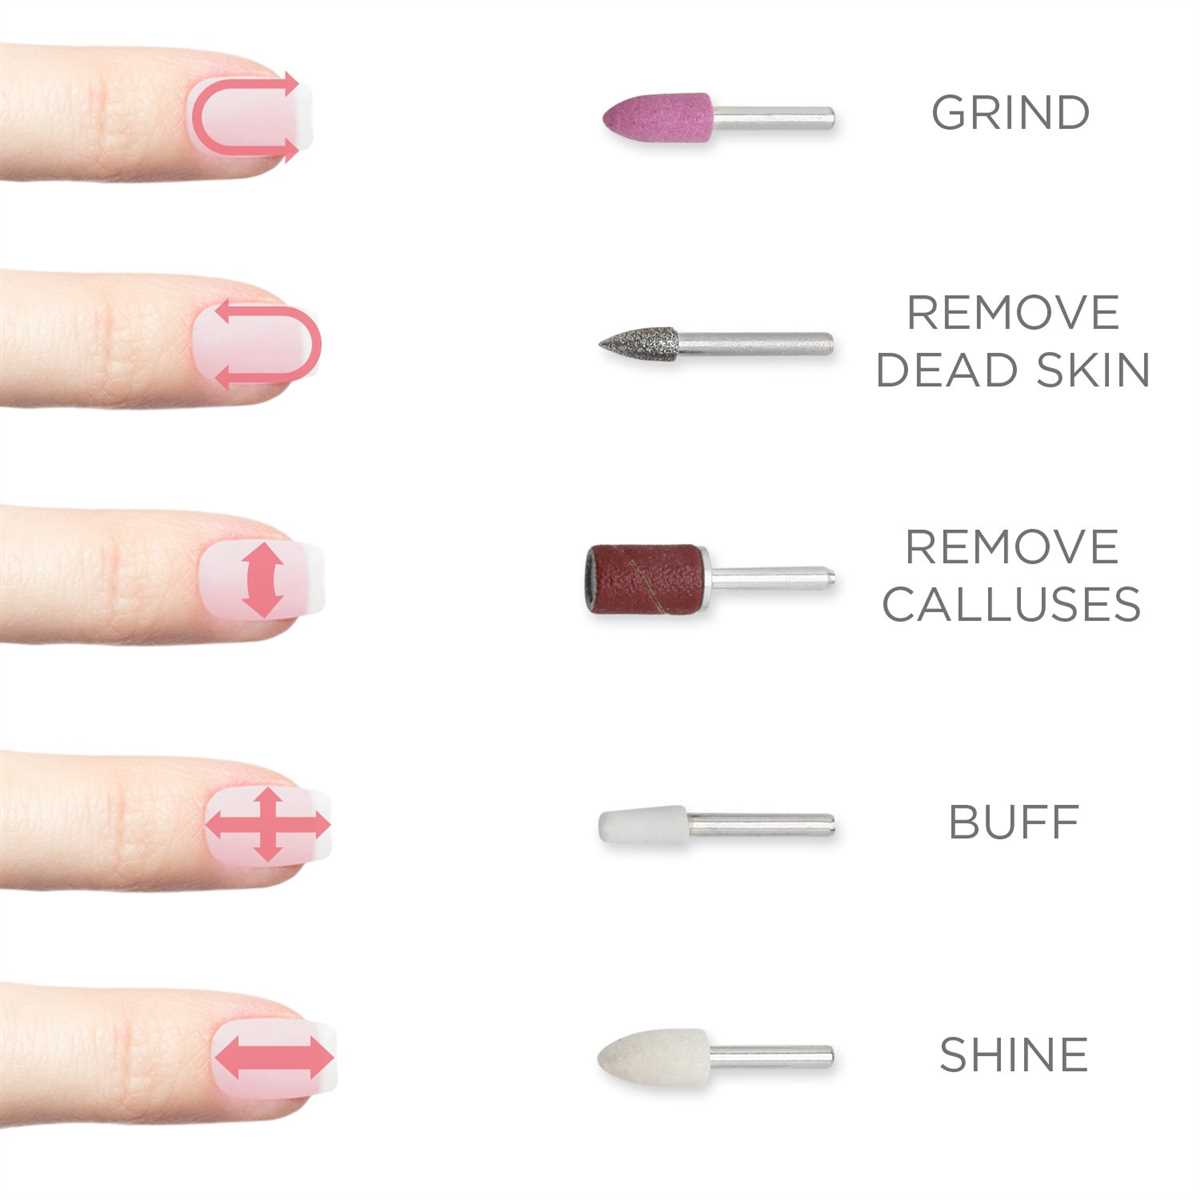
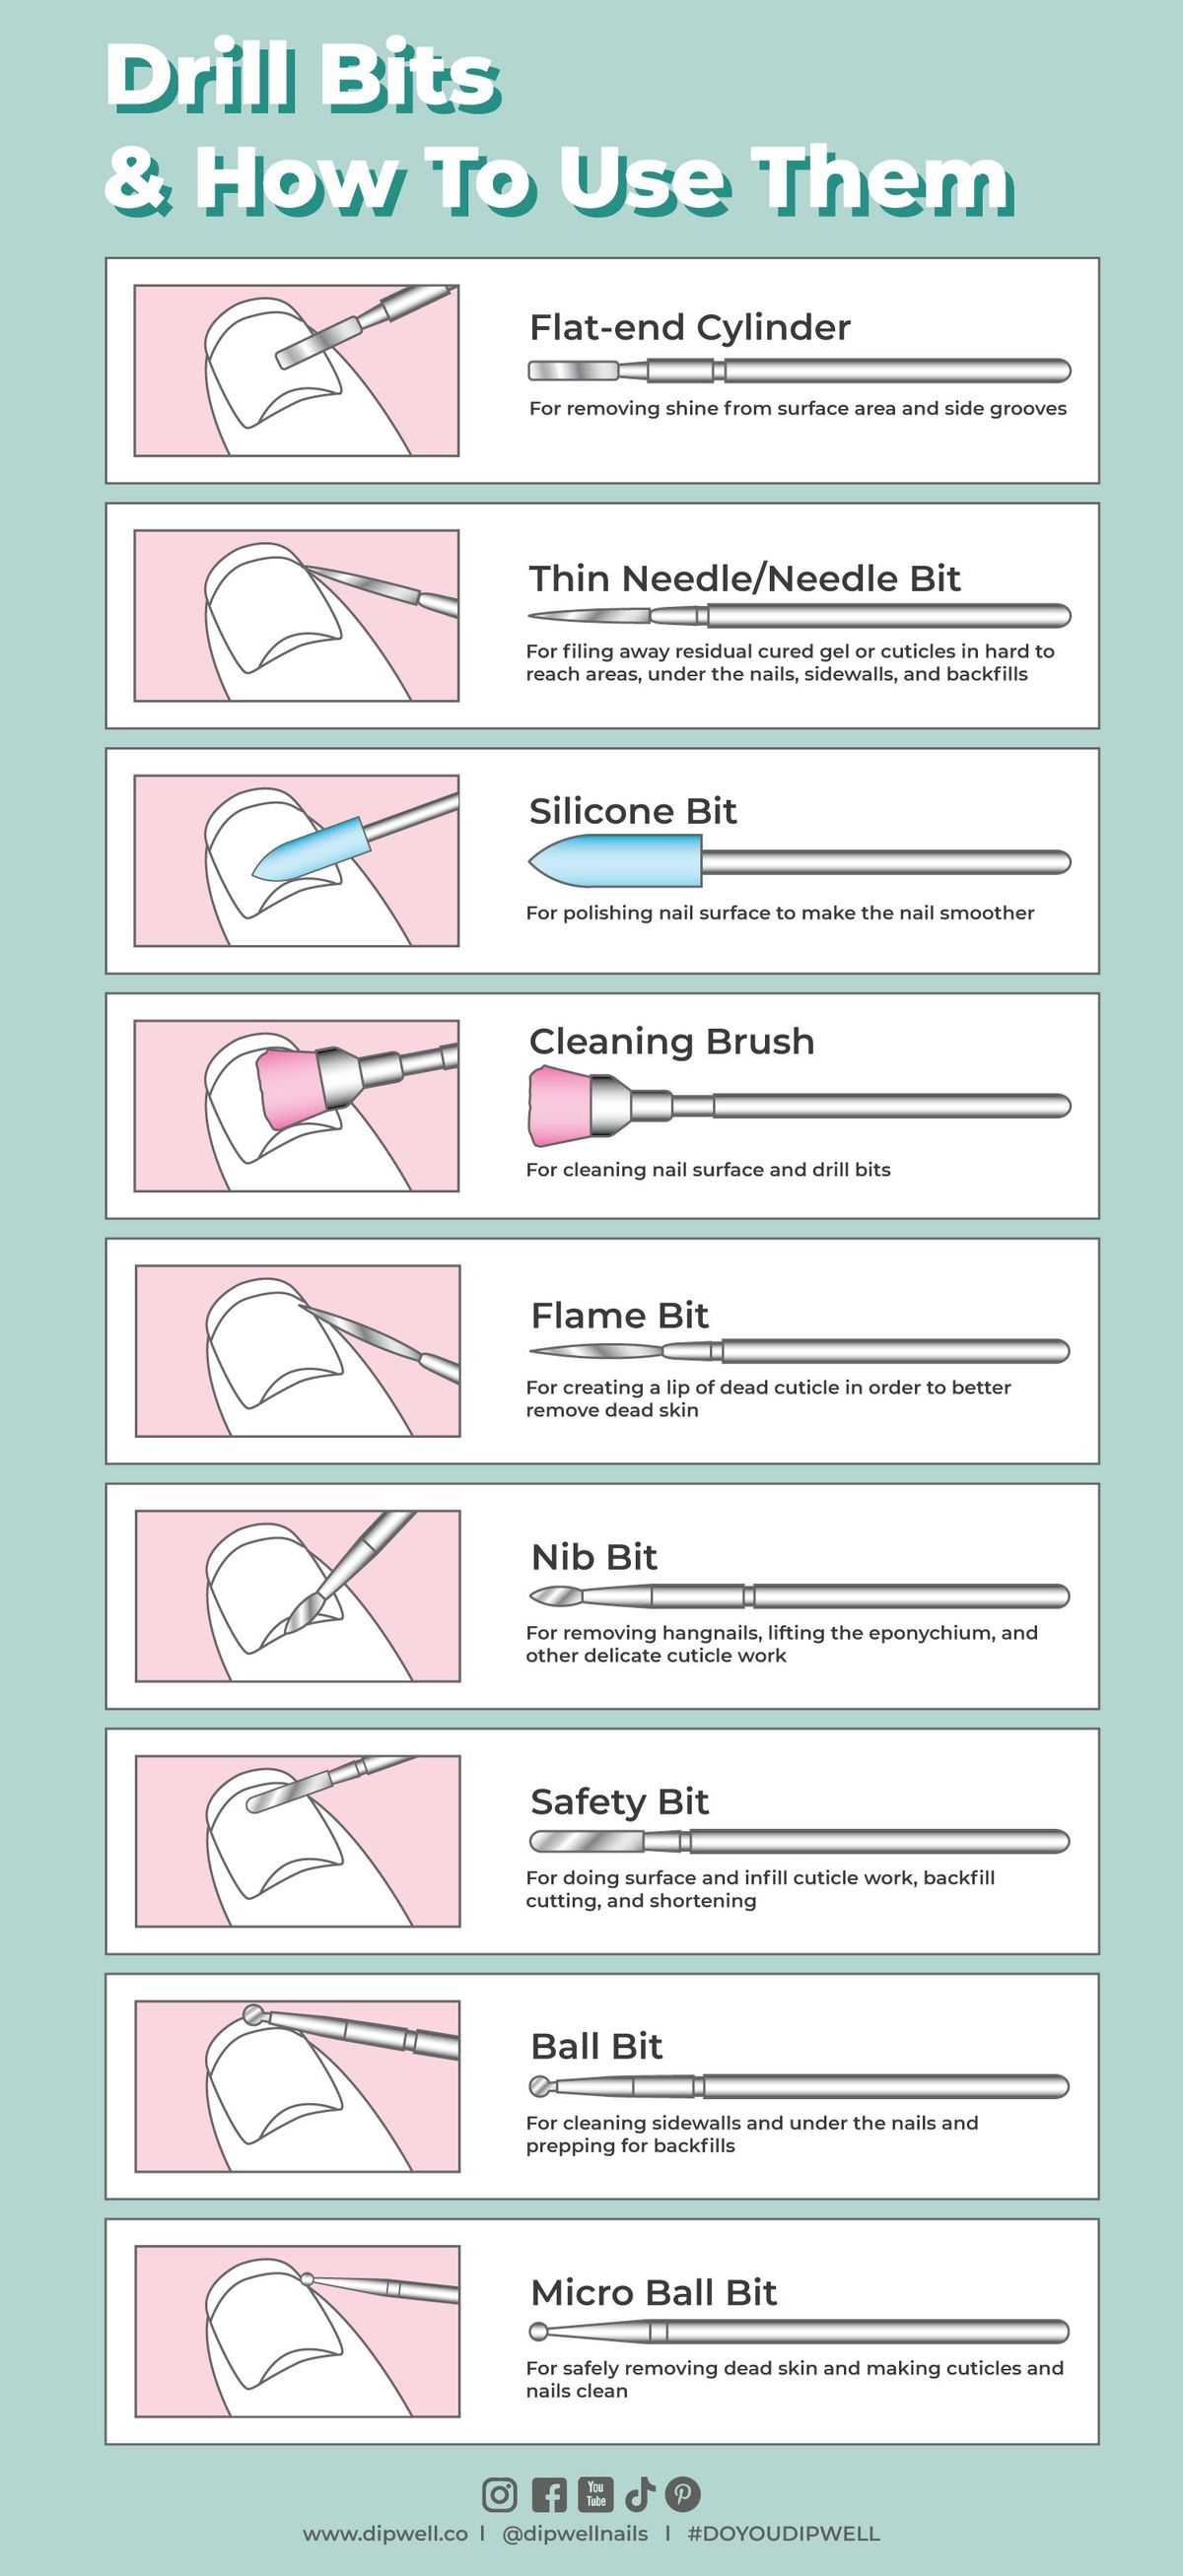
Next, let’s explore the different shapes of nail drill bits. The barrel bit is a cylindrical-shaped bit that is perfect for creating a smooth and even surface. It can also be used for removing product and shortening the nails. The cone bit, on the other hand, is a pointed bit that is great for getting into tight spaces and refining the nail’s shape. The flame bit, with its unique shape, is perfect for removing product in hard-to-reach areas, such as the sidewalls of the nail.
In conclusion, mastering the art of nail drill bits is essential for any nail technician looking to achieve professional results. By understanding the different types and shapes of nail drill bits, you can choose the right tool for the job and create flawless nails every time. So whether you’re a beginner or a seasoned pro, take the time to familiarize yourself with the various nail drill bits and take your nail game to the next level.
Understanding Nail Drill Bits
When it comes to mastering the art of nail drill bits, it is essential to have a good understanding of the different types and their uses. Nail drill bits are small tools that are used with an electric nail drill to shape, file, and clean the nails. They come in various shapes, sizes, and materials, each designed for specific nail treatments.

Types of Nail Drill Bits
Here are some common types of nail drill bits:
- Carbide Bits: These are made of carbide, a durable material that is perfect for removing gel or acrylic nails. Carbide bits are available in various shapes, including cone, flame, and barrel.
- Diamond Bits: Diamond bits have a coating of diamond particles, making them ideal for filing and shaping the natural nail. These bits are gentle but effective and come in different sizes and grits.
- Ceramic Bits: Ceramic bits are gentle on the nail and are typically used for smoothing and refining the nail surface. They are not as aggressive as carbide or diamond bits, making them suitable for natural nails.
- Sanding Bands: These are cylindrical bits made of sandpaper-like material. Sanding bands are commonly used for removing the bulk of gel or acrylic products, shaping the nails, and refining the nail surface.
Choosing the Right Nail Drill Bit
When selecting a nail drill bit, consider the following factors:
- The type of nail treatment you will be performing
- The desired outcome and level of aggressiveness you need
- The material and coating of the bit
- The size and shape of the bit
- Your personal preference and comfort level
It is also essential to consider the quality of the nail drill bit to ensure durability and optimal performance. Investing in high-quality bits will save you time and money in the long run.
Maintaining and Cleaning Nail Drill Bits
Proper maintenance and cleaning of nail drill bits are crucial to ensure their longevity and hygienic use. After each use, remove any debris or product buildup from the bit using a clean brush. To disinfect, soak the bit in a sanitizing solution and use a sterilizer or UV light for further disinfection.
Regularly inspect your nail drill bits for any signs of wear or damage, and replace them as needed. Remember to handle the bits with care to prevent bending or breaking.

Conclusion
Understanding nail drill bits is essential for achieving professional-looking nails. Each type of bit serves a specific purpose and offers different levels of aggressiveness. By selecting the right bit and maintaining it properly, you can ensure efficient and safe nail treatments.
Essential Types of Nail Drill Bits
When it comes to nail drill bits, there are several essential types that every nail technician should have in their kit. These bits are designed for specific tasks and provide different levels of control and precision, making them essential for creating beautiful and professional-looking nails.
1. Ceramic Bits
Ceramic bits are one of the most common types of nail drill bits used in the industry. They are made from ceramic material and are known for their durability and ability to withstand high temperatures. Ceramic bits are perfect for removing gel polish, shaping the nail, and removing dead cuticles.
2. Diamond Bits
Diamond bits are another essential type of nail drill bit. They are made with a layer of diamond particles and are known for their strength and ability to quickly and efficiently remove acrylics, gels, and calluses. Diamond bits are perfect for creating precise and clean nail shapes.
3. Carbide Bits

Carbide bits are extremely versatile and can be used for a wide range of nail services. They are made from a combination of carbide and steel, making them durable and long-lasting. Carbide bits are perfect for shaping the nail, reducing thickness, and removing hard gels or acrylics.
4. Mandrel Bits
Mandrel bits are commonly used for sanding and buffing the nail surface. They are made with a metal shaft and have replaceable sanding bands that can be easily changed out. Mandrel bits are perfect for creating a smooth and polished finish on the nails.
5. Safety Bits
Safety bits are designed with rounded edges and are perfect for sensitive areas such as the cuticles and sidewalls. These bits are less aggressive and provide a gentle touch, making them ideal for those with sensitive nails or skin.
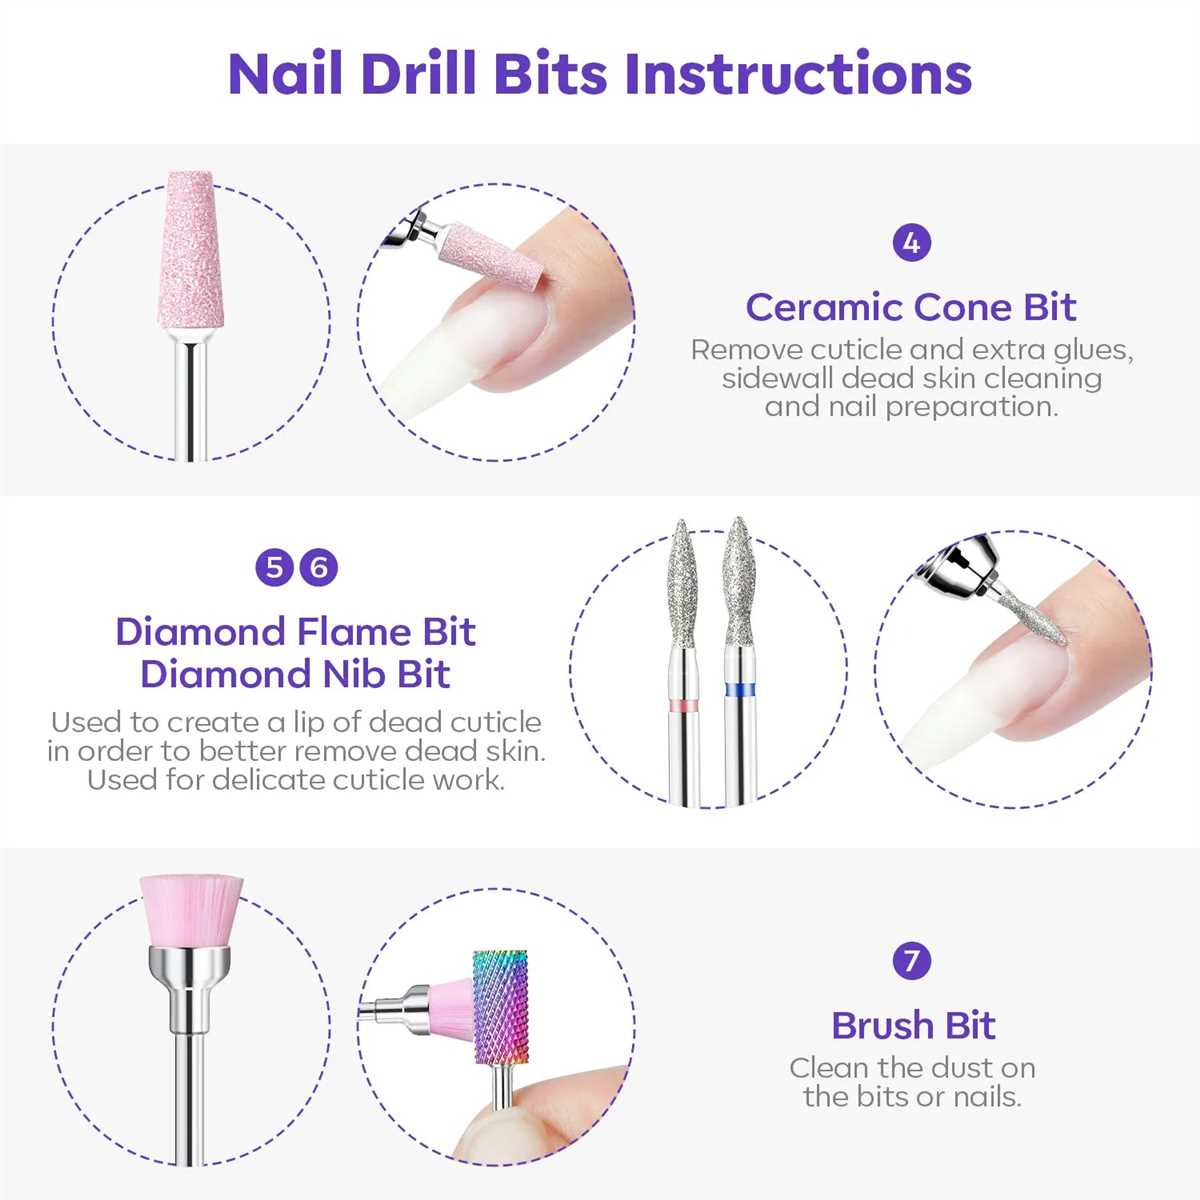
6. Brush Bits
Brush bits are unique in that they are not used for drilling or shaping the nails. Instead, they are used to clean the nail and remove dust and debris. These bits are often used after filing or shaping the nails to ensure a clean and tidy finish.
7. Cone Bits
Cone bits are versatile and can be used for a variety of nail services. They come in different sizes and shapes, allowing for more precise work on different areas of the nail. Cone bits are perfect for cuticle work, under nail cleaning, and reaching hard-to-reach areas.

Having these essential types of nail drill bits in your kit will not only help you achieve professional-looking results but also make your nail services more efficient and effective.
Choosing the Right Nail Drill Bit for Your Needs
1. Understanding the Different Types of Nail Drill Bits
- Carbide Bits: These are durable and long-lasting bits that are designed to remove acrylic and gel efficiently. They come in various shapes, including cylindrical, cone, and barrel, each suitable for different tasks.
- Diamond Bits: Ideal for gentle cuticle work, these bits are coated in tiny diamonds that help exfoliate and shape the nail. They are best used for natural nails and light filing.
- Ceramic Bits: These bits are gentle on the nails and are excellent for removing old polish or gel. They help prevent heat buildup and are suitable for natural nails.
- Sanding Bands: These are disposable and affordable drill bits often used for surface filing or removing gel polish. They come in various grits, allowing for customization based on the desired outcome.
2. Consider the Tasks You Need to Perform
Before choosing a nail drill bit, it’s essential to consider the tasks you will be performing. Different bits are designed for specific purposes, such as removal, shaping, or buffing. Decide whether you need a bit for gel removal, cuticle work, or nail enhancement to ensure you choose the right one.
3. Assess Your Skill Level
Your skill level as a nail technician or enthusiast should also be taken into account when selecting a nail drill bit. Certain bits, such as carbide bits, require more experience to handle correctly and avoid damaging the natural nail. If you are a beginner, it’s best to start with less aggressive bits and gradually work your way up as you gain confidence.
4. Consider the Speed and Power of Your Nail Drill
The speed and power of your nail drill will also influence the type of nail drill bit you should choose. Higher speed and power drills can handle more aggressive bits, while slower drills are better suited for delicate tasks. Be sure to select a bit that is compatible with the specs of your particular nail drill.

5. Experiment and Seek Professional Advice

Choosing the right nail drill bit often requires some trial and error. Experiment with different types and styles of bits to find what works best for you. Additionally, seek advice from professional nail technicians who have experience using various drill bits. They can provide valuable recommendations based on their expertise.
| Nail Drill Bit | Best Suited For |
|---|---|
| Carbide Bits | Acrylic and gel removal, shaping |
| Diamond Bits | Gentle cuticle work, natural nails |
| Ceramic Bits | Old polish or gel removal, natural nails |
| Sanding Bands | Surface filing, gel polish removal |
By understanding the different types of nail drill bits, considering your specific needs and skill level, and experimenting with various options, you can choose the right nail drill bit that best suits your requirements.
Nail Drill Bit Materials and Their Benefits
1. Carbide
Carbide nail drill bits are made from a strong and durable material that is able to handle tough jobs. These bits are ideal for removing hard gel or acrylics, as well as for shaping and drilling nail enhancements. The carbide material provides excellent heat resistance, which reduces the risk of overheating and damaging the natural nail or cuticle.
- Benefits of Carbide Nail Drill Bits:
- High durability
- Heat resistance
- Efficient removal of hard gel or acrylics
- Effective shaping and drilling
2. Ceramic
Ceramic nail drill bits are known for their gentle touch and ability to minimize heat generation. These bits are great for removing gel polish, as well as for refining the surface of the natural nail without causing damage. The ceramic material is non-porous, making it easy to clean and sanitize, which is crucial for maintaining proper hygiene in a salon.
- Benefits of Ceramic Nail Drill Bits:
- Gentle and precise
- Minimizes heat generation
- Does not damage the natural nail
- Easy to clean and sanitize
3. Diamond
Diamond nail drill bits are known for their exceptional strength and durability. These bits are excellent for removing calluses and dead skin on the feet, as well as for filing and shaping thick toenails. The diamond material provides excellent precision and control, allowing for detailed work without causing discomfort or pain to the client.
- Benefits of Diamond Nail Drill Bits:
- High strength and durability
- Effective callus and dead skin removal
- Precision and control
- Comfortable for clients
4. Stainless Steel
Stainless steel nail drill bits are a common choice due to their affordability and versatility. These bits are great for removing cuticles, as well as for filing and shaping both natural and artificial nails. The stainless steel material is resistant to corrosion and easy to clean, making it a practical option for both professional nail technicians and home users.
- Benefits of Stainless Steel Nail Drill Bits:
- Affordable and versatile
- Effective cuticle removal
- Suitable for natural and artificial nails
- Corrosion-resistant and easy to clean
5. Sanding Bands/Sleeves
Sanding bands or sleeves are not technically nail drill bits, but they are commonly used in conjunction with nail drills for various purposes. These disposable sleeves are usually made from abrasive materials, such as sandpaper or emery, and they are ideal for shaping, refining, and smoothing the edges of the nails. Sanding bands/sleeves are available in different grits, allowing you to choose the level of coarseness based on your specific needs.
- Benefits of Sanding Bands/Sleeves:
- Shaping and refining the nails
- Smoothing the edges
- Disposable and easy to replace
- Available in different grits
When choosing nail drill bits, it’s important to consider the material and its specific benefits. Different materials are designed to handle different tasks, so having a variety of drill bits in your collection can help you achieve the best results in your nail services.
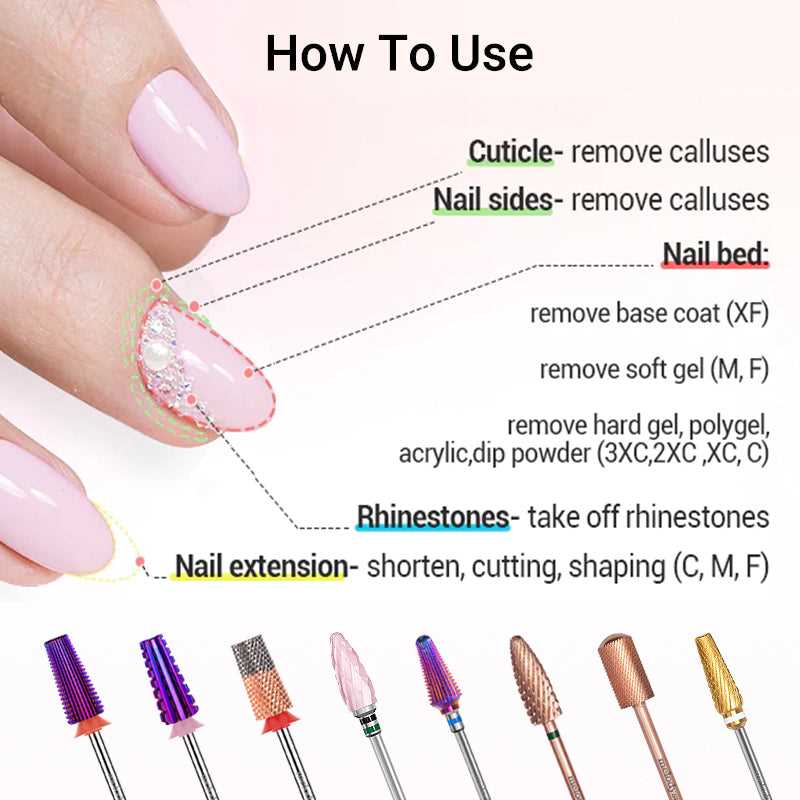
Step-by-Step Guide to Using Nail Drill Bits
Step 1: Preparation
Before using nail drill bits, it is important to properly prepare your nails. Start by removing any old nail polish and trimming your nails to your desired length.
Step 2: Selecting the Right Bit
There are various types of nail drill bits available, each designed for specific purposes. Choose the appropriate bit based on the task you wish to perform, such as filing, shaping, or removing gel polish.
Step 3: Inserting the Bit
Once you have selected the right bit, insert it into the drill handpiece. Make sure it is securely fastened and properly aligned.
Step 4: Adjusting the Speed
Before starting the drilling process, adjust the speed of the drill. For beginners, it is recommended to start with a low speed setting and gradually increase as you gain more experience.
Step 5: Beginning the Process
Hold the drill in your dominant hand and position it at a comfortable angle. Gently touch the tip of the bit to the surface of your nail, applying light pressure. Ensure that the drill is moving in the desired direction.
Step 6: Filing and Shaping
Move the drill bit in a back-and-forth or circular motion to file and shape the nail. Be careful not to apply too much pressure or leave the drill bit in one spot for too long, as this can cause damage to the nail.
Step 7: Removing Gel Polish
If your goal is to remove gel polish, use a suitable bit designed specifically for this purpose. Gently glide the bit over the surface of the polish until it lifts and peels off.
Step 8: Finishing Touches
After using the nail drill bits, it is essential to finish off the process by buffing the nails and applying cuticle oil to moisturize and nourish them.
Step 9: Cleaning and Maintenance
Properly clean and sanitize your nail drill bits after each use to ensure their longevity and prevent the transfer of bacteria. Store them in a clean and dry place to maintain their quality.
Step 10: Practice and Safety
Using nail drill bits requires practice and patience. Remember to always prioritize safety by wearing protective eyewear and avoiding excessive pressure or heat. Regularly educate yourself on proper techniques and guidelines.
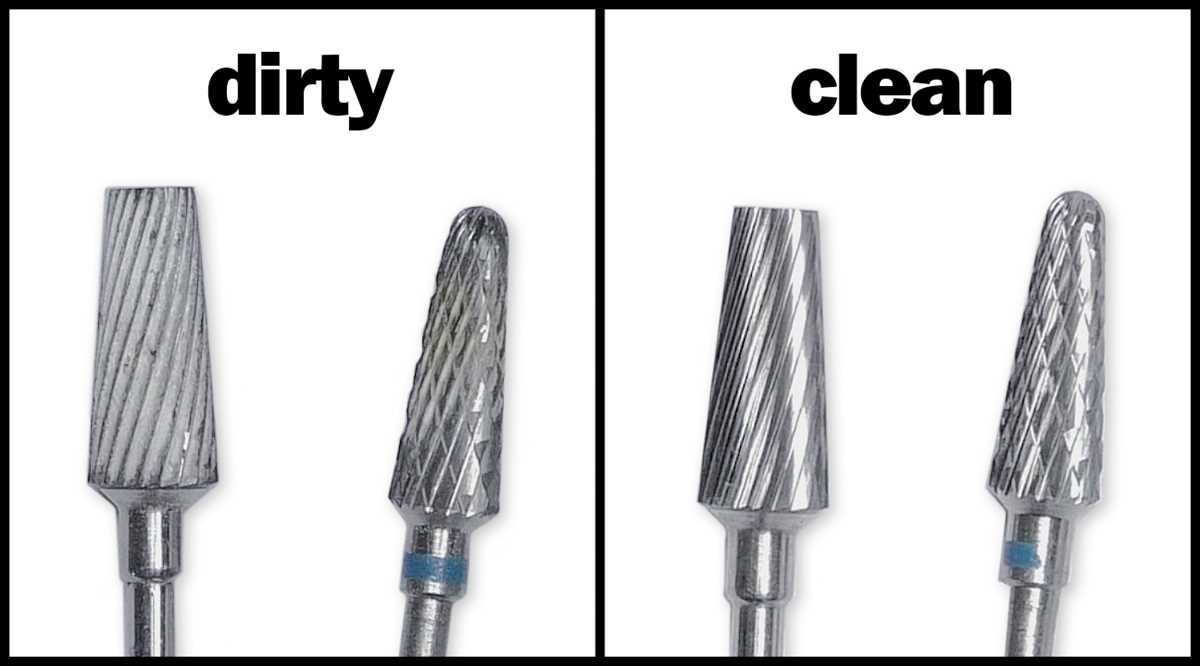
Maintaining and Cleaning Your Nail Drill Bits
Proper maintenance and cleaning of your nail drill bits are essential for maintaining their efficiency and prolonging their lifespan. Here are some tips on how to keep your nail drill bits in top shape:
Regular Cleaning
- After each use, thoroughly clean your nail drill bits with a brush and warm soapy water to remove any residue. Rinse them well and pat dry with a clean towel.
- Pay special attention to the area near the cuticle, as it tends to accumulate the most debris.
- For tough build-up, you can soak the drill bits in a sanitizing solution for a few minutes before cleaning them with a brush.
Sterilization
- To ensure the highest level of hygiene, it is crucial to sterilize your nail drill bits regularly.
- After cleaning, soak the bits in a disinfecting solution specifically designed for nail tools. Follow the manufacturer’s instructions for proper dilution and soaking time.
- Always wear gloves and use a designated container when handling the disinfecting solution.
- Once the sterilization process is complete, rinse the bits with water and dry them thoroughly before storage.
Storage
- Store your nail drill bits in a clean and dry container to protect them from dust and moisture.
- Avoid storing them in direct sunlight or extreme temperatures, as it can cause damage to the bits.
- If possible, separate the different types of bits to prevent them from rubbing against each other, which can cause wear and tear.
Replacement
- Regularly inspect your nail drill bits for signs of wear and tear, such as dullness or chipping.
- If you notice any damage, it is recommended to replace the affected bits to ensure optimal performance and prevent any harm to the nail.
By following these maintenance and cleaning tips, you can enjoy the benefits of your nail drill bits for a long time and ensure a safe and hygienic nail care routine.
Troubleshooting Common Nail Drill Bit Issues
Using a nail drill can greatly speed up the process of shaping and filing nails. However, like any tool, nail drill bits can sometimes encounter issues that can affect their performance. Here are some common issues that you might encounter when using nail drill bits and troubleshooting tips to resolve them:
Dull or Blunt Bit
If your nail drill bit is not cutting through the nail easily or is leaving a rough finish, it could be dull or blunt. This can happen over time as the bit comes into contact with the nail. To resolve this issue, you can try sharpening the bit using a sharpening block or replace it with a new one.
Overheating
If your nail drill bit becomes hot to the touch during use, it is likely overheating. Overheating can be caused by excessive pressure or prolonged use. To prevent overheating, make sure to use a light touch and take breaks during long sessions to allow the bit to cool down. You can also try using a cooling spray or dipping the bit in water periodically to cool it down.
Bit Getting Stuck
Sometimes a nail drill bit may get stuck in the drill chuck or collet. This can happen due to a build-up of debris or improper installation. To release a stuck bit, try cleaning the chuck or collet and then gently pulling or twisting the bit to remove it. Make sure to follow the manufacturer’s instructions for proper installation and removal of the nail drill bits.
Uneven or Chattering Bit
If your nail drill bit is causing uneven or chattering movement while in use, it could be due to an unbalanced or damaged bit. Check the bit for any visible signs of damage or wear. If it appears damaged, replace it with a new bit. It’s also important to ensure that the bit is properly aligned and securely attached to the drill.
Low or No Speed
If your nail drill bit is not spinning or spinning at a lower speed than usual, it could be due to a problem with the drill itself or the power source. Check the power cord and make sure it is securely connected. If the drill is battery operated, make sure the battery is fully charged. If the issue persists, consult the manufacturer or seek professional assistance.
Conclusion
Nail drill bit issues can be frustrating but with a little troubleshooting, most problems can be resolved. Remember to maintain and clean your drill bits regularly to prolong their lifespan and ensure optimal performance. If problems persist, consider seeking professional help or contacting the manufacturer for assistance.
Safety Tips for Using Nail Drill Bits
When using nail drill bits, it is important to prioritize safety to avoid accidents or damage to the nails. Follow these safety tips to ensure a safe and effective manicure or pedicure:
1. Choose the Right Bit
- Use the appropriate drill bit for the desired task. Different bits are designed for various purposes, such as filing, shaping, or removing gel polish. Using the wrong bit can lead to inefficient results or damage to the natural nail.
- Ensure that the bit is clean and in good condition before use. Dull or damaged bits can cause discomfort or injury.
2. Familiarize Yourself with the Drill
- Read the manufacturer’s instructions and study the drill’s features and controls before usage.
- Start with a low speed and gradually increase it as needed. Avoid using excessive speed, as it can generate heat and harm the nail.
- Practice using the drill on a fake nail or other practice materials before using it on the natural nails to build confidence and skill.
3. Protect the Skin and Cuticles
- Create a barrier between the drill bit and the skin and cuticles by applying a thin layer of petroleum jelly or a cuticle oil. This helps prevent accidental cuts or abrasions.
- Do not apply excessive pressure when using the drill on the nails. Let the drill do the work with gentle pressure.
4. Keep the Drill Bit Clean
- Regularly clean and sanitize the drill bits after each use to maintain their effectiveness and prevent the spread of bacteria or fungi.
- Follow the manufacturer’s recommendations for cleaning and sterilizing the bits.
5. Take Breaks
- Avoid prolonged use of the drill. Take breaks to allow the nail and surrounding tissues to rest and recover.
- If any discomfort or pain occurs during or after using the drill, stop using it immediately and seek professional advice.
By following these safety tips, you can confidently and safely use nail drill bits to achieve professional-quality manicures and pedicures. Remember to prioritize safety and regularly maintain your drill bits for optimal performance.
FAQ:
What are nail drill bits used for?
Nail drill bits are used for various purposes in manicures and pedicures. They are commonly used to remove dead skin, shape and file nails, remove gel or acrylic overlays, and prepare the nails for polish.
Are nail drill bits safe to use?
When used properly, nail drill bits are safe to use. However, it is important to follow the instructions and use them with caution to prevent any damage to the nails or skin. It is recommended to start with a low speed and gradually increase it if needed.
What types of nail drill bits are available?
There are various types of nail drill bits available, each designed for different purposes. Some common types include diamond bits for removing gel or acrylic, carbide bits for shaping and filing nails, sanding bands for smoothing and buffing, and brush bits for cleaning the nails.
How do I choose the right nail drill bit?
Choosing the right nail drill bit depends on the type of service you are performing and the desired outcome. Consider the material you are working with (natural nails, gel, acrylic), the level of precision required, and the effect you want to achieve. It is also important to choose the right size and shape for the nail drill bit.
Video:


Meet Harrison Clayton, a distinguished author and home remodeling enthusiast whose expertise in the realm of renovation is second to none. With a passion for transforming houses into inviting homes, Harrison's writing at https://thehuts-eastbourne.co.uk/ brings a breath of fresh inspiration to the world of home improvement. Whether you're looking to revamp a small corner of your abode or embark on a complete home transformation, Harrison's articles provide the essential expertise and creative flair to turn your visions into reality. So, dive into the captivating world of home remodeling with Harrison Clayton and unlock the full potential of your living space with every word he writes.


