How to bleed brakes on a bicycle

If you are an avid cyclist, you know how important it is to properly maintain your brakes. One of the key maintenance tasks for bicycle brakes is bleeding them.
Bleeding the brakes helps to remove any air bubbles that may have accumulated in your brake lines, ensuring that your brakes function optimally. If there is air in the brake lines, it can lead to a spongy or weak brake feel, which can affect your ability to stop safely.
While bleeding brakes may sound intimidating, it is actually a straightforward process that can be done at home with the right tools and a little bit of patience.
Benefits of Brake Maintenance
Making sure your bicycle’s brakes are in good working order is essential for your safety and the safety of others on the road. Regular brake maintenance brings several benefits:
1. Increased Safety: Properly adjusted and maintained brakes provide reliable stopping power, allowing you to slow down and stop quickly when necessary. This is particularly important in emergency situations or when riding in heavy traffic.

2. Improved Performance: Well-maintained brakes ensure consistent and predictable performance. They allow for smoother braking, which can help reduce wear on other components like tires and rims.
3. Longevity of Brake Components: Regular maintenance helps prevent premature wear and tear on brake pads, cables, and calipers. This can save you money in the long run by avoiding costly repairs or replacements.
4. Enhanced Ride Quality: When your brakes are properly adjusted and maintained, you can have confidence in your bike’s stopping power. This can improve your overall riding experience and make your journeys more enjoyable.
5. Peace of Mind: Knowing that your brakes are in good condition and functioning properly can give you peace of mind while riding. It allows you to focus more on the road ahead and enjoy your time on the bike.
Remember, regular brake maintenance is crucial for optimal performance and safety. It is recommended to check your brakes regularly and have them serviced by a professional if you are unsure of what to do.

Enhancing Safety and Control
Ensuring proper brake function is essential for enhancing safety and control while riding a bicycle. Here are some tips to help you achieve optimal brake performance:
Maintaining Brake Pads
Regularly inspect the brake pads for wear and tear. Replace the brake pads if they are excessively worn or damaged. Worn-out brake pads can compromise braking efficiency and reduce control.
Adjusting Brake Cable Tension
Proper brake cable tension is crucial for optimal brake response. If the brake lever feels spongy or requires excessive effort, adjust the cable tension until the brakes engage smoothly with minimal effort.
Note: An appropriate level of brake cable tension ensures a firm brake lever feel and reliable stopping power.
Bleeding Brakes Regularly
To maintain optimal braking performance, bleed your bicycle brakes regularly. Over time, air bubbles can accumulate in the brake system, affecting brake feel and reducing control. Bleeding the brakes removes any air bubbles and ensures efficient hydraulic brake operation.
Tip: Follow manufacturer guidelines for bleeding your specific brake system to avoid potential damage or incorrect bleeding procedures.
By regularly maintaining your brakes and bleeding them when necessary, you enhance safety, control, and overall riding experience. Remember to consult a professional or refer to the manufacturer’s instructions if you are unsure about any aspect of maintaining or bleeding your bicycle brakes.
Tools You’ll Need
To bleed your brakes successfully, you will need several tools to ensure a smooth and efficient process. Make sure you have the following tools before beginning:
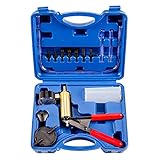
1. Brake Bleed Kit: This kit typically includes a syringe, tubing, and adapters to connect to your brake calipers. It is crucial for pushing the brake fluid through the system.
2. Brake Fluid: You will need brake fluid specific to your bicycle’s brake system. It is important to use the correct type of fluid recommended by the manufacturer.

3. Allen Keys: The size of the Allen keys will vary depending on your brake calipers. Ensure you have the corresponding sizes to remove any bolts or bleed screws.
4. Rags or Towels: Have plenty of rags or towels on hand to clean up any spills or excess fluid. Brake fluid can be corrosive, so it’s important to wipe away any spills quickly.
5. Container: A small container or tray to catch excess brake fluid during the bleeding process is essential. This will prevent any mess and make it easier to dispose of the fluid properly.
6. Brake Cleaner: Brake cleaner can be used to clean the brake calipers and remove any dirt or grime that may have accumulated.
7. Eye Protection: When working with brake fluid, it’s important to protect your eyes. Wear safety goggles or glasses to prevent any potential splashes or accidents.

Having the necessary tools before you start the brake bleeding process will make it easier and more efficient. Make sure all your tools are in good condition and readily accessible before you begin.
Gather All Necessary Equipment
Before you begin the process of bleeding the brakes on your bicycle, it’s important to gather all the necessary equipment. This will ensure that you have everything you need to complete the job without interruption.
Here’s a list of the essential items you’ll need:
- Bleed kit: You’ll need a bleed kit that is designed for your specific brake system. This kit will typically include a syringe, tubing, fittings, and other components needed for bleeding the brakes.
- Brake fluid: Choose the appropriate brake fluid for your particular bicycle brake system. This information can usually be found in the owner’s manual or online.
- Torx or Allen wrench: Depending on your brake system, you may need either a Torx wrench or an Allen wrench to remove the bleed port screws and access the brake fluid reservoir.
- Clean cloth: Have a clean cloth or rag on hand to wipe away any spilled brake fluid and to keep your work area neat and tidy.
- Gloves: It’s a good idea to wear disposable gloves to protect your hands from coming into contact with the brake fluid, which can be corrosive.
- Bike stand or workstand: Using a bike stand or workstand will make the bleeding process much easier by keeping your bicycle secure and at a comfortable working height.
Having all these items readily available will help ensure a smooth and efficient brake bleeding process. It’s important to be prepared and properly equipped before you start the task to avoid any setbacks or delays.
Preparation and Safety Measures
Before starting to bleed the brakes on your bicycle, it is crucial to take some precautionary measures to ensure your safety and the effectiveness of the process. Here are some essential steps to follow:

1. Gather the Necessary Tools and Accessories
To properly bleed the brakes on your bicycle, you will need to have the following tools and accessories ready:
| Item | Description |
| Bleed Kit | A brake bleeding kit specifically designed for bicycle brakes. |
| Brake Fluid | The recommended brake fluid by the manufacturer of your bicycle’s braking system. |
| Clean Rag | A lint-free cloth or rag to clean any spills and handle the bike components. |
| Wrenches | Appropriate wrenches or tools to loosen and tighten the brake bleeder screws. |
| Plastic Bags | To cover your bike frame and prevent any brake fluid from accidentally dripping on it. |
2. Choose a Well-Ventilated Area
Perform the brake bleeding process in a well-ventilated area, preferably outdoors or in a spacious garage. This will help to minimize the inhalation of brake fluid fumes and ensure proper air circulation.
3. Wear Safety Gear
Wear protective gloves and safety glasses to safeguard your hands and eyes from any potential splashes or spills of brake fluid. Brake fluid can irritate the skin and eyes, so taking this precaution is essential.
Follow these preparation and safety measures accordingly to create a safe environment for bleeding the brakes on your bicycle. Ensuring that you have all the necessary tools and protective gear will make the process smoother and significantly reduce the risks involved.
Choosing the Right Location
When it comes to bleeding brakes on a bicycle, choosing the right location is crucial. The ideal location is one that provides a clean and controlled environment, as well as ample space to maneuver around the bike.

Here are some factors to consider when choosing the right location:
- Well-ventilated area: Look for a location with good airflow to ensure that any fumes or odors from the brake fluid can dissipate quickly.
- Well-lit space: Proper lighting is essential to accurately see the brake components and ensure a successful bleeding process.
- Clean and flat surface: Find a surface that is clean, smooth, and flat to provide stability and prevent any accidental spills or damage to the bike.
- Minimal distractions: It’s important to choose a location that is free from distractions, such as noise or frequent foot traffic, as it can affect your focus and concentration during the bleeding process.
- Access to necessary tools: Ensure that you have easy access to all the tools and equipment required for bleeding the brakes, such as wrenches, bleed kits, and a container for collecting the old brake fluid.
- Comfort: Lastly, consider your own comfort. Choose a location where you can work comfortably for an extended period of time, as bleeding brakes can require patience and attention to detail.
By taking these factors into account, you can create an optimal setup for bleeding the brakes on your bicycle, ensuring a smooth and successful process.
Bleeding the Brakes
Bleeding the brakes on your bicycle is an essential maintenance task that helps to keep your brakes functioning properly. Over time, air can become trapped in the brake lines, which reduces the effectiveness of the brake system. By bleeding the brakes, you remove any air bubbles and ensure that the brakes are able to generate maximum stopping power. This process involves flushing out the old brake fluid and replacing it with fresh fluid. Here’s how you can bleed the brakes on your bicycle:
| Step 1: Gather the Necessary Tools | ||
| – Brake bleed kit | – New brake fluid | – Allen wrench or screwdriver for removing the brake caliper |
| Step 2: Prepare the Brake System | |||
| – Position your bike in a stable position or use a bike stand | – Remove the wheel to access the brake caliper | – Locate the brake bleed port on the caliper or brake handle | – Attach the brake bleed kit to the caliper or brake handle |
| Step 3: Flush Out Old Brake Fluid | ||
| – Loosen the bleed screw to allow old brake fluid to flow out | – Keep an eye on the fluid level in the brake reservoir | – Continue flushing the system until fresh fluid appears without any air bubbles |
| Step 4: Refill and Test Brakes | |||
| – Refill the brake reservoir with fresh brake fluid | – Tighten the bleed screw once no more air bubbles are present | – Test the brakes to ensure they are functioning properly | – If necessary, repeat the bleeding process to remove any remaining air bubbles |
It’s important to follow manufacturer’s instructions and specific brake bleeding procedures for your particular bicycle model. Regularly bleeding the brakes will help to maintain optimal braking performance and ensure your bicycle is safe to ride.
Removing Air from the System
Once you have completed the brake bleeding process, it is important to remove any remaining air from the system to ensure optimal brake performance. Here are the steps to follow:
Step 1: Check the Bleed Screw
Make sure that the bleed screw on the brake caliper is securely tightened. If it is loose, this can cause air to enter the system.
Step 2: Repeat the Bleeding Process
If you still feel spongy or weak brakes, you may need to repeat the bleeding process to remove any remaining air bubbles. Follow the same steps that you previously did to bleed the brakes.
Step 3: Tap and Shake the Brake Lines
To help release any trapped air from the brake lines, lightly tap and shake the brake lines while holding the lever in a partially depressed position. This can help dislodge any air bubbles that may be stuck in the system.
Step 4: Test the Brakes
After removing the air from the system, test the brakes to ensure they are functioning properly. Squeeze the lever and check for a firm and responsive feel. If the brakes still feel spongy or weak, you may need to repeat the bleeding process again.
By following these steps, you can effectively remove any air from the brake system and ensure your bicycle has reliable and responsive brakes.


Harrison Clayton
Meet Harrison Clayton, a distinguished author and home remodeling enthusiast whose expertise in the realm of renovation is second to none. With a passion for transforming houses into inviting homes, Harrison's writing at https://thehuts-eastbourne.co.uk/ brings a breath of fresh inspiration to the world of home improvement. Whether you're looking to revamp a small corner of your abode or embark on a complete home transformation, Harrison's articles provide the essential expertise and creative flair to turn your visions into reality. So, dive into the captivating world of home remodeling with Harrison Clayton and unlock the full potential of your living space with every word he writes.


