How to connect dvd player to smart tv without hdmi

Connecting a DVD player to a smart TV is usually a straightforward process. However, it can become challenging if your smart TV doesn’t have an HDMI port. Many modern smart TVs only come with HDMI ports, which can make it difficult to connect older DVD players that use different types of cables.
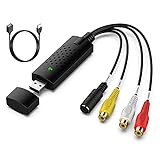
Fortunately, there are alternative ways to connect your DVD player to a smart TV without HDMI. One option is to use component cables, which have red, blue, and green connectors for video, and red and white connectors for audio. These cables are commonly found with most DVD players and can be connected to the corresponding ports on your smart TV.
Another option is to use a composite cable, which consists of a yellow connector for video, and red and white connectors for audio. Although the video quality may not be as good as with HDMI or component cables, it can still provide a decent viewing experience. Simply connect the yellow end of the cable to the video input on your smart TV, and the red and white ends to the corresponding audio inputs.
If your DVD player has a coaxial output, you can also use a coaxial cable to connect it to your smart TV. This type of cable is commonly used for cable TV connections and can be plugged into the coaxial input on your smart TV. However, keep in mind that not all smart TVs have coaxial inputs, so this option may not be available for everyone.
Although connecting a DVD player to a smart TV without HDMI may require some additional cables or adapters, it is still possible to enjoy your favorite movies and shows. By following these alternative methods, you can easily connect your DVD player to your smart TV and start enjoying your collection of DVDs once again.

Step-by-Step Guide for Connecting a DVD Player to a Smart TV Without HDMI
If you have a smart TV that doesn’t have an HDMI input or you simply prefer to connect your DVD player without using HDMI, don’t worry! There are several alternative methods you can use to make the connection. Follow along with this step-by-step guide to get started.
What You’ll Need
Before getting started, make sure you have the following items:
- An RCA AV cable (usually includes yellow, red, and white connectors)
- Analog-to-digital converter box (optional, if your TV only has a digital tuner)
- Audio adapter (optional, if your TV doesn’t have red and white audio inputs)
Step 1: Verify your TV and DVD Player
First, check the available inputs on your smart TV and the output options on your DVD player. Look for RCA AV inputs on your TV and RCA AV outputs on your DVD player. These outputs are usually color-coded as yellow (video), red (right audio), and white (left audio).
Step 2: Connect the RCA AV Cable
Connect one end of the RCA AV cable to the AV outputs of your DVD player, matching the colors of the connectors to the corresponding outputs on your DVD player.
Next, connect the other end of the RCA AV cable to the AV inputs on your smart TV, again matching the colors. Make sure to insert the yellow plug into the yellow input, the red plug into the red input, and the white plug into the white input.

Step 3: Set the Input Source on Your TV
Once the DVD player is connected, use your TV remote to navigate to the input/source menu. Select the appropriate AV input where you connected the RCA AV cable.
Step 4 (Optional): Use Analog-to-Digital Converter Box
If your smart TV only has a digital tuner and doesn’t have RCA AV inputs, you’ll need an analog-to-digital converter box. Connect the RCA AV cable to your DVD player, then connect the other end of the cable to the input of the converter box. Finally, use an HDMI cable to connect the output of the converter box to an available HDMI input on your smart TV.
Step 5: Adjust Audio Settings (Optional)
If your smart TV doesn’t have audio inputs that match the red and white connectors on the RCA AV cable, you’ll need an audio adapter. Connect the red and white plugs of the RCA AV cable to the audio adapter, then connect the audio adapter to an available audio input on your TV.
That’s it! You have successfully connected your DVD player to your smart TV without using an HDMI cable. Now you can enjoy watching DVDs on your smart TV. Remember to adjust the input/source on your TV whenever you want to watch a DVD.
| Problem | Possible Solution |
|---|---|
| No video signal on the TV | Make sure the RCA AV cable is securely connected and that the input/source is set correctly on your TV. |
| No audio or distorted audio | Check that the audio connections are properly seated and that the volume is set appropriately on both the DVD player and TV. |
| Black and white video | Ensure the yellow plug of the RCA AV cable is connected to the yellow input on your TV. If using a converter box, make sure it is set to output in color. |
| No sound from specific speakers (e.g., surround sound) | Verify the audio settings on your TV and DVD player to ensure they are compatible with your speaker setup. Consult the user manuals for guidance. |

Checking the Available Ports
Before connecting your DVD player to a smart TV without HDMI, it’s important to check the available ports on both devices. Different smart TVs and DVD players may have different input and output ports, so it’s essential to ensure compatibility.
First, locate the ports on your DVD player. Common ports include RCA (red, white, yellow) connectors, component/composite video, and S-Video. Check your DVD player’s manual or look for labels on the back of the device to identify the specific ports available.
Next, identify the ports on your smart TV. Some common options include VGA, DVI, component, and composite video. Most modern smart TVs also have USB ports, which can be used for connecting external devices. Review your TV’s manual or examine the TV itself for labels to find the suitable ports.
Once you’ve identified the ports on both devices, look for matching ports or those that can be used with an adapter. For example, if your DVD player has RCA connectors and your TV has component video ports, you may require an RCA-to-component video adapter or cable. If your TV has a VGA port but your DVD player has only S-Video output, you may need a VGA-to-S-Video adapter.
Note: It’s important to respect the limitations of the connections available on your devices. Connecting analog (e.g., component/composite) outputs to digital (e.g., HDMI) inputs may result in lower quality video and audio.
Ensure that any necessary adapters or cables are readily available before proceeding to connect your DVD player to your smart TV without HDMI. Once you have determined the appropriate connections, you can move on to the next steps, which involve connecting the audio and video output from the DVD player to the corresponding input on the TV.
Using Component or Composite Cables
If your smart TV does not have an HDMI port and your DVD player does not support any other form of digital connection, you may need to use component or composite cables to connect the two devices.
Component cables have red, blue, and green cables for video, and red and white cables for audio. Composite cables, on the other hand, have a yellow cable for video, and red and white cables for audio.
Here are the steps to connect your DVD player to a smart TV using component or composite cables:
- Locate the component or composite ports on both your DVD player and smart TV. These are typically labeled as “Component” or “AV” on the back panels.
- Connect one end of the component or composite cables to the corresponding ports on your DVD player.
- Connect the other end of the cables to the matching ports on your smart TV. Make sure to match the colors of the cables with the corresponding ports.
- Turn on both your DVD player and smart TV.
- Using the remote control of your smart TV, navigate to the input/source menu and select the appropriate input/source option for the component or composite connection. This option is usually labeled as “AV,” “Composite,” or “Component.”
- You should now be able to see and hear the content from your DVD player on your smart TV. Use the DVD player’s own remote control to control playback.
Note that the quality of the video and audio may not be as high as when using HDMI, as component and composite cables do not support high-definition signals. However, it should still provide a basic connection and allow you to watch DVDs on your smart TV.

Please consult the user manuals for your DVD player and smart TV for more specific instructions on connecting the two devices using component or composite cables.
| Advantages | Disadvantages |
|---|---|
| Does not require HDMI ports | Lower video and audio quality compared to HDMI |
| Easy to find and affordable | More cables and connections to manage |
| Provides a basic connection for watching DVDs | May not support high-definition signals |
Setting Up the Connections and Adjusting the TV Settings
When connecting a DVD player to a smart TV without HDMI, you will need to use alternative connections, such as the composite audio/video cables (yellow, white, and red RCA cables) or component cables (red, green, and blue video cables, along with red and white audio cables). Follow these steps to set up the connections and adjust the TV settings properly:
Step 1: Connect the DV
Start by connecting one end of the chosen cable (composite or component) to the appropriate ports on the back of the DVD player. Make sure to match the colors correctly to the corresponding ports.
Step 2: Connect the TV
Next, connect the other end of the cable to the corresponding input ports on the back of the TV. Again, make sure to match the colors correctly.

Step 3: Power on and select input
Plug in the power cord of the DVD player and turn it on. Use the TV remote to navigate to the input/source settings and select the input source that corresponds to the port you connected the DVD player to.
Step 4: Adjust picture and sound settings
Once you have selected the correct input source, you may need to adjust the picture and sound settings on your TV. Use the TV remote to access the picture and audio settings menu, and make any necessary changes to optimize the playback from your DVD player.
Step 5: Test the connection
After completing the steps above, insert a DVD into the player and test the connection by playing the DVD. Ensure that both the audio and video are working properly. If there are any issues, double-check the connections and ensure the settings are accurately configured.
| Composite Connections | Component Connections |
|---|---|
|
|
By following these steps and properly adjusting the TV settings, you should be able to connect a DVD player to a smart TV without HDMI and enjoy your favorite movies and shows.


Harrison Clayton
Meet Harrison Clayton, a distinguished author and home remodeling enthusiast whose expertise in the realm of renovation is second to none. With a passion for transforming houses into inviting homes, Harrison's writing at https://thehuts-eastbourne.co.uk/ brings a breath of fresh inspiration to the world of home improvement. Whether you're looking to revamp a small corner of your abode or embark on a complete home transformation, Harrison's articles provide the essential expertise and creative flair to turn your visions into reality. So, dive into the captivating world of home remodeling with Harrison Clayton and unlock the full potential of your living space with every word he writes.


