Tips for drilling through ceramic tile without causing cracks
Drilling through ceramic tile can be a tricky task, as the material is known for its fragility and susceptibility to cracking. However, with the right tools and techniques, you can successfully drill through ceramic tiles without causing any damage. In this article, we will share some valuable tips to help you complete your drilling project with ease and precision.
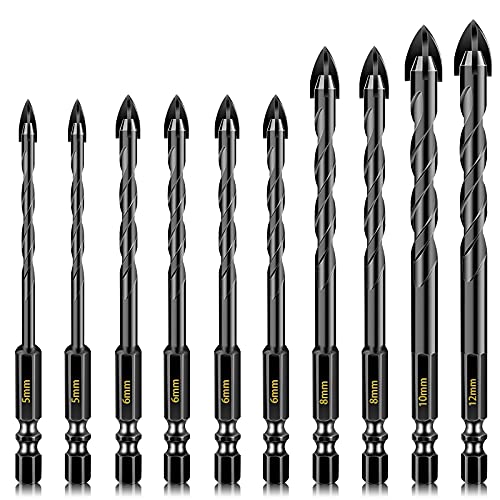
1. Choose the right drill bit: When drilling through ceramic tile, it is important to use a drill bit specifically designed for the material. A carbide-tipped masonry bit or a diamond bit are ideal choices. These bits are specifically designed to cut through hard surfaces like ceramic tiles without causing cracks.
2. Mark the drilling spot: Before drilling, use a pencil or a marker to clearly mark the spot where you want to drill. This will help you maintain accuracy and prevent any mistakes. Make sure to measure and mark the spot carefully, as once the hole is drilled, it cannot be easily corrected.
3. Start with a small pilot hole: To minimize the risk of cracking, it is recommended to start with a small pilot hole before drilling the final hole. This will help in better precision and prevent the tile from cracking under pressure. Gradually increase the size of the hole until you reach the desired diameter.
4. Use water as a lubricant: To keep the drill bit cool and prevent overheating, it is advisable to use water as a lubricant while drilling. This will also help in reducing friction and prolonging the life of your drill bit. Simply spray a small amount of water on the drilling spot while drilling.

5. Drill at a slow speed: Drilling through ceramic tile requires patience and a slow speed. Avoid applying too much pressure or drilling at a high speed, as this can increase the chances of cracks. Instead, use a moderate speed and let the drill bit do the work gradually.
Remember, drilling through ceramic tile requires precision and careful handling. By following these tips, you can avoid cracks and successfully complete your drilling project. Always wear safety goggles and gloves while drilling, and take necessary precautions to protect yourself and the tile.
Proper Tools and Materials
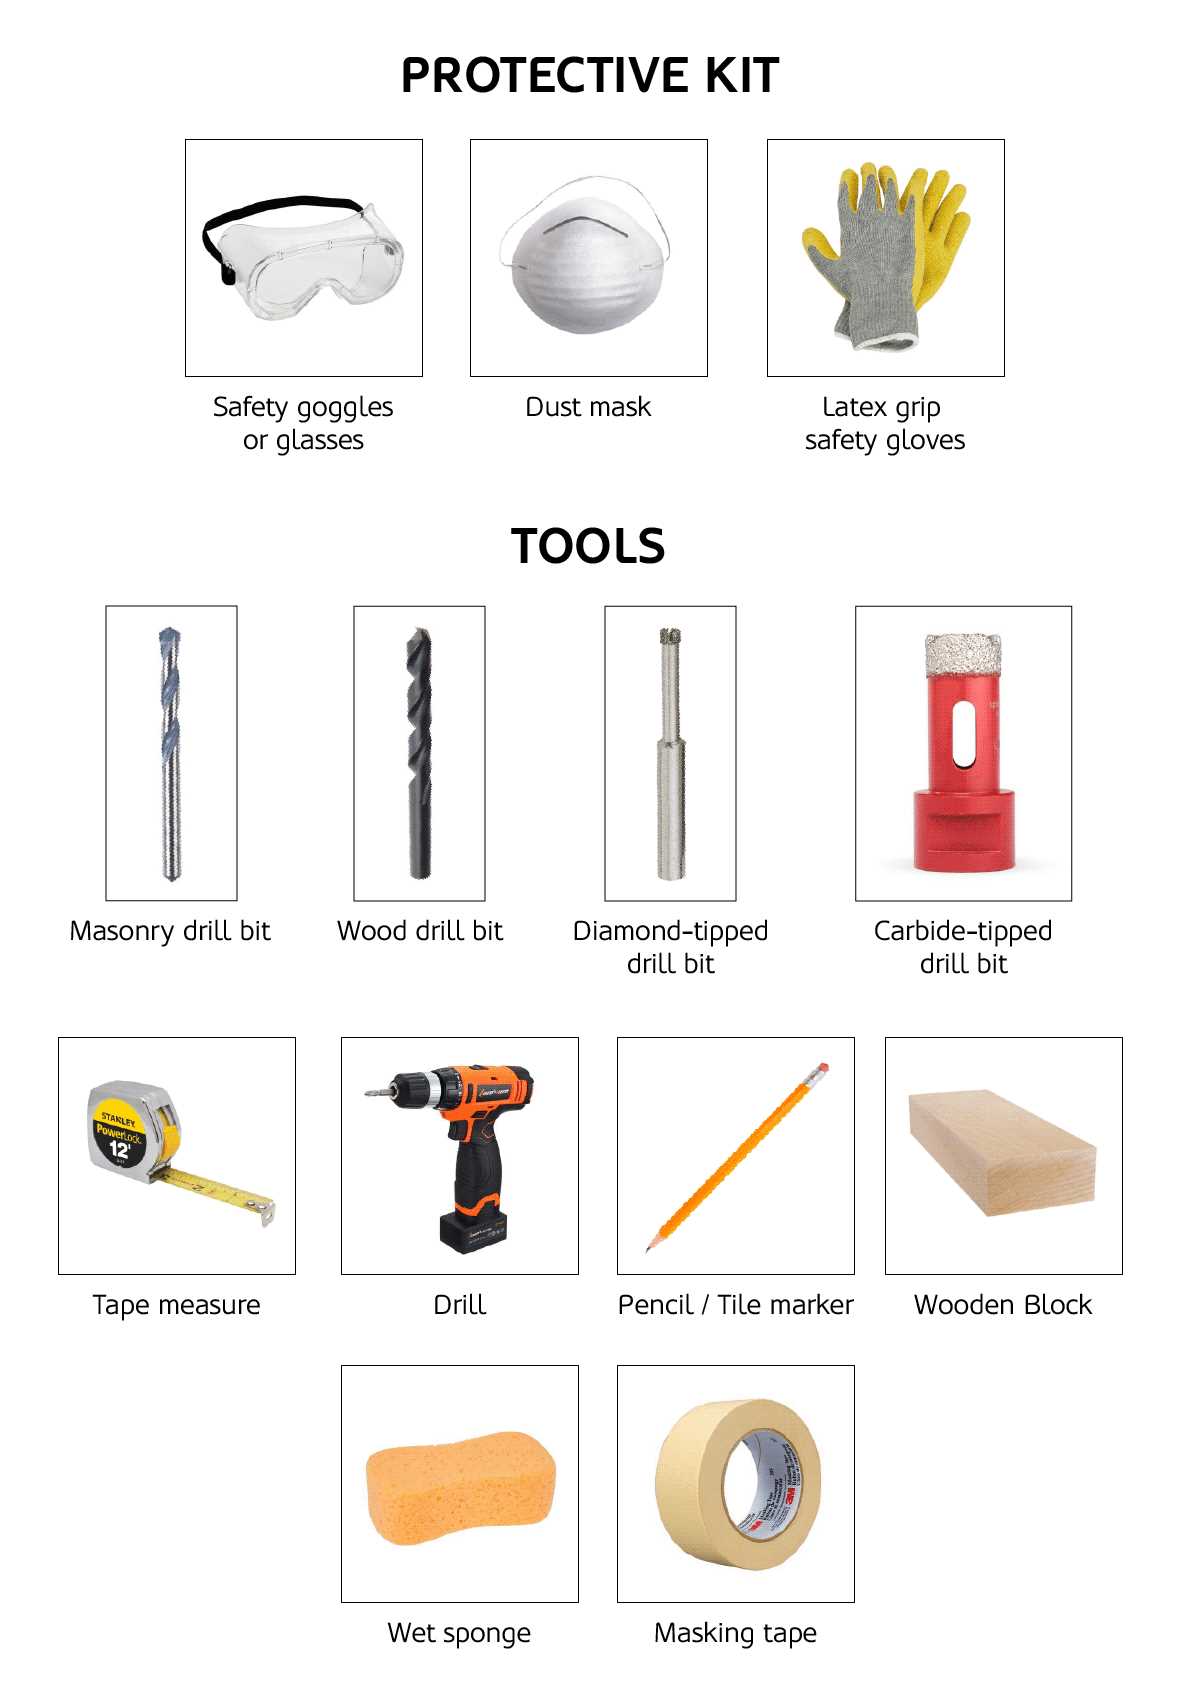
When drilling through ceramic tile, it is essential to use the proper tools and materials to avoid causing cracks. Here are some key items you will need:
- Power Drill: Use a power drill that has variable speed settings and a designated tile or glass drill bit. This will allow you to control the drilling process and prevent cracks.
- Tile or Glass Drill Bit: It is important to use a drill bit specifically designed for drilling through ceramic tile or glass. These drill bits have a diamond or carbide tip that can penetrate the hard surface without causing damage.
- Masking Tape: Applying masking tape over the area where you plan to drill can help prevent the tile from cracking. The tape will provide stability and reduce the risk of the drill bit slipping.
- Water: To prevent the tile from overheating and cracking, it is recommended to use water as a lubricant during the drilling process. You can either spray water directly on the tile or use a wet sponge to keep the area cool.
- Safety Glasses and Gloves: Always wear safety glasses to protect your eyes from any flying debris while drilling. Additionally, wearing gloves can provide added protection and improve your grip on the drill.
Preparing the Tile
- Clean the tile surface: Before drilling, make sure the ceramic tile is free of any dirt, dust or debris. Use a damp cloth or sponge to clean the surface thoroughly. This will ensure that the drill bit can make a clean and precise hole without any hindrances.
- Mark the spot: Use a pencil or a marker to mark the spot where you want to drill the hole. This will help you to create a guide for drilling and ensure that you drill in the right spot without any errors.
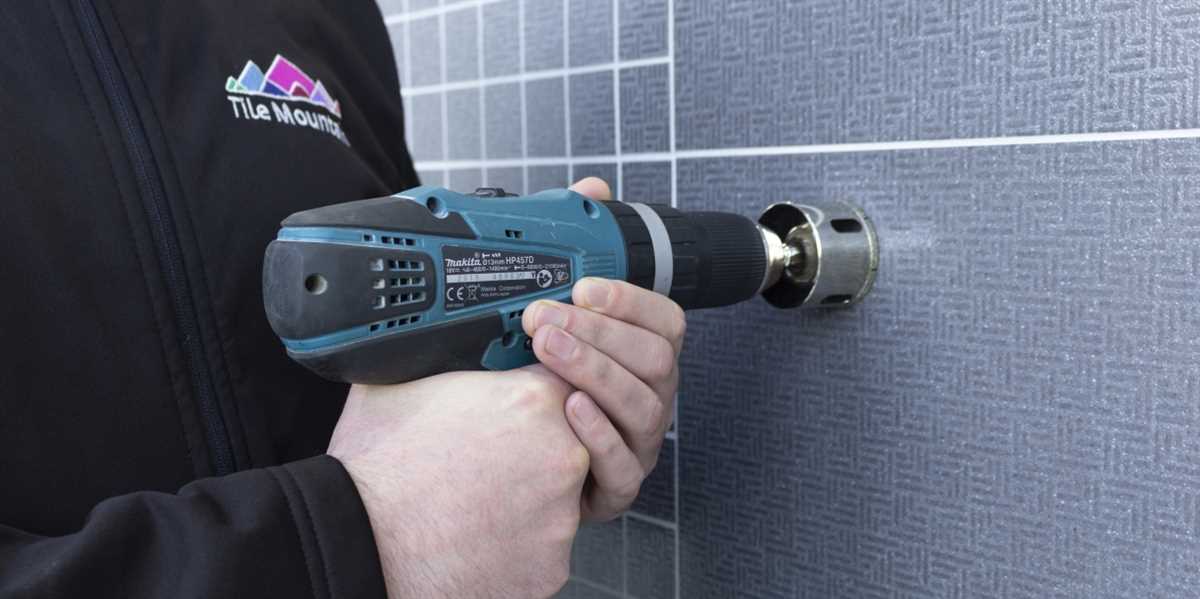
- Use a tile hole saw or a diamond drill bit: For drilling through ceramic tile, it is recommended to use a tile hole saw or a diamond drill bit specifically designed for this purpose. These tools have diamond grits on their tips that can easily cut through the hard ceramic surface without causing any cracks or chips.
- Apply masking tape: To prevent any damage or cracking while drilling, you can apply a piece of masking tape over the marked spot. The tape will provide an extra layer of protection and also help to reduce any vibrations during the drilling process.
- Start with a small pilot hole: It is advisable to start with a small pilot hole before drilling the actual hole. This will help to prevent any slipping or skidding of the drill bit and provide more control and accuracy.
- Drill at a slow speed: When drilling through ceramic tile, it is important to drill at a slow speed to avoid any heat buildup. Excessive speed can cause the tile to crack due to the friction generated by the drilling process. Ensure that you maintain a steady and even pressure while drilling.
- Use water as a lubricant: To further reduce the risk of cracks and damage, you can use water as a lubricant during the drilling process. Simply dip the drill bit into a small container of water periodically to keep it cool and lubricated. This will help to dissipate heat and prevent the tile from overheating or cracking.
Marking the Hole
Before you start drilling through ceramic tile, it’s important to mark the exact spot where you want the hole to be. This will help ensure accuracy and prevent any unnecessary cracks or damage to the tile.
Here are some tips for marking the hole:

- Measure and mark: Use a measuring tape or ruler to determine the exact location for the hole. Make sure to carefully measure the dimensions and position to avoid any mistakes.
- Use a pencil: Once you have determined the spot, use a pencil to mark the center of the hole. This will provide a visible guide for drilling.
- Consider masking tape: If you want to be extra cautious, you can place a small piece of masking tape over the marked spot. The tape will act as a protective barrier and can help prevent any cracking or chipping.
- Double-check your markings: Before you start drilling, take a moment to double-check your markings. Ensure that the pencil mark is clearly visible and aligned with your desired hole location.
By following these steps and taking the time to accurately mark the hole, you can significantly reduce the risk of causing cracks or damage to the ceramic tile while drilling.
Start Drilling
Once you have prepared the necessary tools and marked the spot where you want to drill, it’s time to start drilling. Follow these steps to ensure a smooth drilling process:
- Choose the right drill bit: Select a carbide-tipped masonry bit that matches the diameter of the hole you need to drill. This type of bit is specifically designed for drilling through ceramic tile and will provide the best results.
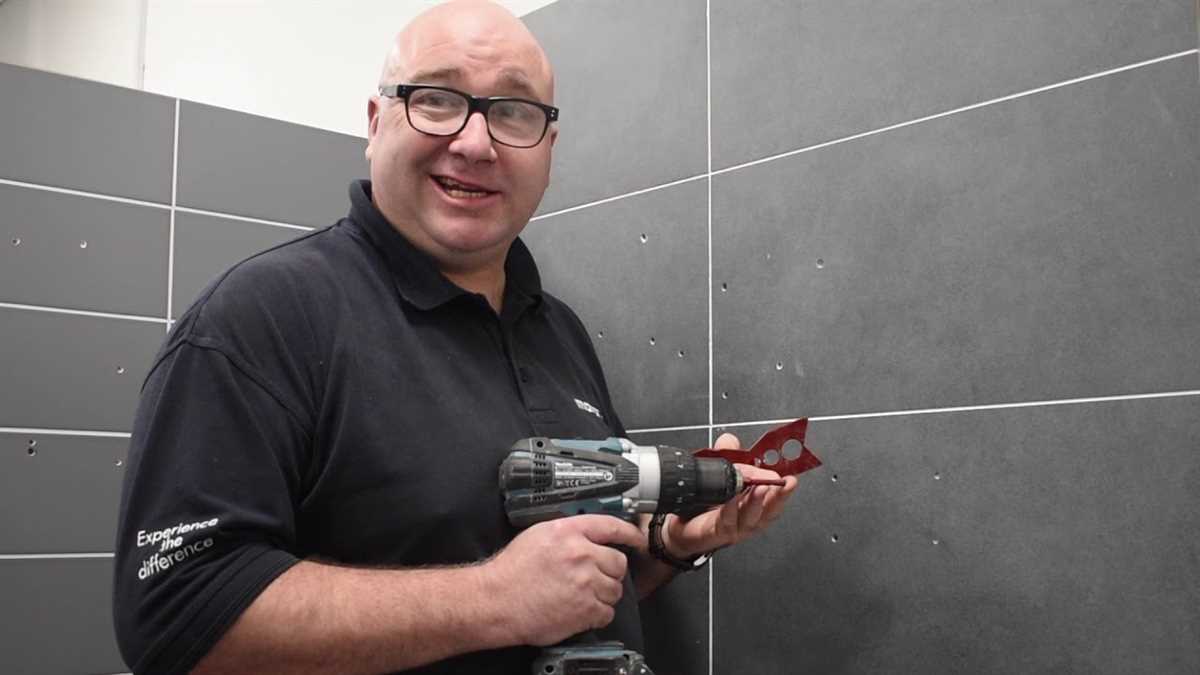
- Secure the tile: Place a piece of scrap wood under the tile to provide support and prevent cracking. You can also apply a piece of masking tape over the drilling spot to further reduce the chances of damaging the tile.
- Apply gentle pressure: Hold the drill perpendicular to the tile surface and apply steady pressure as you begin drilling. Start at a slow speed to prevent skidding or chipping of the tile, then gradually increase the speed for a smoother cut.
- Keep the drill steady: While drilling, try to maintain a consistent drilling speed and keep the drill as straight as possible. This will help you avoid creating cracks or damaging the surrounding tile.
- Use a lubricant: To minimize heat and prevent the bit from dulling, it is recommended to use water or a coolant as a lubricant while drilling. This will also prevent dust from building up and improve the drilling process.
- Take breaks: Drilling through ceramic tile can generate a lot of heat, so it’s important to take breaks every 10-15 seconds to let the bit cool down. This will extend the life of the drill bit and prevent it from becoming too hot to handle.
By following these steps, you can drill through ceramic tile without causing cracks or damage. Remember to take your time, use appropriate tools, and be patient to achieve the best results.
Applying Steady Pressure
Drilling through ceramic tile requires a steady hand and consistent pressure to avoid cracking or damaging the tile. Here are some tips for applying steady pressure while drilling:

1. Start with a pilot hole
Before drilling the actual hole, it’s helpful to create a pilot hole. Use a smaller drill bit to create a small indentation on the tile surface. This will serve as a guide for the larger drill bit and help prevent any slipping or wandering of the drill.
2. Use a slow speed
When drilling into ceramic tile, it’s important to use a slow speed setting on your drill. High speeds can generate heat and cause the tile to crack. Set your drill to a slower speed to ensure more control and reduce the risk of damaging the tile.
3. Hold the drill steady
As you begin drilling, make sure to hold the drill steady with both hands to maintain control and avoid unnecessary movement. Avoid applying too much force or angling the drill as this can lead to cracks or chips in the tile.
4. Apply even pressure
Apply gentle, even pressure as you drill into the ceramic tile. Avoid pushing too hard or using sudden movements. The goal is to create a smooth, consistent drilling motion that allows the drill bit to gradually penetrate the tile without causing any damage.

5. Use water as a lubricant
To reduce friction and heat buildup, you can use water as a lubricant while drilling. Simply dampen a sponge or cloth and hold it near the drilling area. This will help keep the tile and drill bit cool, reducing the risk of cracking.
6. Take breaks if needed
If you feel the tile becoming too hot or if you’re having difficulty drilling, it’s important to take breaks. This will give the tile and drill bit a chance to cool down and prevent any unnecessary damage. Patience is key when drilling through ceramic tile.
By following these tips and applying steady pressure, you can successfully drill through ceramic tile without causing cracks or damage. Remember to take your time and be cautious throughout the drilling process.
Using a Slow Speed
When drilling through ceramic tile, it’s important to use a slow speed to prevent cracks and damage. The high speed of a drill can create too much heat and pressure, causing the tile to crack or shatter. By using a slow speed, you can reduce the risk of damaging the tile and ensure a clean hole.
Here are some tips for using a slow speed when drilling through ceramic tile:

- Choose the right drill bit: Opt for a carbide-tipped or diamond drill bit specifically designed for drilling through ceramic tile. These drill bits are specifically designed to handle the hardness of the tile and will reduce the chances of cracks.
- Mark the drilling point: Use a marker or a piece of tape to mark the exact spot where you want to drill. This will help you stay on track and prevent unnecessary movements that can cause cracks.
- Start with a pilot hole: Before drilling the actual hole, start with a small pilot hole. This will help guide the drill bit and reduce the risk of slipping or damaging the tile. Use a low speed to create the pilot hole.
- Go slow and steady: When drilling the actual hole, use a slow speed setting on your drill. Apply gentle and consistent pressure, letting the drill bit do the work. Avoid rushing or exerting too much force, as this can cause cracks.
- Keep the area cool: To reduce heat buildup, periodically dip the drill bit in water or use a coolant spray. This will help keep the temperature down and prevent the tile from cracking due to excessive heat.
- Use light pressure towards the end: As you near the completion of the hole, use lighter pressure to reduce the chances of a crack. This is especially important when drilling through the back side of the tile.
By using a slow speed and following these tips, you can successfully drill through ceramic tile without causing cracks or damage. Remember to always wear safety goggles and gloves when drilling to protect yourself from any flying debris or accidents.
Cooling the Tile
When drilling through ceramic tile, the friction generated by the drilling process can cause the tile to heat up. This can lead to cracks or breaks in the tile. To prevent this, it is important to keep the tile cool during drilling.
There are several ways to cool the tile:
- Water spray: Using a water spray bottle to keep the drill bit and the tile wet can help dissipate heat and prevent cracks. Make sure to continuously spray water onto the tile while drilling.
- Cooling gel: Applying a cooling gel or lubricant specifically designed for drilling through tile can also help keep the tile cool. These gels create a protective layer between the tile and the drill bit, reducing heat buildup.
- Ice cube: Holding an ice cube against the tile while drilling can provide instant cooling and prevent cracks. However, this method may require frequent pauses to replenish the ice cube.
- Cooling time: If possible, take breaks between drilling holes to allow the tile to cool down naturally. This can help prevent excessive heat buildup and minimize the risk of cracks.
- Cooling fan: Using a small fan to blow cool air over the tile can help dissipate heat and keep the tile cool. Position the fan in a way that it directs airflow towards the drilling area.
Remember, keeping the tile cool is essential for successful drilling without causing cracks. Choose the cooling method that works best for you and your specific situation to ensure a smooth drilling process.
Proper Technique for Drill Bit Removal
Drilling through ceramic tile requires precision and care to avoid cracks and damage. Equally important is the proper technique for removing the drill bit from the tile after drilling. Here are some tips to ensure a safe and effective removal:
1. Turn off the drill
Before attempting to remove the drill bit, ensure that the drill is turned off. This will prevent any accidental spinning or movement of the bit during removal.
2. Release the chuck
Most drills have a chuck that holds the drill bit in place. To remove the drill bit, release the chuck by turning it counterclockwise. This will loosen the grip on the bit and allow for easy removal.
3. Pull the bit straight out
When removing the drill bit, it is important to pull it straight out of the tile. Any sideways motion or angling can cause the drill bit to scrape against the tile, increasing the risk of cracks or damage.
4. Clean the bit
After removing the drill bit from the tile, it is important to clean it thoroughly. Ceramic dust and debris can accumulate on the bit, affecting its performance and lifespan. Use a brush or compressed air to remove any residue before storing the bit.
5. Secure the drill bit
To avoid misplacing or losing the drill bit, it is a good practice to secure it properly. You can use a magnetic bit holder, storage case, or a designated area in your toolbox to keep the bit safe and easily accessible for future use.
6. Inspect the tile
After removing the drill bit, take a moment to inspect the ceramic tile for any signs of damage or cracks. If you notice any issues, it is important to address them promptly to prevent further problems down the line.
By following these proper techniques for drill bit removal, you can safely and effectively drill through ceramic tile without causing cracks or damage. Remember to always prioritize safety and take your time during the process to achieve the best results.
FAQ:
What tools do I need for drilling through ceramic tile?
To drill through ceramic tile, you will need a drill with a carbide drill bit, masking tape, a marker or pencil, a level, and safety glasses.
How do I mark my drilling spot on the tile?
To mark your drilling spot on the tile, place masking tape over the area where you want to drill. Use a marker or pencil to mark your drilling spot on the tape.
What is the best drill bit to use for drilling through ceramic tile?
The best drill bit to use for drilling through ceramic tile is a carbide drill bit, as it is specifically designed to drill through hard materials like tile without causing cracks or chips.
How do I prevent cracks or chips when drilling through ceramic tile?
To prevent cracks or chips when drilling through ceramic tile, you can use the following tips: use a carbide drill bit, apply gentle pressure, use a lower speed setting on your drill, and periodically check the progress of the hole.
Should I dampen the tile before drilling?
No, you should not dampen the tile before drilling. Dampening the tile can actually increase the risk of cracking or chipping, as it softens the material and makes it more prone to damage.
Can I drill through ceramic tile without a drill bit designed for tile?
It is not recommended to drill through ceramic tile without a drill bit designed for tile. Using the wrong drill bit can increase the risk of cracking or chipping the tile.
What should I do if I accidentally crack or chip the tile while drilling?
If you accidentally crack or chip the tile while drilling, you can try to repair it using epoxy or tile filler. If the damage is significant, you may need to replace the tile.
Video:

How to get to hydra greece

Meet Harrison Clayton, a distinguished author and home remodeling enthusiast whose expertise in the realm of renovation is second to none. With a passion for transforming houses into inviting homes, Harrison's writing at https://thehuts-eastbourne.co.uk/ brings a breath of fresh inspiration to the world of home improvement. Whether you're looking to revamp a small corner of your abode or embark on a complete home transformation, Harrison's articles provide the essential expertise and creative flair to turn your visions into reality. So, dive into the captivating world of home remodeling with Harrison Clayton and unlock the full potential of your living space with every word he writes.


