How to make ice lollies with juice

If you’re looking for a refreshing and healthy treat during the hot summer months, why not try making your own ice lollies with juice? Not only are they simple to make, but you have full control over the flavors and ingredients you use. Whether you’re trying to beat the heat or looking for a fun activity to do with your children, making ice lollies with juice is a fantastic option.
Step 1: Gather Your Supplies
The first step in making ice lollies with juice is to gather all the necessary supplies. This includes ice lolly molds, juice of your choice, popsicle sticks, and any additional ingredients you want to add, such as fruit slices or mint leaves. Make sure to have enough molds for each lolly you plan to make.
Step 2: Fill the Molds
Once you have all your supplies ready, it’s time to fill the molds. Pour your chosen juice into each mold, leaving a small gap at the top to allow for expansion when freezing. If you’re adding fruit slices or other ingredients, place them into the molds and gently press them down with a popsicle stick.

Step 3: Insert the Sticks
After filling all the molds, carefully insert a popsicle stick into each one. Make sure they are centered and straight. The stick will act as the handle for the lolly once frozen. Leave enough of the stick exposed so it can be easily held.
Step 4: Freeze and Enjoy!
Finally, place the filled molds into the freezer and allow them to freeze completely, usually for about 4-6 hours, or overnight. Once the ice lollies are fully frozen, remove them from the molds by running the bottom of the mold under warm water. Now, sit back, relax, and enjoy your homemade ice lollies with juice!
Preparation and Equipment
To make delicious ice lollies with juice, you will need the following equipment:

- A set of ice lolly moulds with sticks.
- A pitcher or container with a spout for pouring juice.
- A mixing spoon or whisk.
- A knife or fruit peeler for preparing fresh fruit (optional).
- A cutting board or plate for slicing fruits (optional).
- A strainer or sieve to remove any pulp or seeds from the juice (optional).
Before you start making the ice lollies, it is important to ensure that the ice lolly moulds are clean and dry. This prevents any contamination and helps the lollies freeze evenly.
If you plan to use fresh fruits, wash them thoroughly and remove any seeds or pits. Peel and cut the fruits into small pieces and set them aside. If you prefer smoother lollies without fruit chunks, you can strain the juice before pouring it into the moulds.
Lastly, make sure you have enough space in your freezer to accommodate the moulds. Ideally, place them on a flat surface to prevent any spillage or distortion while freezing.
Gather needed supplies
Before you start making ice lollies with juice, it’s essential to gather all the necessary supplies. Here’s what you’ll need to get started:
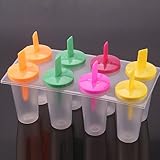
- Ice lolly molds: These are special plastic containers that hold the liquid and shape it into ice lollies. You can find them at most kitchen supply stores or online.
- Juice: Choose your favorite juice flavor to make the ice lollies. You can use single fruit juice or mix different flavors to create unique combinations.
- Sweetener (optional): If you like your ice lollies sweeter, you can add a sweetener like sugar, honey, or agave syrup to the juice. However, this step is entirely optional.
- Wooden ice lolly sticks: These sticks go into the molds and serve as handles for the ice lollies. You can find them in the baking or craft sections of most stores.
- Freezer: You’ll need a freezer to freeze the ice lollies and turn the liquid into a delicious frozen treat.
Once you have all these supplies ready, you’re all set to start making your own homemade ice lollies with juice!
Prepare ice lolly molds
Before you start making your delicious ice lollies, you’ll need to make sure you have the right molds. Ice lolly molds come in various shapes and sizes, so choose the ones that you like best. Some molds come with their own sticks, while others require separate sticks to be inserted later. Make sure you check the packaging for instructions.
Once you have your chosen molds, it’s important to wash them thoroughly with warm soapy water. This will ensure that your ice lollies don’t have any unwanted bacteria or residue from previous uses.
If your molds require separate sticks, now is the time to insert them. Simply place the sticks into the designated slots or holes in the mold. Make sure they are securely in place, as this will prevent them from falling out when you add the liquid.
If you want to add extra fun to your ice lollies, you can also consider using reusable silicone molds that come in different shapes like animals or popular characters. These molds are not only fun for children, but they can also be easy to remove the frozen lollies from once they are ready to be enjoyed.
After preparing your molds, place them on a flat surface or a baking tray to make it easier to transport them to the freezer. This step will ensure that the liquid stays in place and prevents any spills or leaks.

Now that your ice lolly molds are ready, it’s time to move on to the next step of filling them with your favorite juice or fruit mixture. Read on to discover different flavor combinations and creative ideas for your ice lollies!
Choose and Mix Flavors
When making ice lollies with juice, one of the most exciting parts is choosing and mixing the flavors. You can get creative and come up with unique combinations that will tantalize your taste buds. Here are a few suggestions to inspire you:
1. Classic Combo: Mix orange juice with pineapple juice for a refreshing and tropical flavor.
2. Berry Blast: Combine strawberry juice, blueberry juice, and raspberry juice for a burst of fruity goodness.
3. Citrus Twist: Blend lemon juice, lime juice, and grapefruit juice to create a zesty and tangy treat.

4. Tropical Paradise: Mix mango juice, passion fruit juice, and coconut water for a taste of the tropics.
5. Watermelon Delight: Use freshly squeezed watermelon juice for a sweet and refreshing summer treat.
Feel free to experiment with different ratios to find your perfect balance of flavors. Remember, there are no limits when it comes to creating delicious ice lollies with juice!
Tip: If you’re feeling adventurous, you can even add a touch of mint leaves or a squeeze of lemon/lime for an extra refreshing twist.
Select your favorite juice
Making ice lollies with juice is a fun and refreshing way to beat the summer heat. The best part is that you can use any of your favorite juices to create delicious and healthy frozen treats. Here are some tips for selecting the best juice for your ice lollies:

Consider the flavor
When choosing a juice for your ice lollies, it’s important to consider the flavor. Think about what flavors you enjoy and what blends well together. Whether you prefer citrusy flavors like orange or lemon, fruity flavors like berry or mango, or more unique flavors like pineapple or watermelon, the choice is yours!
Check the sugar content
Before selecting a juice, be sure to check the sugar content. Some juices may be packed with added sugars, which can make your ice lollies too sweet. Look for juices that are 100% fruit juice or have no added sugars. This way, you can enjoy a healthier and more natural frozen treat.
- Read the labels carefully
- Look for 100% fruit juice
- Avoid juices with added sugars
Add fruit chunks or zest
If you want to add an extra burst of flavor and texture to your homemade ice lollies, consider incorporating fruit chunks or zest. This simple addition will take your frozen treats to the next level.
There are endless possibilities when it comes to choosing fruits to add to your ice lollies. You can go for classics like strawberries, blueberries, or kiwi, or get creative with tropical fruits like mango or pineapple. Feel free to mix and match different fruits and flavors to create your own unique combinations.
Fruit chunks
To add fruit chunks, simply chop your chosen fruit into small bite-sized pieces. You can either distribute them evenly throughout the lolly molds or create layers of fruit and juice for a visually appealing treat. Be careful not to overfill the molds, as the fruit chunks may expand slightly as they freeze.

For a more sophisticated option, you can also macerate the fruit chunks in sugar or honey before adding them to the molds. This will release extra juices and infuse the flavors together.
Zest
If you prefer a subtler fruit flavor or want to add a touch of citrus to your ice lollies, consider incorporating zest. Citrus fruits like lemon, lime, or orange can add a refreshing tang to your homemade treats.
To add zest, simply grate the outer colored part of the fruit peel using a fine grater or zester. Be careful not to include the bitter white pith underneath. Add the zest directly to your juice before pouring it into the molds. Stir well to ensure even distribution.
Remember to taste your mixture before freezing to ensure the desired level of flavor. Keep in mind that flavors can intensify when frozen, so you may need to add more zest or fruit chunks for a bold burst of flavor.
| Fruit | Description |
|---|---|
| Strawberries and banana | A classic combination that will delight both kids and adults. |
| Watermelon and mint | A refreshing option perfect for hot summer days. |
| Mango and pineapple | A tropical blend that will transport you to an exotic paradise. |
Filling the Molds
Once you have prepared your juice mixture, it’s time to fill the molds with the liquid. Here are some simple steps to ensure you get the perfect ice lolly:
1. Gather your ice lolly molds:
Make sure you have enough ice lolly molds for the amount of juice mixture you have prepared. It’s a good idea to have a few extra molds just in case.
2. Pour the juice into a pouring jug:
For easier pouring, transfer the juice mixture to a jug with a spout. This will help you to fill the molds with precision.
3. Fill the molds:
Hold the ice lolly mold firmly and pour the juice mixture into each mold, making sure to leave a little bit of space at the top for expansion. Be careful not to overfill the molds, as the liquid will expand as it freezes.
4. Remove air bubbles:
To make sure there are no air bubbles in the molds, gently tap the molds on a hard surface. This will help the juice mixture settle and remove any trapped air inside the molds.
5. Insert the sticks:
Place the ice lolly sticks into the molds, ensuring that they are centered in each mold. The liquid should hold them in place. If the stick starts to tilt, remove it and try again. It’s important to keep the sticks upright for easy eating later on.
6. Freeze the molds:
Once all the molds are filled and the sticks are inserted, carefully transfer the molds to the freezer. Make sure the molds are placed on a flat surface so that the juice mixture doesn’t spill. Allow the ice lollies to freeze completely, usually taking around 4-6 hours.
Following these steps will ensure you have perfectly filled ice lolly molds ready to be enjoyed on a hot summer day!

Harrison Clayton
Meet Harrison Clayton, a distinguished author and home remodeling enthusiast whose expertise in the realm of renovation is second to none. With a passion for transforming houses into inviting homes, Harrison's writing at https://thehuts-eastbourne.co.uk/ brings a breath of fresh inspiration to the world of home improvement. Whether you're looking to revamp a small corner of your abode or embark on a complete home transformation, Harrison's articles provide the essential expertise and creative flair to turn your visions into reality. So, dive into the captivating world of home remodeling with Harrison Clayton and unlock the full potential of your living space with every word he writes.


