How to paint a shed
Painting a shed can not only enhance its appearance, but also protect it from the elements, increasing its lifespan. Whether you have a wooden, metal, or vinyl shed, a fresh coat of paint can make a huge difference. However, painting a shed requires some preparation and the right technique to achieve a professional-looking finish.
1. Clean and Prepare
Before painting your shed, it is essential to clean it thoroughly. Remove any dirt, grime, or loose paint using a stiff brush or power washer. Scrub away any mold or mildew using a mixture of water and bleach. Make sure to wear protective clothing, such as goggles and gloves, when working with bleach.
Note: If your shed has any rust or flaking paint on a metal surface, use sandpaper or a wire brush to remove the rust and create a smooth surface.
Preparation
Before you begin painting your shed, it is important to properly prepare the surface to achieve the best results. Here are some steps to follow:
Clean the Shed
The first step is to clean the shed thoroughly. Use a pressure washer or a hose with a high-pressure nozzle to remove any dirt, cobwebs, dust, or debris from the surface. If there are any stains or mildew, use a mild detergent solution and a scrub brush to clean them off.
Repair and Smooth the Surface
Inspect the shed for any damages like cracks, peeling paint, or rotten wood. Use a putty knife to scrape off any loose paint or wood. Sand the surface with medium-grit sandpaper to smooth it out. If there are any holes or cracks, fill them with a wood filler or caulk. Allow the filler to dry and then sand it down until it is smooth.
Protect the Surrounding Area
It is important to protect the surrounding area from paint splatters or drips. Cover any nearby plants, walkways, or other surfaces with drop cloths or plastic sheets. Use painter’s tape to tape off any areas that should not be painted, such as windows, door frames, or hardware.
Remember, proper preparation is key to a successful painting project. Taking the time to clean, repair, and protect the shed will ensure that the paint adheres properly and the finish is long-lasting.
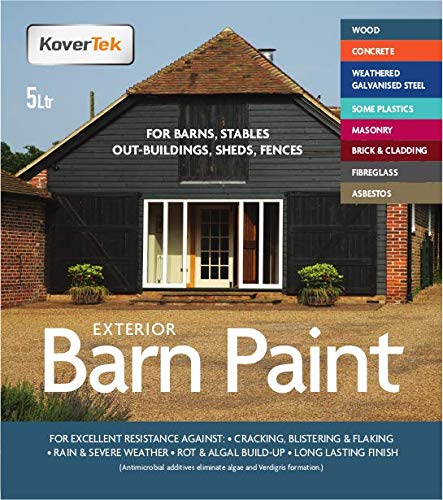
Choosing the Right Paint
When it comes to painting a shed, choosing the right paint is crucial. Not only will the right paint protect your shed from the elements, but it will also give it a fresh and attractive look. Here are some important factors to consider when selecting the paint for your shed.
Durability and Weather Resistance
One of the most important considerations when choosing shed paint is its durability and weather resistance. Since sheds are often exposed to different weather conditions, including rain, snow, and harsh sunlight, it’s important to select a paint that can withstand these elements. Look for paint that is specifically designed for exterior use and is formulated to resist peeling, cracking, and fading.
Color and Finish
Another important aspect to consider is the color and finish of the paint. The color you choose can have a significant impact on the overall appearance of your shed, so it’s important to choose a color that complements your surroundings and personal style. Additionally, consider the finish of the paint, whether it’s glossy, semi-gloss, or matte. Each type of finish has different aesthetic qualities and practical considerations, so choose one that suits your preferences and needs.
You may also want to consider using a paint that has built-in UV protection. This can help prevent the color from fading over time and maintain the vibrancy of your shed’s appearance.
Ease of Application and Maintenance
Consider the ease of application and maintenance when selecting shed paint. Look for paint that is easy to apply, as it will save you time and effort during the painting process. Water-based paints are generally easier to work with and clean up, while oil-based paints may require additional steps for cleaning and preparation.
Additionally, think about the maintenance requirements of the paint. Some paints may require regular touch-ups or reapplication, while others offer long-lasting protection with minimal maintenance. Take into account your time and resources when making a decision.

In conclusion, choosing the right paint for your shed is a crucial step in ensuring its longevity and aesthetic appeal. Consider factors such as durability, color and finish, and ease of application and maintenance when making your selection. By doing so, you’ll be able to enjoy a beautifully painted shed that can withstand the test of time.
Cleaning
Before you start painting your shed, it is important to thoroughly clean the surface to ensure proper adhesion of the paint. Here are the steps to follow:
1. Remove any loose dirt or debris using a stiff brush or broom. Sweep away any leaves, cobwebs, or dust that may have accumulated on the shed.
2. Use a power washer or hose to rinse the shed with water. Start from the top and work your way down, making sure to remove any dirt, grime, or mildew that may be present.
3. For stubborn stains or areas with mold or mildew, mix a solution of water and mild detergent. Scrub the affected areas using a soft brush or sponge. Rinse thoroughly.
4. If there are any loose or flaking paint on the shed, use a scraper to remove it. Sand the surface gently to create a smooth and even base.
5. Allow the shed to completely dry before proceeding with the painting process. This will prevent the paint from peeling or blistering.
By investing time and effort in cleaning the shed properly, you will ensure that the paint adheres well and your shed looks fresh and new.
Removing Debris and Dirt
Before you start painting your shed, it’s important to properly clean it to ensure a smooth and even finish. Follow these steps to remove debris and dirt:
1. Clear out the shed
Remove all items and clutter from inside the shed to make it easier to clean. This will also help protect your belongings from any splatters or drips of paint.
2. Sweep the interior
Using a broom or a brush, sweep the flooring and walls of the shed to remove loose dirt, cobwebs, and dust. Pay careful attention to corners and crevices where debris tends to accumulate.
3. Pressure wash the exterior
If the exterior of your shed is made of a material that can handle pressure washing, use a pressure washer to remove built-up dirt and grime. Start from the top and work your way down, holding the nozzle a few feet away from the surface to prevent damage.
If your shed is made of a more delicate material or you don’t have access to a pressure washer, you can use a garden hose and a scrub brush to gently wash away dirt and debris.
4. Scrub stubborn stains
If there are any stubborn stains or mildew spots on your shed, use a mixture of mild detergent and water to scrub them away. Be sure to rinse off the soap thoroughly and allow the shed to dry completely before moving on to the next step.
By properly cleaning your shed before painting, you’ll ensure that the paint will adhere well and provide a long-lasting and attractive finish.
Priming
Before you start painting your shed, it is important to prime the surface. Priming helps to seal the wood and create a smooth and even surface for the paint to adhere to.
Here are the steps to prime your shed:
- Clean the surface: Remove any dirt, dust, or loose paint from the shed using a brush or a pressure washer. Make sure the surface is dry before proceeding.
- Prepare the primer: Choose a high-quality exterior primer suitable for the type of shed material you have. Follow the instructions on the primer can to prepare it for use.
- Apply the primer: Using a brush or a roller, apply a thin coat of primer to the shed surface. Make sure to cover all areas evenly. Work in small sections, starting from the top and working your way down.
- Allow the primer to dry: Follow the drying time mentioned on the primer can. It is essential to let the primer dry completely before applying the paint.
- Inspect the surface: Once the primer is dry, inspect the surface for any missed spots or rough areas. Sand them lightly to even out the surface if needed.
Priming your shed before painting will not only improve the paint’s adherence but also enhance its durability. It acts as a protective layer that helps to prevent moisture penetration and extends the lifespan of your shed.
| Benefits of Priming: |
|---|
| 1. Enhances paint adhesion |
| 2. Provides a smoother finish |
| 3. Helps to seal the wood |
| 4. Extends the lifespan of the shed |
| 5. Prevents moisture penetration |
Applying a Primer Coat
Before you start painting your shed, it’s important to apply a primer coat. Primer acts as a base coat that helps the paint adhere better to the surface and creates a smooth, long-lasting finish. Follow these steps to properly apply a primer coat:
- Clean the shed surface: Use a broom or brush to sweep away any dirt, debris, or loose paint. You can also use a power washer for a more thorough cleaning.
- Repair any damaged areas: Inspect the shed for any cracks or holes. Fill them with an appropriate filler and sand the area smooth.
- Choose the right primer: Select a primer suitable for the material of your shed. If your shed is made of wood, use a wood primer. If it’s made of metal, choose a metal primer.
- Prepare the primer: Follow the manufacturer’s instructions to properly prepare the primer. This may involve shaking or stirring the can to mix the contents.
- Apply the primer: Use a paintbrush or roller to apply an even coat of primer to the shed’s surface. Start from the top and work your way down, making sure to cover all areas.
- Allow the primer to dry: Check the drying time specified on the primer’s label. It’s typically recommended to let the primer dry for at least 24 hours or as indicated by the manufacturer.
- Sand the primer coat: After the primer has dried, lightly sand the surface with fine-grit sandpaper to create a smooth finish. This will help the paint adhere better.
- Clean the shed surface again: Before applying the paint, make sure the shed’s surface is clean and free of dust or debris.
Once you’ve completed these steps, your shed is ready for the paint application. Applying a primer coat ensures that the paint will adhere better and adds an extra layer of protection to your shed.
Painting
Preparation
Before starting to paint your shed, it is important to properly prepare the surface. This involves cleaning the shed to remove any dirt or grime that may prevent the paint from adhering properly. You can use a power washer or a scrub brush and soapy water to clean the shed. Once the shed is clean, allow it to dry completely before proceeding.
Choosing the Right Paint
When it comes to painting a shed, it is crucial to choose the right type of paint. Look for exterior paint that is specifically formulated for use on outdoor surfaces. Ensure that the paint is weather-resistant and durable, as sheds are exposed to various weather conditions. Consider the color you want and how it will complement the surroundings.
Painting Process
Begin by priming the shed with a high-quality exterior primer. This will help the paint adhere better and provide a smooth surface for the paint. Once the primer is dry, start applying the paint using a brush or roller. Apply thin, even coats, and allow each coat to dry completely before applying the next one. This will help to prevent drips and ensure a professional finish.
| Tools and Materials | Description |
|---|---|
| Exterior paint | Choose weather-resistant paint in a color of your choice. |
| Primer | High-quality exterior primer to ensure good adhesion. |
| Brushes and rollers | Use different sizes of brushes and rollers for different areas. |
| Drop cloths | Protect the surrounding area from paint spills or drips. |
| Cleaners | Use soap and water or a power washer to clean the shed. |
Follow these steps and you’ll have a beautifully painted shed that will not only enhance the appearance of your garden but also protect the wood from the elements.

How to play the bugle

Harrison Clayton
Meet Harrison Clayton, a distinguished author and home remodeling enthusiast whose expertise in the realm of renovation is second to none. With a passion for transforming houses into inviting homes, Harrison's writing at https://thehuts-eastbourne.co.uk/ brings a breath of fresh inspiration to the world of home improvement. Whether you're looking to revamp a small corner of your abode or embark on a complete home transformation, Harrison's articles provide the essential expertise and creative flair to turn your visions into reality. So, dive into the captivating world of home remodeling with Harrison Clayton and unlock the full potential of your living space with every word he writes.


