How to Adjust Cut-Out Pressure on Air Compressor

Adjusting the cut-out pressure on an air compressor is essential for maintaining proper operation and efficiency. The cut-out pressure is the maximum pressure at which the compressor will stop running, while the cut-in pressure is the minimum pressure at which the compressor will start running again.
To adjust the cut-out pressure, you will need to locate the pressure switch on your air compressor. Typically, the pressure switch is located near the motor or on the control panel of the compressor. It is usually a cylindrical device with a knob or lever that controls the pressure settings.
Before making any adjustments, it is important to reference the manufacturer’s instructions for your specific air compressor model. This will provide you with the correct procedure and recommended pressure settings. It is crucial to follow these instructions to avoid damaging the compressor or voiding any warranties.
Once you have familiarized yourself with the manufacturer’s instructions, you can begin adjusting the cut-out pressure. Turn off the compressor and disconnect the power supply for safety. Use a wrench or pliers to turn the knob or lever on the pressure switch clockwise to increase the cut-out pressure or counterclockwise to decrease it.
After making the adjustment, reconnect the power supply and turn on the compressor. Monitor the pressure gauge to ensure the cut-out pressure is set to the desired level. If necessary, repeat the adjustment process until the desired cut-out pressure is achieved.
![Car Sun Shade,Sun Shield for Windscreen,[210T Polyester Fabric] Sunshade Windshield UV Protector Front Window Reflector to Block 99.87% UV Rays for SUV, Truck (61"X34.6")](https://m.media-amazon.com/images/I/41NvIV-0XPS._SS520_.jpg)
Remember to regularly check and adjust the cut-out pressure on your air compressor to optimize its performance and prevent any potential issues. Proper maintenance and monitoring of the cut-out pressure will extend the lifespan of your compressor and ensure its reliable operation.
What is an Air Compressor?
An air compressor is a mechanical device that is used to compress air and store it in a tank. It is commonly used in various industrial applications, construction sites, and also in households for various purposes. Air compressors are versatile tools that can be used for powering pneumatic tools, inflating tires, air brushing, and many other tasks that require compressed air.
There are different types of air compressors available, including reciprocating air compressors, rotary screw air compressors, and centrifugal air compressors. Each type has its own advantages and is used for different applications. Reciprocating air compressors are the most common type and use pistons to compress air, while rotary screw air compressors use twin screws to compress air in a continuous process.
An air compressor consists of various components, including an electric or gas-powered motor, a compressor pump, and an air tank. The motor provides the power to drive the compressor pump, which compresses and pressurizes the air. The pressurized air is then stored in the air tank, ready to be used when needed. An air compressor also has a pressure switch that controls the cut-in and cut-out pressure, ensuring that the compressor operates within a certain pressure range.
Uses of an Air Compressor
An air compressor has a wide range of uses and can be found in various industries and settings. Some common uses of an air compressor include:

- Powering pneumatic tools such as nail guns, impact wrenches, and paint sprayers.
- Inflating tires, balls, and other inflatable objects.
- Operating airbrushes for painting and artwork.
- Providing air supply for sandblasting operations.
- Supplying clean and pressurized air for breathing apparatus in diving equipment.
These are just a few examples of the many uses of an air compressor. With its ability to provide compressed air on demand, an air compressor is a valuable tool in many industries and applications.
Why Adjust Cut-Out Pressure?
Adjusting the cut-out pressure on an air compressor is an important task that can greatly impact its performance and efficiency. The cut-out pressure refers to the maximum pressure at which the compressor will automatically shut off. By adjusting this pressure, you can optimize the compressor’s operation for different applications and conditions.
One reason to adjust the cut-out pressure is to improve energy efficiency. Running the compressor at a lower cut-out pressure can reduce the overall energy consumption, as it will not have to work as hard to reach the lower pressure level. This can result in cost savings and a lower environmental impact.
Another reason to adjust the cut-out pressure is to meet specific requirements for a particular application. Different tools and equipment may require different air pressure levels to operate effectively. By adjusting the cut-out pressure, you can ensure that the compressor provides the necessary pressure for the task at hand.
Additionally, adjusting the cut-out pressure can help prolong the lifespan of the compressor. Running the compressor at a lower pressure can reduce wear and tear on its components, resulting in less frequent maintenance and repairs. On the other hand, increasing the cut-out pressure may be necessary for certain heavy-duty applications that require higher pressures.

Overall, adjusting the cut-out pressure on an air compressor allows for greater flexibility, improved efficiency, and better performance. It is a simple yet important task that should be considered depending on the specific requirements and conditions of each application.
Step 1: Safety Precautions
Prior to adjusting the cut-out pressure on your air compressor, it is important to ensure your safety by taking the following precautions:
1. Wear Safety Gear
Put on appropriate safety gear, such as safety goggles and gloves, to protect yourself from any potential hazards.
2. Disconnect the Power
Before starting any maintenance or adjustment procedures, disconnect the power supply to the air compressor to prevent any accidental startup.

3. Release Pressure
Release the pressure in the air compressor by opening the drain valve. This will help prevent any sudden release of stored pressure during the adjustment process.
4. Follow Manufacturer’s Instructions
Always refer to the manufacturer’s instructions and recommendations for your specific air compressor model. Different models may have different procedures and specifications for adjusting the cut-out pressure.
5. Work in a Well-Ventilated Area
Ensure that you are working in a well-ventilated area to avoid inhaling any fumes or gases that may be emitted by the air compressor.
6. Use Proper Tools
Make sure you have the necessary tools, such as a wrench or screwdriver, to safely adjust the cut-out pressure. Using the wrong tools can lead to damage or injury.
By following these safety precautions, you can minimize the risk of accidents and ensure a safe adjustment of the cut-out pressure on your air compressor.

Step 2: Check Manufacturer’s Instructions
Before attempting to adjust the cut-out pressure on your air compressor, it is important to consult the manufacturer’s instructions. These instructions will provide you with specific details and guidelines for your particular model of air compressor.
The manufacturer’s instructions will typically include information on the recommended cut-out pressure range for your compressor, as well as the correct procedure for adjusting the cut-out pressure. It is important to follow these instructions carefully to ensure the safe and proper functioning of your air compressor.
In addition to the cut-out pressure, the manufacturer’s instructions may also provide information on other important settings and adjustments for your air compressor. This could include details on adjusting the cut-in pressure, which is the pressure at which the compressor starts running again after it has reached the cut-out pressure.
By checking the manufacturer’s instructions, you can ensure that you have a thorough understanding of the specific requirements and procedures for adjusting the cut-out pressure on your air compressor. This will help you avoid any potential damage to the compressor and ensure that it operates effectively and safely.
Remember to always refer to the manufacturer’s instructions as the primary source of information and guidance for making adjustments to your air compressor. If you have any questions or concerns, it is always best to contact the manufacturer directly for assistance.
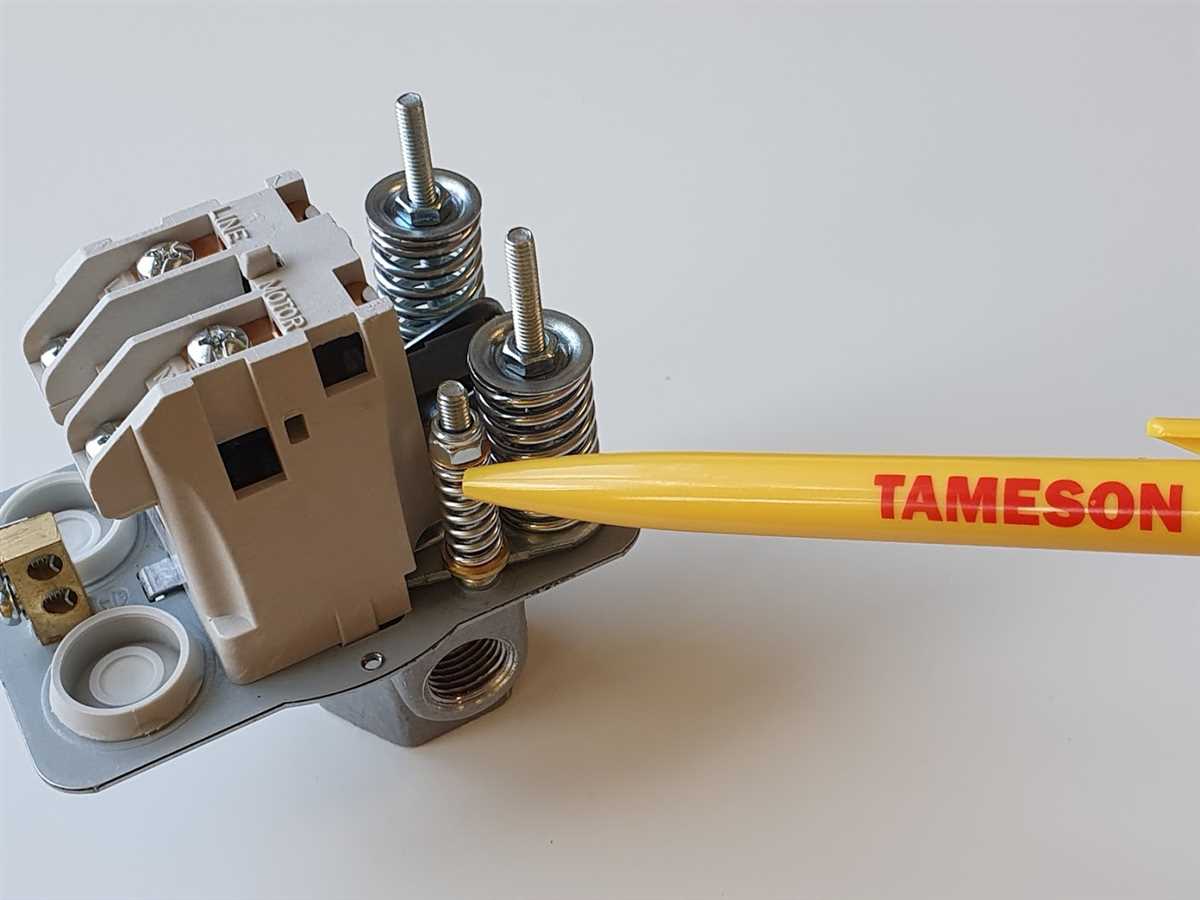
Step 3: Locate Pressure Switch
After identifying the air compressor’s power source and relieving the pressure, the next step is to locate the pressure switch. The pressure switch is a key component responsible for regulating the cut-out pressure. It is usually located near the tank and is connected to the motor of the compressor.
To find the pressure switch, visually inspect the air compressor and look for a small box-shaped device with wires coming out of it. The switch may also have a small adjustment screw or knob on top, which is used to adjust the cut-out pressure.
If you are having trouble locating the pressure switch, refer to the owner’s manual of your specific air compressor model. The manual should provide detailed instructions on where to find the pressure switch and how to adjust the cut-out pressure.
Once you have located the pressure switch, it is important to handle it with care. Remember to turn off the power to the air compressor and disconnect it from any power sources before making any adjustments to the pressure switch.
Identifying the Pressure Switch on the Air Compressor
The pressure switch is an essential component of an air compressor that controls the cut-out pressure. By identifying the pressure switch, you can make the necessary adjustments to ensure that your air compressor operates at the desired pressure levels.
Locating the Pressure Switch
The pressure switch is typically located near the motor of the air compressor. It is a small device that is connected to the tank and the motor through electrical wires. The switch itself may have a rectangular or square shape, and it often has a cover that can be removed for adjustment purposes.
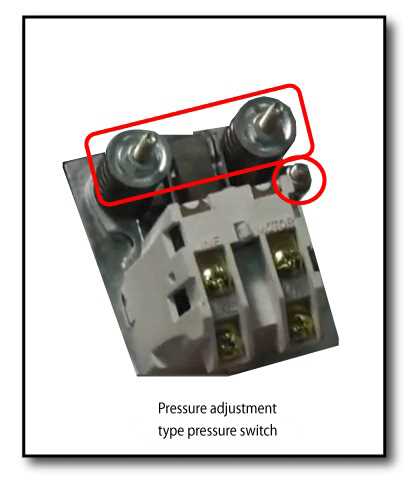
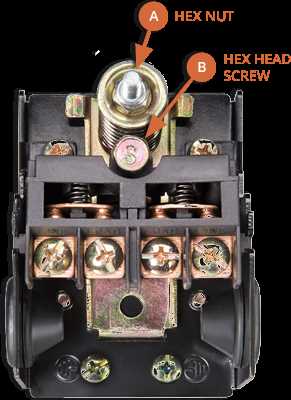
Identifying the Adjustment Screws
Once you have located the pressure switch, you will need to identify the adjustment screws. Most pressure switches have two screws – one for adjusting the cut-in pressure, and the other for adjusting the cut-out pressure. The cut-in pressure is the point at which the compressor starts to build pressure, while the cut-out pressure is the point at which the compressor stops building pressure.
Note: Before making any adjustments, it is important to consult the manufacturer’s manual or guidelines for your specific air compressor model. This will provide you with specific instructions on how to safely make adjustments to the cut-out pressure.
Adjusting the Cut-Out Pressure
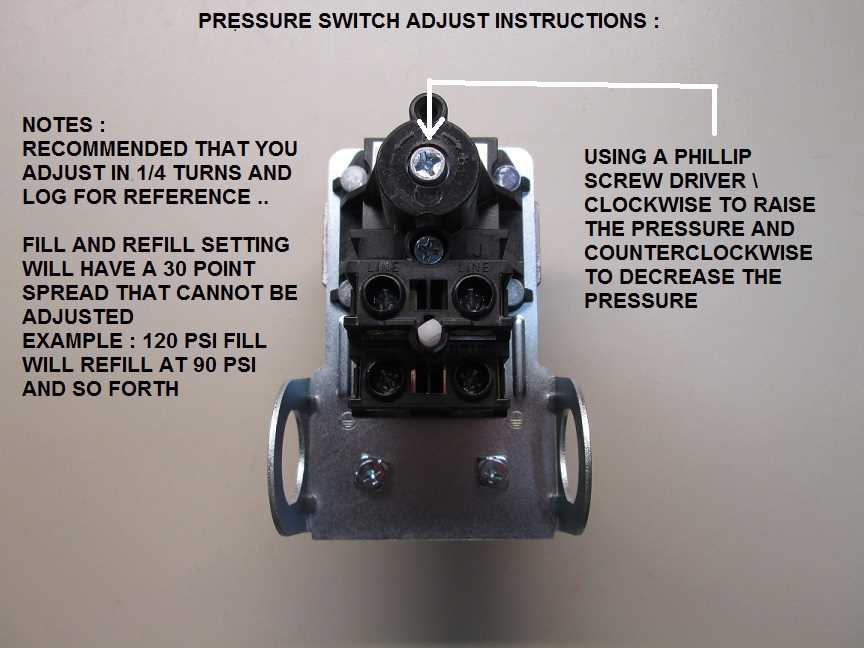
To adjust the cut-out pressure, locate the screw that is labeled or identified as the cut-out pressure adjustment screw. This screw is typically larger than the other adjustment screw. Using a screwdriver, turn the screw in a clockwise or counterclockwise direction to increase or decrease the cut-out pressure, respectively. Make small adjustments and check the pressure gauge on the air compressor to ensure that you are achieving the desired cut-out pressure.
Tip: It is recommended to make small adjustments and test the compressor after each adjustment. This will help you avoid any potential damage to the compressor or other components.
Step 4: Adjusting Cut-Out Pressure
Adjusting the cut-out pressure on your air compressor is an important step to ensure optimal performance. The cut-out pressure refers to the pressure at which the compressor automatically shuts off to prevent over-pressurization. Here are the steps to adjust the cut-out pressure:
1. Locate the pressure switch
The pressure switch is usually located near the compressor tank. It is a rectangular box with a lever or dial to adjust the pressure settings. Consult your compressor’s manual if you have difficulty finding it.
2. Determine the desired cut-out pressure
Before making any adjustments, you need to decide on the desired cut-out pressure. This depends on the specific requirements of your tools or equipment. It is recommended to consult the manufacturer’s recommendations or guidelines.
3. Adjust the cut-out pressure
Using the lever or dial on the pressure switch, carefully adjust the cut-out pressure to your desired setting. Turn the lever or dial clockwise to increase the pressure or counterclockwise to decrease it. Make small adjustments and test the compressor’s performance after each adjustment.
4. Monitor the pressure gauge
While making adjustments, keep an eye on the pressure gauge to ensure it is reflecting the desired cut-out pressure. The pressure gauge is usually located on the compressor tank or the pressure switch itself. Stop adjusting once the desired pressure is reached.
5. Test the compressor
After adjusting the cut-out pressure, test the compressor by running it and operating your tools or equipment. Ensure that the compressor shuts off within the desired pressure range and that it provides sufficient air flow for your needs. Fine-tune the cut-out pressure if necessary.
Adjusting the cut-out pressure on your air compressor may require some trial and error to find the optimal settings for your specific needs. Remember to always follow safety precautions and consult the manufacturer’s guidelines for your particular compressor model.
Understanding Cut-Out Pressure
The cut-out pressure is an important setting on the air compressor that determines when the compressor stops pumping air. It is the maximum pressure at which the compressor will automatically shut off. Understanding the cut-out pressure and how to adjust it can help ensure the compressor operates efficiently and safely.
How it works:
When the air compressor is running, it continuously pumps air into the storage tank. As air is compressed, the pressure in the tank rises until it reaches the cut-out pressure. At this point, the compressor stops running, and the pressure remains constant until it drops below the cut-in pressure, at which point the compressor starts running again to refill the tank.
Why adjust the cut-out pressure:
Adjusting the cut-out pressure allows you to control the amount of air pressure in the storage tank, which can be useful for different applications. For example, if you need higher air pressure for a specific task, you can increase the cut-out pressure. Similarly, if you want to conserve energy or reduce wear on the compressor, you can lower the cut-out pressure.
How to adjust the cut-out pressure:
To adjust the cut-out pressure, you will need to locate the pressure switch on your air compressor. The pressure switch is typically located near the motor and has a cover that can be removed. Inside the pressure switch, there are two adjustment screws: one for the cut-in pressure and one for the cut-out pressure. By turning the cut-out pressure adjustment screw clockwise, you can increase the pressure, and by turning it counterclockwise, you can decrease the pressure.
Considerations:
When adjusting the cut-out pressure, it is important to consider the manufacturer’s recommendations and the specific requirements of your application. Increasing the cut-out pressure beyond the recommended range can put excessive strain on the compressor and other components, leading to premature failure. Conversely, setting the cut-out pressure too low can result in insufficient air pressure for certain tasks. It is recommended to make gradual adjustments and test the compressor’s performance after each adjustment to ensure optimal operation.
Adjusting the Cut-Out Pressure on the Air Compressor
Step 1: Understand the Cut-Out Pressure
The cut-out pressure refers to the pressure at which the air compressor shuts off and stops compressing air. This pressure is predetermined by the manufacturer, but it can be adjusted according to your specific needs.
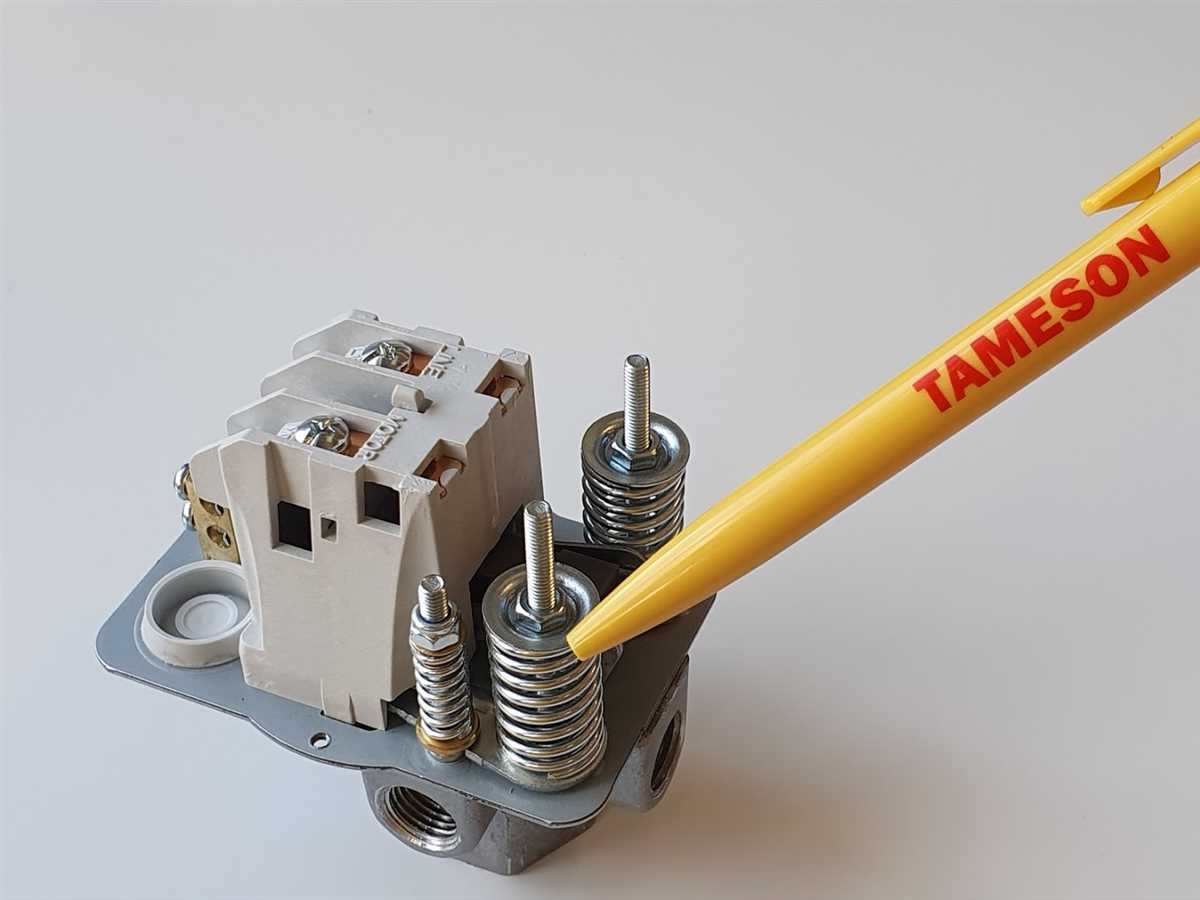
Step 2: Locate the Pressure Switch
The pressure switch is a device that controls the cut-out pressure on the air compressor. It is usually located near the motor or compressor tank and is connected to the power supply. To adjust the cut-out pressure, you will need to access this switch.
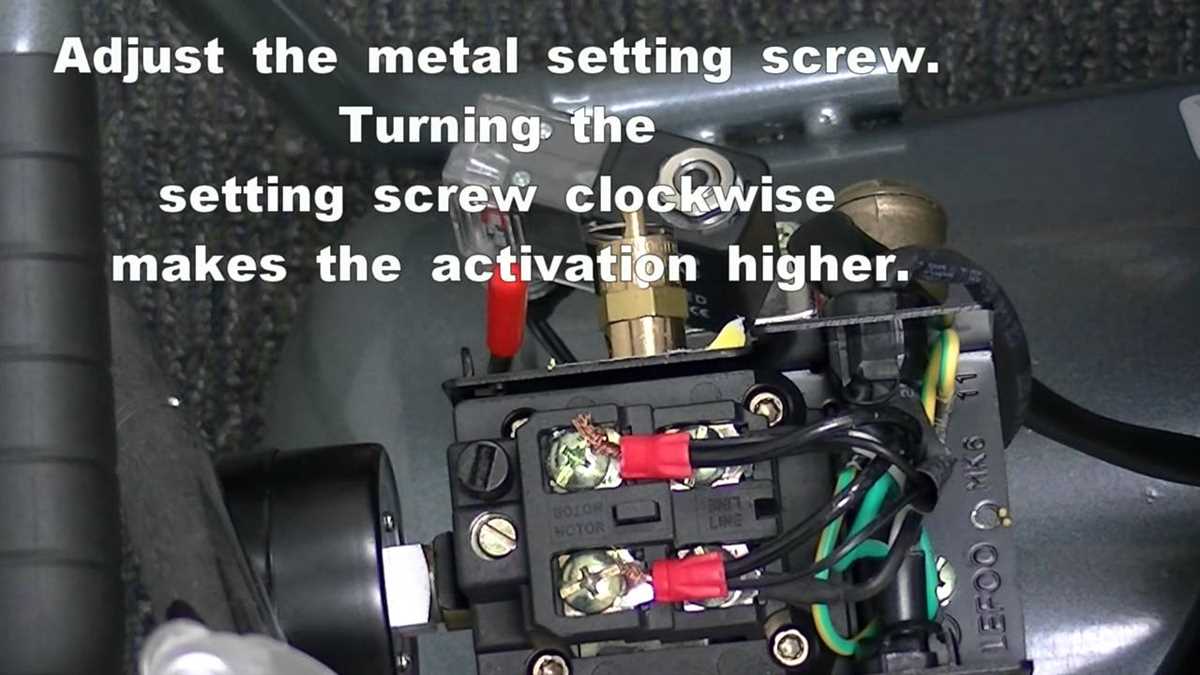
Step 3: Identify the Adjusting Screw
The pressure switch has an adjusting screw that is used to change the cut-out pressure. It is typically labeled or marked with an arrow to indicate its location. This screw controls the spring tension inside the switch, which in turn determines the cut-out pressure.
Step 4: Adjust the Cut-Out Pressure
- Start by disconnecting the air compressor from the power supply to ensure your safety.
- Use a screwdriver or a wrench to turn the adjusting screw clockwise or counterclockwise, depending on whether you want to increase or decrease the cut-out pressure.
- Turn the screw slowly and carefully, making small adjustments at a time. It is important not to make drastic changes to avoid damaging the pressure switch or the air compressor.
- Reconnect the air compressor to the power supply and turn it on to test the adjusted cut-out pressure. Use a pressure gauge to monitor the pressure while the compressor is running.
- If necessary, repeat the adjustment process until you achieve the desired cut-out pressure.
Always remember to handle the pressure switch with caution and follow all safety guidelines provided by the manufacturer. It is also recommended to consult the air compressor’s user manual for specific instructions on adjusting the cut-out pressure.
Step 5: Test the Adjusted Cut-Out Pressure
Once you have successfully adjusted the cut-out pressure on your air compressor, it’s time to test it to ensure that it is functioning correctly. This step is important to make sure that the compressor is not operating at too high or too low of a pressure, which can result in damage to the equipment or inefficiency in its performance.
To test the adjusted cut-out pressure, follow these steps:
- Turn on the air compressor and allow it to run until it reaches the cut-out pressure.
- Observe the pressure gauge and make sure it reaches the desired cut-out pressure level that you have adjusted.
- If the pressure gauge reaches the desired cut-out pressure, the adjustment has been successful. The compressor will automatically shut off at this pressure.
- If the pressure gauge does not reach the desired cut-out pressure, you may need to repeat Steps 3 and 4 to make further adjustments.
During the testing process, it is crucial to pay attention to any unusual sounds or vibrations coming from the compressor. These may indicate a mechanical problem or an incorrect adjustment of the cut-out pressure.
Additionally, you should monitor the compressor’s overall performance. If you notice any issues such as excessive cycling on and off, inconsistent pressure levels, or a decrease in output, these may also indicate a need for further adjustment.
It is recommended to test the adjusted cut-out pressure multiple times to ensure its accuracy and reliability. Regular maintenance and monitoring of the cut-out pressure is essential for the efficient and safe operation of your air compressor.
FAQ:
Why do I need to adjust the cut-out pressure on my air compressor?
Adjusting the cut-out pressure on your air compressor can help optimize its performance and ensure that it meets your specific needs. By adjusting the cut-out pressure, you can control the amount of air pressure that builds up in the tank before the compressor shuts off. This can be useful in various applications, such as maintaining a consistent air supply for tools or equipment.
How do I know if I need to adjust the cut-out pressure on my air compressor?
If you notice that your air compressor is not providing enough or too much air pressure for your specific needs, it may be a good idea to adjust the cut-out pressure. For example, if your tools or equipment are not functioning properly due to low air pressure, you may need to increase the cut-out pressure. On the other hand, if the air pressure is too high and causing damage or inefficiency, you may need to decrease the cut-out pressure.
What tools or equipment do I need to adjust the cut-out pressure on my air compressor?
To adjust the cut-out pressure on your air compressor, you will typically need a pressure regulator, a pressure gauge, and a flathead screwdriver or similar tool. The pressure regulator allows you to adjust the cut-out pressure, while the pressure gauge helps you monitor the pressure levels. The screwdriver is used to make the necessary adjustments.
Can I adjust the cut-out pressure on any type of air compressor?
The ability to adjust the cut-out pressure may vary depending on the make and model of your air compressor. It is always best to consult the manufacturer’s instructions or documentation to determine if your specific air compressor allows for cut-out pressure adjustment. Some compressors may have a fixed cut-out pressure that cannot be adjusted.
Is adjusting the cut-out pressure on an air compressor a difficult task?
Adjusting the cut-out pressure on an air compressor is generally a relatively simple task, but it does require some basic knowledge and understanding of the compressor’s controls and settings. As long as you follow the manufacturer’s instructions and take the necessary precautions, such as wearing safety glasses and working in a well-ventilated area, you should be able to adjust the cut-out pressure without much difficulty.
What are the potential risks or dangers of adjusting the cut-out pressure on an air compressor?
Adjusting the cut-out pressure on an air compressor can potentially be dangerous if not done properly. If the pressure is set too high, it can cause damage to the compressor or other equipment and create safety hazards. On the other hand, if the pressure is set too low, it may not meet your air supply needs or cause inefficient operation. It is important to carefully follow the manufacturer’s instructions and make gradual adjustments while monitoring the pressure levels to avoid any potential risks or dangers.
Video:


Meet Harrison Clayton, a distinguished author and home remodeling enthusiast whose expertise in the realm of renovation is second to none. With a passion for transforming houses into inviting homes, Harrison's writing at https://thehuts-eastbourne.co.uk/ brings a breath of fresh inspiration to the world of home improvement. Whether you're looking to revamp a small corner of your abode or embark on a complete home transformation, Harrison's articles provide the essential expertise and creative flair to turn your visions into reality. So, dive into the captivating world of home remodeling with Harrison Clayton and unlock the full potential of your living space with every word he writes.


