How To Sharpen Secateurs And Shears

Secateurs and shears are essential tools for any gardener or landscaper. However, over time, the blades can become dull, making it harder to cut through branches and stems. Sharpening your secateurs and shears is a simple process that can help restore their cutting performance.
Step 1: Cleaning
Before you begin sharpening, it’s important to clean your secateurs and shears. Remove any dirt, rust, or sap that may have accumulated on the blades. Use a cloth or wire brush to scrub away the debris. Cleaning will ensure a smooth sharpening process and prevent any damage to the blades.
Step 2: Choosing the Right Tools
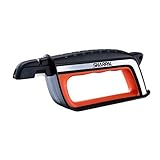
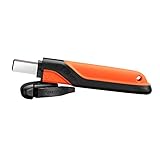
Sharpening secateurs and shears requires the use of specific tools. You will need a sharpening stone, a file, or a sharpening tool designed for garden tools. It’s important to choose the right tool for your specific needs and the type of blades you have. Consult the manufacturer’s instructions or visit a local garden center for guidance.
Step 3: Sharpening the Blades
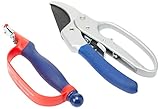
Hold the secateurs or shears securely in one hand and the sharpening tool in the other. Position the sharpening tool against the blade at the original cutting edge, at the same angle as the bevel. With even pressure, move the sharpening tool along the blade, from the base to the tip, following the shape of the blade. Repeat this motion several times, applying light pressure, until the blade is sharp. Turn the secateurs or shears over and repeat the process on the other side. Always remember to wear protective gloves during this process.
Step 4: Testing and Finishing
After sharpening, it’s important to test the blades to ensure they are sharp enough. Hold a piece of paper or a thin branch and attempt to cut it with your secateurs or shears. If the blades cut through easily and cleanly, you’ve successfully sharpened them. If not, repeat the sharpening process. Finally, wipe the blades with a clean cloth and apply a thin layer of oil to prevent rust.
By following these simple steps, you can keep your secateurs and shears sharp and ready for all your gardening tasks. Regular sharpening will enhance their performance, making your work easier and more efficient.
The Importance of Sharp Secateurs and Shears
Having sharp secateurs and shears is crucial for any gardener or landscaper. These tools are designed to cut through branches, stems, and other plant material, so it’s essential that they are sharp and able to make clean, precise cuts.
When secateurs and shears are dull, they can tear and crush plant tissue instead of making clean cuts. This can lead to damage to the plant, making it more susceptible to disease and pest infestations. Additionally, dull tools can cause strain on the gardener’s hand and arm muscles, making pruning tasks more difficult and tiring.
Sharp secateurs and shears not only make gardening tasks easier, but they also promote healthier plants. Clean cuts help the plant heal quickly, reducing the risk of infection and disease. By maintaining sharp tools, gardeners can ensure that their plants remain healthy and vibrant.
Regularly sharpening secateurs and shears is essential for maintaining their functionality and effectiveness. Sharpening should be done using a sharpening stone or file, ensuring that the blades are honed to a fine edge. It’s also important to clean the blades after each use to remove any sap or plant residue that may accumulate and dull the cutting edge.
Investing time in sharpening and maintaining secateurs and shears is a small but important aspect of successful gardening. By keeping these tools sharp, gardeners can achieve cleaner cuts, healthier plants, and make their gardening tasks more enjoyable and efficient.

| Benefits of Sharp Secateurs and Shears |
|---|
| 1. Clean, precise cuts |
| 2. Reduced risk of disease and pest infestations |
| 3. Less strain on hand and arm muscles |
| 4. Quicker healing for plants |
| 5. Easier and more efficient gardening tasks |
The Benefits of Sharp Gardening Tools
Gardening tools such as secateurs and shears play a crucial role in keeping your garden well-maintained. While it is important to have the right tools for the job, it is equally important to keep them sharp. Sharpening your gardening tools regularly offers various benefits that can enhance your gardening experience.
1. Improved Efficiency
Having sharp gardening tools allows you to work more efficiently. Dull secateurs and shears can make cutting and pruning tasks more difficult and time-consuming. Sharp tools, on the other hand, make clean and precise cuts, reducing the effort required and helping you accomplish tasks more quickly.
2. Healthier Plants
Sharp gardening tools help promote the health of your plants. When you make clean cuts, the plants are less likely to experience tearing or crushing of the tissues. This reduces the risk of infection and disease, allowing your plants to heal and grow more effectively.
3. Reduced Strain
Working with sharp gardening tools can help reduce strain on your hands and arms. When tools are dull, you may have to exert more force to make cuts, leading to fatigue and discomfort. Sharp tools slice through branches and stems effortlessly, minimizing the strain on your muscles and joints.
4. Longevity of Tools
Regularly sharpening your gardening tools can extend their lifespan. Dull tools are more prone to damage as they require more force to use and are more likely to slip or get stuck. By keeping your tools sharp, you can reduce the risk of accidents and prolong their overall durability.

5. Enhanced Plant Aesthetics
Sharp gardening tools contribute to the overall appearance of your plants. Clean cuts made by sharp secateurs and shears result in uniform and tidy shapes, enhancing the aesthetics of your garden. Well-maintained plants not only look pleasing to the eye but also create a sense of pride and satisfaction for the gardener.
In conclusion, regularly sharpening your gardening tools brings numerous benefits to your gardening experience. It improves efficiency, promotes plant health, reduces strain, prolongs tool longevity, and enhances the overall aesthetics of your garden. So, don’t forget to keep your secateurs and shears sharp for a well-maintained and beautiful garden.
When to Sharpen Your Secateurs and Shears
In order to achieve optimal performance and ensure a clean cut, it is important to sharpen your secateurs and shears regularly. Dull blades can cause damage to plants, create jagged cuts, and make it difficult to achieve precision in pruning.
Signs that your secateurs and shears need sharpening:
- Blades appear dull or worn
- Difficulty in making clean cuts
- Twisting or tearing of plant material
- Increased effort required to prune
- Uneven or ragged cuts
It is recommended to inspect your secateurs and shears before each use to ensure the blades are sharp and in good condition. If you notice any of the above signs, it is time to sharpen them.
How often to sharpen:
The frequency of sharpening your secateurs and shears depends on how frequently you use them and the type of material you are cutting. For regular garden maintenance, it is generally recommended to sharpen them every couple of months or as needed. However, if you are using them heavily or working with tougher materials, you may need to sharpen them more frequently.

Regular maintenance and sharpening will not only improve the performance of your secateurs and shears, but also increase their lifespan. It is important to use proper sharpening techniques or seek professional help to ensure the best results.
Choosing the Right Sharpening Method
When it comes to sharpening your secateurs and shears, there are several methods you can choose from. The right method for you depends on your tools, your skill level, and your personal preference. Here are a few options to consider:
Sharpening Stones: Sharpening stones, also known as whetstones, are a popular choice for sharpening secateurs and shears. They come in different grits, ranging from coarse to fine, allowing you to choose the level of sharpness you want to achieve. Sharpening stones require some practice and skill, but they offer precise control and can be a great option for those who want to achieve a professional-level sharpening.
File: Using a file is another option for sharpening your secateurs and shears. A file allows you to quickly remove any nicks or burrs on the blade, restoring its sharpness. This method is relatively easy to learn and is suitable for those who are new to sharpening tools. However, it may not provide the same level of precision as sharpening stones.
Sharpening Kits: If you’re a beginner or don’t have much experience with sharpening tools, a sharpening kit can be a good option. These kits usually include a guide or clamp that holds the secateurs or shears at the correct angle, making it easier to achieve a consistent edge. Some kits may also include sharpening stones or files, providing you with all the tools you need in one package.

Professional Sharpening: If you don’t have the time or confidence to sharpen your secateurs and shears yourself, you can also consider taking them to a professional sharpener. They have the knowledge and equipment to sharpen your tools properly, ensuring they stay sharp for longer. While this option may cost more, it can be a convenient choice for those who want the best results without the hassle.
No matter which sharpening method you choose, it’s important to follow the proper technique and take your time. A well-sharpened tool will not only make your gardening tasks easier but also prolong the lifespan of your secateurs and shears. So, take the time to find the right method for you and keep your tools sharp and ready for use!
Step-by-Step Guide to Sharpening Secateurs
Sharpening secateurs is essential for maintaining their cutting performance and prolonging their lifespan. By following these step-by-step instructions, you can ensure your secateurs remain sharp and effective for years to come:
- Start by cleaning the secateurs to remove any dirt, sap, or rust. Use a cloth with warm soapy water to wipe the blades and dry them thoroughly.
- Inspect the blades for any nicks, chips, or dull areas. Hold the secateurs up to the light to check for any light reflection, as this can indicate areas that need sharpening.
- If you notice any dull spots on the blade, use a sharpening stone or a sharpening tool specifically designed for secateurs. Follow the manufacturer’s instructions for proper use.
- Hold the secateurs firmly and position the sharpening tool at the correct angle. Most secateurs have a beveled edge, so make sure the sharpening tool matches this angle.
- Using steady, smooth strokes, run the sharpening tool along the blade’s edge. Start from the base of the blade and move towards the tip. Repeat this process several times until you achieve a sharp edge.
- After sharpening, wipe the blade clean to remove any metal shavings or debris.
- Apply a light coat of lubricating oil or silicone spray to the secateurs’ blades to prevent rust and ensure smooth operation.
- Check the functionality of the secateurs by testing them on a small branch or stem. Ensure they cut cleanly and effortlessly.
- If necessary, repeat the sharpening process until you achieve the desired cutting performance.
- Lastly, store the secateurs in a clean, dry place to protect them from moisture and dust.
By following these steps regularly, you can maintain the sharpness and functionality of your secateurs, allowing you to tackle gardening tasks with ease and precision.
Step-by-Step Guide to Sharpening Shears
Sharpening shears is an essential skill for maintaining the functionality and longevity of your gardening tools. A sharp blade allows for cleaner and more precise cuts, making your gardening tasks easier and more efficient. Here is a step-by-step guide to help you sharpen your shears:
1. Gather your tools: Before you begin sharpening your shears, make sure you have all the necessary tools on hand. You will need a sharpening stone or file, a lubricant (such as oil or water), a cloth, and safety gloves.
2. Clean the shears: Start by cleaning your shears thoroughly to remove any dirt, debris, or rust. Use a cloth soaked in warm soapy water to wipe down the blades and handles. This will ensure a clean sharpening surface and prevent the spread of any fungal or bacterial diseases.
3. Disassemble the shears: If your shears have removable blades, consider disassembling them to gain better access to the cutting edges. Use a screwdriver or wrench to carefully remove the screws or bolts that hold the blades in place.
4. Identify the bevel: The bevel is the angled edge of the blade that needs to be sharpened. It is usually the side that slants away from the handle. Identify this side before moving on to the next step.
5. Start sharpening: Place the sharpening stone or file against the bevel of the blade at a 20 to 30-degree angle. Using even pressure, draw the stone or file along the cutting edge in smooth strokes. Repeat this motion several times, applying enough pressure to remove any nicks or dullness from the blade.
6. Lubricate the blade: Apply a few drops of oil or water to the sharpened blade to lubricate it and prevent overheating during use. This will also help maintain the sharpness of the blade for longer.
7. Check for sharpness: Test the sharpness of the blade by cutting through a piece of paper or a thin piece of cardboard. If the blade cuts through smoothly and cleanly, it is sharp enough. If not, continue sharpening until you achieve the desired sharpness.
8. Reassemble the shears: Once you are satisfied with the sharpness of the blade, carefully reassemble the shears. Make sure all the screws or bolts are tightened securely.
9. Clean and store: After sharpening and reassembling your shears, clean them once again to remove any metal debris or oil residue. Dry them thoroughly with a clean cloth before storing them in a dry and secure place.
Remember, sharpening shears is a skill that requires practice and patience. With regular maintenance and sharpening, your shears will remain sharp and ready for all your gardening needs.
Questions and answers
What tools do I need to sharpen secateurs and shears?
To sharpen secateurs and shears, you will need a sharpening stone or a mill file, lubricant such as oil or water, and a stiff brush to clean the tools before and after sharpening.
How often should I sharpen my secateurs and shears?
The frequency of sharpening your secateurs and shears will depend on how often you use them and the type of cutting tasks you perform. Generally, it is recommended to sharpen the blades at least once every couple of months or whenever you notice that the cutting performance has decreased.


Harrison Clayton
Meet Harrison Clayton, a distinguished author and home remodeling enthusiast whose expertise in the realm of renovation is second to none. With a passion for transforming houses into inviting homes, Harrison's writing at https://thehuts-eastbourne.co.uk/ brings a breath of fresh inspiration to the world of home improvement. Whether you're looking to revamp a small corner of your abode or embark on a complete home transformation, Harrison's articles provide the essential expertise and creative flair to turn your visions into reality. So, dive into the captivating world of home remodeling with Harrison Clayton and unlock the full potential of your living space with every word he writes.

