How To Cut Box Joints On A Table Saw

Box joints, also known as finger joints, are a popular woodworking joint used to join two pieces of wood at right angles. They are strong, attractive, and relatively easy to make with a table saw. If you’re interested in adding box joints to your woodworking repertoire, read on to learn how to cut them on a table saw.
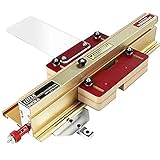
Before you start, it’s important to have the right tools and materials. You’ll need a table saw with a dado blade set, two pieces of wood that are the same thickness and width, and a miter gauge or sled.
To begin, set up your table saw with the dado blade. The size of the dado blade you use will depend on the thickness of the wood you’re working with. It’s a good idea to start with a small dado blade and make test cuts to determine the right fit.
Next, adjust the height of the dado blade to match the width of the wood. The blade should be slightly higher than the wood, so it cuts a groove that is slightly deeper than half the thickness of the wood. This will allow for a snug fit when the joints are assembled.
Once your table saw is set up, position the miter gauge or sled to make the first cut. Line up the wood against the miter gauge and push it through the blade. This will create a slot in the wood.

To make the second cut, flip one of the pieces of wood end for end, so the slots line up. Position the wood against the miter gauge and push it through the blade again. This will create another slot that interlocks with the first, forming a box joint.
Continue making alternating cuts until you have the desired number of box joints. Remember to use a push stick or push block to keep your hands safely away from the blade.
Once you’ve cut all your box joints, you can assemble your project using glue or other appropriate joinery methods. Sand and finish your project as desired, and admire your newly created box joints!
Tools and Materials Needed for Box Joints
Before you can start cutting box joints on a table saw, you will need to gather the necessary tools and materials. Here is a list of what you will need:
Table Saw: A table saw is the primary tool used to cut box joints. Make sure you have a reliable table saw with a sharp blade and an adjustable fence.

Dado Blade Set: A dado blade set is essential for creating the grooves in the box joint. It consists of multiple blades that can be adjusted to create different groove widths.
Miter Gauge or Sled: A miter gauge or sled is used to guide the workpiece through the table saw. It ensures accurate and consistent cuts.
Tape Measure and Pencil: Measuring and marking tools are necessary for precision when laying out the box joint pattern on the workpiece.
Push Stick: A push stick is crucial for safety. It helps keep your hands away from the saw blade while guiding the workpiece through the cut.
Clamps: Clamps are necessary to secure the workpiece and prevent movement during the cutting process.

Safety Glasses and Ear Protection: As with any woodworking project, safety glasses and ear protection are essential to protect your eyes and ears from potential hazards.
Wood: Finally, you will need wood to create your box joint project. Choose a sturdy and suitable species of wood for your desired outcome.
Once you have gathered all the necessary tools and materials, you will be ready to start cutting box joints on your table saw. Remember to always prioritize safety and take your time to ensure accurate cuts.
Setting Up the Table Saw for Box Joints
Before you start cutting box joints on your table saw, it’s essential to set up the saw correctly. Following these steps will ensure accurate and clean joints.
1. Select the appropriate blade: Choose a table saw blade specifically designed for box joints. These blades typically have multiple teeth grouped together, creating a series of small kerfs that match the spacing of your box joint fingers.
2. Set the blade height: Adjust the height of the blade to match the thickness of the material you’re using for your box joints. Make sure the blade protrudes slightly above the material to create a clean cut.
3. Set the fence position: Position the table saw fence parallel to the blade and adjust it to the desired width of your box joint fingers. Use a ruler or a box joint jig to set the fence accurately. Ensure that the material will be fully supported by the fence throughout the cut, reducing the risk of kickback.
4. Install a dado blade insert: To minimize tear-out and ensure clean cuts, install a dado blade insert that matches the width of your box joint fingers. This insert will help prevent the material from splintering as it passes over the blade.
5. Use a push stick: For your safety, always use a push stick while making box joints on a table saw. A push stick will keep your hands away from the blade and provide better control over the material being cut.
By following these steps, you’ll be able to set up your table saw for box joints properly. This will result in accurate and well-fitting joints that enhance the quality and aesthetics of your woodworking projects.

Making the First Cut
Before you begin making box joints on a table saw, you need to make sure you have the appropriate supplies and set up your saw correctly. Here is a step-by-step guide on how to make the first cut for box joints on a table saw:
| Step 1 | Measure and mark the width of the box joint on the end of your workpiece using a measuring tape and a pencil. Make sure to include the width of both the pins and the slots. |
| Step 2 | Set the height of the saw blade so that it matches the thickness of your workpiece. Adjust the blade by raising or lowering it until it reaches the desired height. |
| Step 3 | Set the fence of the table saw to the width of the pins. The fence should be parallel to the saw blade and positioned in a way that aligns with the marked lines on the workpiece. |
| Step 4 | Place your workpiece against the fence and line it up with the saw blade. Make sure the blade is positioned between the marked lines on the workpiece. |
| Step 5 | Hold the workpiece securely against the fence and start the table saw. Slowly push the workpiece through the blade, making sure to maintain a steady and even pressure. |
| Step 6 | Repeat the process for the remaining cuts, moving the fence to the next position each time to create the desired pattern. Make sure to always align the marked lines on the workpiece with the blade. |
Following these steps will help you make the first cut for box joints on a table saw with accuracy and ease. Remember to always prioritize safety when working with power tools and wear appropriate protective gear.
Adjustments for Perfect Box Joints
When cutting box joints on a table saw, it is essential to make precise adjustments to ensure a perfect fit. Here are some adjustments you can make to improve the quality of your box joints:
- Blade height: Adjust the height of the saw blade so that it matches the thickness of the material you are using. The blade should cut halfway through the thickness of the material.
- Fence position: Position the table saw fence so that the distance between the blade and the fence is equal to the width of the box joint fingers you want to create.
- Dado blade setup: If you are using a dado blade set, make sure the width of the dado blades matches the width of the box joint fingers.
- Squareness: Ensure that the saw blade is perfectly square to the table saw’s miter gauge slot. Use a square to check for any discrepancies and make necessary adjustments.
- Miter gauge setup: Set the miter gauge to the desired angle for the box joint fingers. Use a protractor or angle gauge to ensure accuracy.
- Test cuts: Before cutting the actual box joints, make a few test cuts on scrap material to fine-tune the adjustments and ensure a perfect fit.
- Featherboards and push sticks: Use featherboards to hold the workpiece against the fence and prevent it from moving during the cut. Additionally, use push sticks to maintain a safe distance between your hands and the saw blade.
By making these adjustments and following proper safety precautions, you can achieve precise and tight-fitting box joints on your table saw.
Cutting the Remaining Box Joints
Once you have successfully cut the first box joint on your table saw, it’s time to cut the remaining joints. Follow these steps:

- Measure the width of the first box joint you cut. This measurement will be used to set the width of the dado blade on your table saw.
- Set the width of the dado blade on your table saw to the measurement you took in the previous step.
- Position the workpiece against the miter gauge and hold it firmly in place.
- Turn on the table saw and slowly feed the workpiece into the dado blade, making sure to keep your fingers clear of the blade at all times.
- Move the workpiece back and forth against the miter gauge to create a clean, straight cut for the remaining box joints.
- Continue cutting the box joints in the same manner until you have completed all of the joints on your project.
Remember to always wear safety goggles and use a push stick when operating a table saw. Take your time and make sure to double-check your measurements before making any cuts. With practice, you will be able to create professional-looking box joints with ease.
Finishing and Assembly of Box Joints
After cutting and fitting the box joints on your table saw, the next steps involve finishing and assembly. These final steps will give your project a polished and professional appearance.
1. Sanding
Before applying any finish, it is important to thoroughly sand the box joints. Use a sanding block or sandpaper to smooth out any rough edges or imperfections. Start with a coarse grit sandpaper and gradually work your way up to a finer grit for a smooth finish.
2. Staining or Paint
You have the option to stain or paint your box joints, depending on your desired look. Staining will enhance the natural beauty of the wood, while paint can add a pop of color or create a uniform finish. Apply the stain or paint using a brush or foam applicator, following the manufacturer’s instructions.
3. Sealing
To protect your box joints and enhance the finish, apply a sealer or topcoat. This will provide a layer of protection against moisture and everyday wear and tear. Choose a clear sealer or topcoat that is compatible with the type of stain or paint you used and apply it according to the manufacturer’s instructions.

4. Assembly
Once the finish is dry, you can proceed with the assembly of your box joints. Apply a small amount of wood glue to the mating surfaces of the joints and press them together. Use clamps or straps to secure the joints while the glue sets. Ensure that the box is square and allow the glue to fully cure before removing the clamps.
Finally, sand any excess glue residue and touch up the finish if necessary. Your box joints are now complete and ready for use!
Questions and answers
What are box joints?
Box joints, also known as finger joints, are a type of joinery method that interlocks two pieces of wood together at a right angle. They create a strong and visually appealing connection.
Why would I want to use box joints?
Box joints are commonly used in woodworking because they provide strength and aesthetics to the overall project. They are especially useful for creating boxes, drawers, and other furniture pieces.
Can box joints be cut on a table saw?
Yes, box joints can be easily cut on a table saw using a dado blade or a box joint jig. The table saw allows for precise and efficient cutting, resulting in clean and accurate box joints.
What tools do I need to cut box joints on a table saw?
To cut box joints on a table saw, you will need a table saw with a dado blade or a box joint jig, a miter gauge, a push block or stick for safety, measuring tools, and clamps to secure the workpiece.


Harrison Clayton
Meet Harrison Clayton, a distinguished author and home remodeling enthusiast whose expertise in the realm of renovation is second to none. With a passion for transforming houses into inviting homes, Harrison's writing at https://thehuts-eastbourne.co.uk/ brings a breath of fresh inspiration to the world of home improvement. Whether you're looking to revamp a small corner of your abode or embark on a complete home transformation, Harrison's articles provide the essential expertise and creative flair to turn your visions into reality. So, dive into the captivating world of home remodeling with Harrison Clayton and unlock the full potential of your living space with every word he writes.


